Lecture2 - More About ROS System
ROS Node가 실행되고 Topic 통신이 이루어지기 위해서 Master에게 자신을 등록하고 Master에 의한 Node간 TCPROS / UDPROS 연결이 이루어져야 합니다.
개념 정리와 예시, 그리고 데모를 통해 ROS의 통신 시스템에 대해 배워봅시다.
XMLRPC
- Extensible Markup Language - XML이란, 웹 서비스에서 데이터를 표현하기 위해 사용하는 마크업 언어입니다. (such as HTML), 모든 데이터를 구조화해서 transport하기 때문에 검색과 재사용에 유리합니다.
- ROS에서 사용하는 launch file도 xml을 사용하고 있으므로 ROS 개발자들에게는 익숙한 문법일 것입니다.
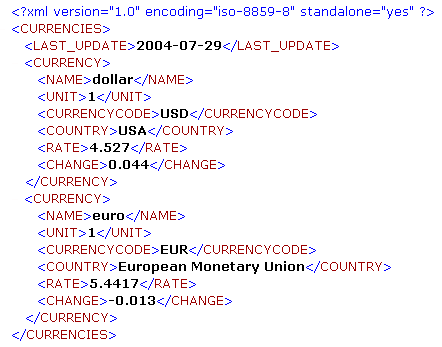
- image from : xml 파일의 비밀
RPC - remote procedure call 란, 분산 네트워크 환경에서의 프로그래밍을 용이하게 하기 위해 등장한 기술로, 원격에 정의된 함수를 로컬에서 호출하는 식으로 사용이 가능합니다.
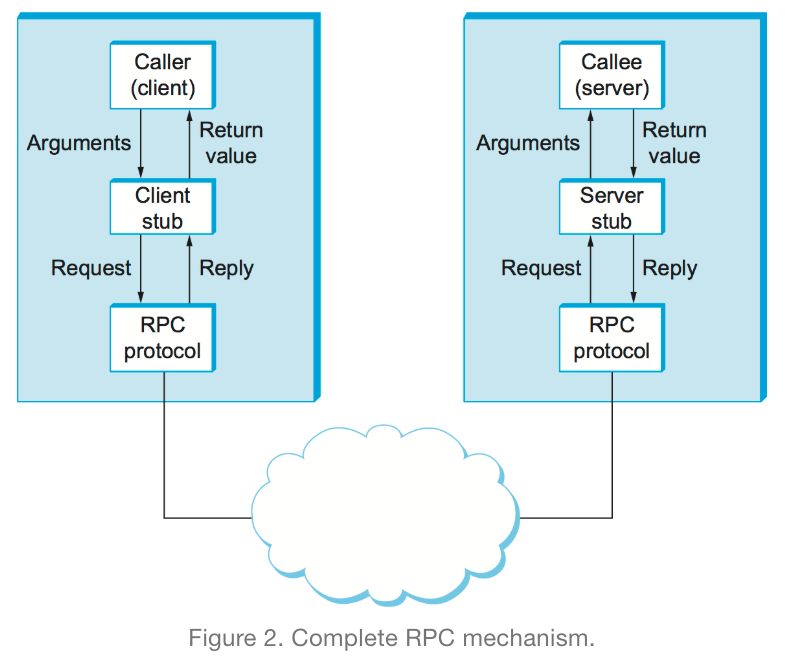
- image from : RPC란?
이 둘을 결합한 XML-RPC는 RPC 기술 과정에서 XML을 사용하는 것입니다. 서버-클라이언트 정보가 XML 문서로 만들어져 응답하게 됩니다.
- XML-RPC Request Format Example - HTTP Header를 포함한 예시이며, /xmlrpc라는 서버에 circleArea라는 method를 request 하는 경우입니다.
POST /xmlrpc HTTP 1.0
User-Agent: myXMLRPCClient/1.0
Host: 192.168.124.2
Content-Type: text/xml
Content-Length: 169
<?xml version="1.0"?>
<methodCall>
   <methodName>circleArea</methodName>
      <params>
         <param>
            <value><double>2.41</double></value>
         </param>
      </params>
</methodCall>
- XML-RPC Response Format Example - Request와 유사한 구조를 갖지만 methodCall 대신 methodResponse가 사용되며, methodName가 없다는 차이를 갖습니다. Header는 성공, 실패 유무와 상관 없이 200 OK를 반환한다는 점에 유의합니다.
HTTP/1.1 200 OK
Date: Sat, 06 Oct 2001 23:20:04 GMT
Server: Apache.1.3.12 (Unix)
Connection: close
Content-Type: text/xml
Content-Length: 124

<?xml version="1.0"?>
<methodResponse>
   <params>
      <param>
         <value><double>18.24668429131</double></value>
      </param>
   </params>
</methodResponse>
ROS는 Topic, Service 통신을 위해 standard TCP/UDP socket에 기반하여 독자적인 Header와 프로토콜을 가진 TCPROS/UDPROS를 만들었습니다. 이들에 대해 하나씩 살펴보겠습니다.
Connection Header
Connection Header는 Node간 통신이 이루어지기 위한 typing, routing 데이터를 포함하고 있으며 TCPROS와 UDPROS 별도 다른 형태를 갖고 있습니다. 공식 문서에서 명확히 밝히고 있는 TCPROS의 Connection Header를 분석해봅시다.
- Encoding Format은 다음과 같습니다.
4-byte length + [4-byte field length + field=value ]*
* All length fields are little-endian integers
* Field names and values are strings.
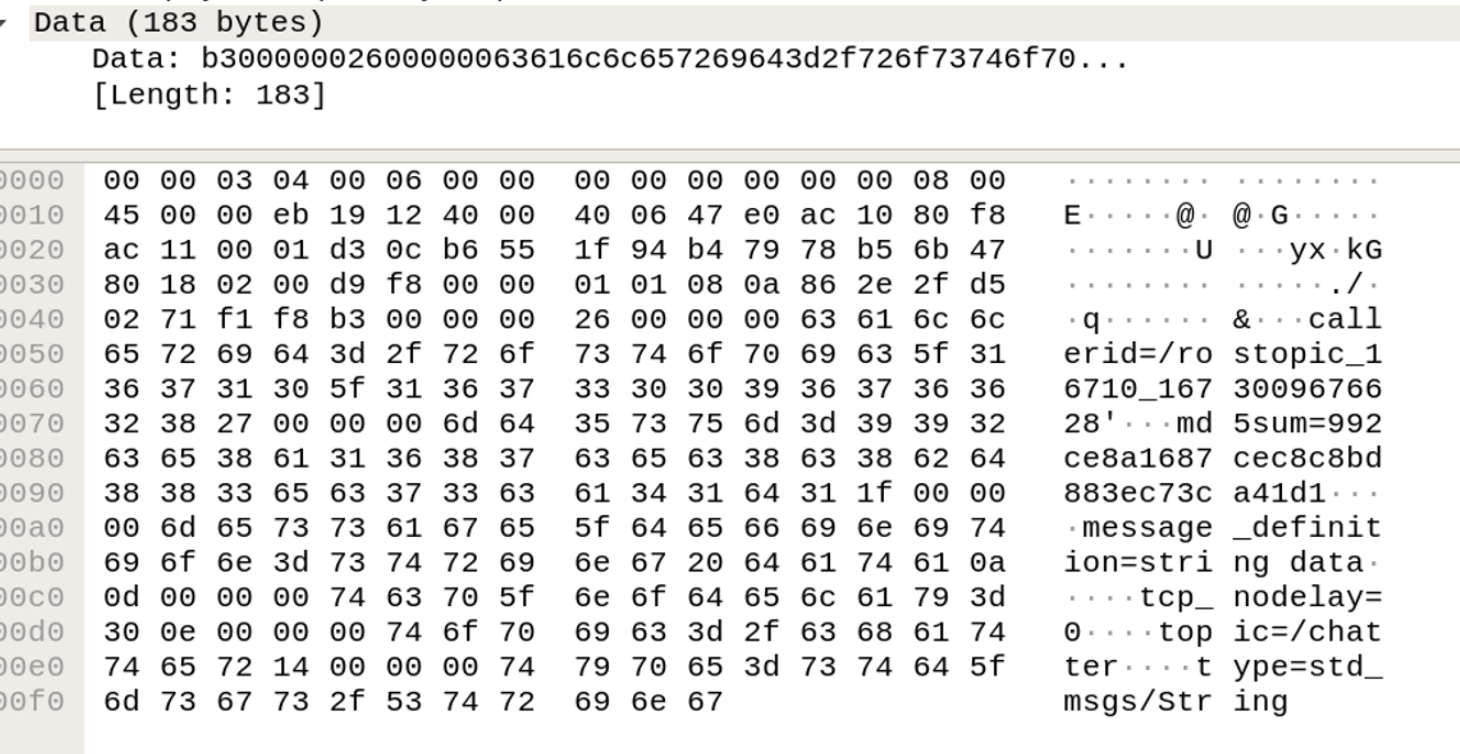
rostopic pub /chatter std_msgs/String "hello”에 대한 hex output은 아래와 같습니다.
전체 header 길이 176 바이트 ⇒ (b0 00 00 00, little-endian 사용)
b0 00 00 00
   20 00 00 00
      6d 65 73 73 61 67 65 5f 64 65 66 69 6e 69 74 69 6f 6e 3d 73 74 72 69 6e 67
      20 64 61 74 61 0a 0a
   25 00 00 00
      63 61 6c 6c 65 72 69 64 3d 2f 72 6f 73 74 6f 70 69 63 5f 34 37 36 37 5f 31
      33 31 36 39 31 32 37 34 31 35 35 37
   0a 00 00 00
      6c 61 74 63 68 69 6e 67 3d 31
   27 00 00 00
      6d 64 35 73 75 6d 3d 39 39 32 63 65 38 61 31 36 38 37 63 65 63 38 63 38 62
      64 38 38 33 65 63 37 33 63 61 34 31 64 31
   0e 00 00 00
      74 6f 70 69 63 3d 2f 63 68 61 74 74 65 72
   14 00 00 00
      74 79 70 65 3d 73 74 64 5f 6d 73 67 73 2f 53 74 72 69 6e 67
09 00 00 00
   05 00 00 00
      68 65 6c 6c 6f
- message_definition 필드는 아래와 같이 해석됩니다. - 길이 32 bytes (20 00 00 00)
6d 65 73 73 61 67 65 5f 64 65 66 69 6e 69 74 69 6f 6e 3d 73 74 72 69 6e 67-
 m  e  s  s  a  g  e  _  d  e  f  i  n  i  t  i  o  n  =  s  t  r  i  n  g-
20 64 61 74 61 0a 0a
    d  a  t  a \n \n
- callerid 필드는 아래와 같이 해석됩니다. - 길이 37 bytes (25 00 00 00)
63 61 6c 6c 65 72 69 64 3d 2f 72 6f 73 74 6f 70 69 63 5f 34 37 36 37 5f 31 33-
 c  a  l  l  e  r  i  d  =  /  r  o  s  t  o  p  i  c  _  4  7  6  7  _  1  3-
31 36 39 31 32 37 34 31 35 35 37
 1  6  9  1  2  7  4  1  5  5  7
- latching 필드는 아래와 같이 해석됩니다. - 길이 10 bytes (0a 00 00 00)
6c 61 74 63 68 69 6e 67 3d 31
 l  a  t  c  h  i  n  g  =  1
- md5sum 필드는 아래와 같이 해석됩니다. - 길이 39 bytes (27 00 00 00)
6d 64 35 73 75 6d 3d 39 39 32 63 65 38 61 31 36 38 37 63 65 63 38 63 38 62 64-
 m  d  5  s  u  m  =  9  9  2  c  e  8  a  1  6  8  7  c  e  c  8  c  8  b  d-
38 38 33 65 63 37 33 63 61 34 31 64 31
 8  8  3  e  c  7  3  c  a  4  1  d  1
- topic 필드는 아래와 같이 해석됩니다. - 길이 14 bytes (0e 00 00 00)
74 6f 70 69 63 3d 2f 63 68 61 74 74 65 72
 t  o  p  i  c  =  /  c  h  a  t  t  e  r
- message type 필드는 아래와 같이 해석됩니다. - 길이 20 bytes (14 00 00 00)
74 79 70 65 3d 73 74 64 5f 6d 73 67 73 2f 53 74 72 69 6e 67
 t  y  p  e  =  s  t  d  _  m  s  g  s  /  S  t  r  i  n  g
- hello라는 데이터 response는 5 bytes를 갖고, message body 필드 길이는 9 bytes이며, std_msgs/String 타입을 갖습니다.
09 00 00 00
   05 00 00 00
      68 65 6c 6c 6f
       h  e  l  l  o
이렇게 Topic response는 특정 필드와 데이터로 구성되어 있습니다.
사용되는 모든 필드에 대한 데이터는 링크로 대체하겠습니다.
TCPROS
TCPROS는 ROS의 Topic, Service 통신 시 Inbound connection으로 TCP 소켓을 사용하는 방식입니다. 일전 살펴본 Connection Header에서와 같이 특정 필드들을 결합하여 Header와 Data를 송수신합니다.
만약 header가 ’topic’ 필드를 포함하고 있다면 ROS Topic 연결로 이루어지고 ‘service’ 필드를 포함하고 있다면 ROS Service 연결로 이루어지는 방식입니다.
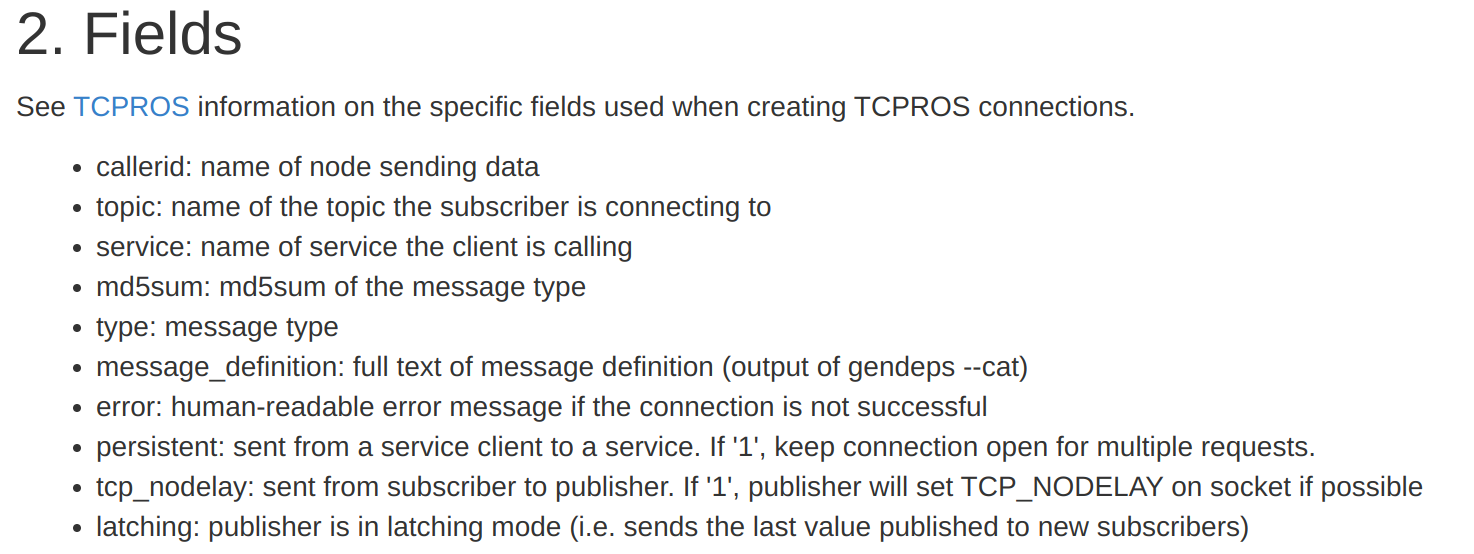
- 각각의 필드들에 대한 간략한 나열은 아래와 같습니다.
TCPROS subscriber의 Request
- message_definition: full text of message definition
- callerid: subscriber node name
- topic: name of the topic the subscriber is connecting to
- md5sum: md5sum of the message type
- type: message type
md5sum 이란? 파일을 다운받거나, 이동하거나, 복사한 후에 원본파일과 동일한 파일인지 확인하는 목적으로 쓰이는 해시 알고리즘입니다. (ex - git의 SHA-1)
TCPROS publisher의 Response
- md5sum: md5sum of the message type
- type: message type
TCPROS service client의 Request
- callerid: node name of service client
- service: name of the topic the subscriber is connecting to
- md5sum: md5sum of the message type
- type: service type
optional 필드들
- tcp_nodelay: 이 값이 ‘1’ 일 시 topic 통신에 TCP_NODELAY 옵션을 적용합니다.
- latching: latch를 사용하면 마지막으로 메시지가 저장되고 이후 연결 시 이 데이터를 전송합니다. 지도와 같이 정적이고 느린 데이터를 다룰 때 유용합니다. 이 값이 ‘1’ 이면 publish하는 데이터가 latch라는 것을 의미합니다.
- persistent: 이 값이 ‘1’ 일 시, Service Server는 여러 Request에 대응하여 계속 통신을 열어둬야 한다는 것을 의미합니다.
- error: 통신 실패 시 등장하는 human-readable error message입니다.
- ok: Service Response에서 사용되는 값으로 이 값이 ‘1’ 일 시, response가 성공적으로 통신되지만, 이 값이 ‘0’ 일 시, serialized string 타입의 에러 메세지가 이어집니다. 경우에 따라 return false로 인해 비어있을 수 있습니다.
UDPROS
UDPROS는 ROS의 Topic, Service 통신 시 Inbound connection으로 UDP 소켓을 사용하는 방식입니다. UDPROS는 standard UDP datagram과 serialized된 message data를 사용하며, 로봇의 제어와 센서 데이터를 다루는 것과 같이 빠른 통신에 사용됩니다.
UDPROS header format은 아래와 같으며 TCPROS에 비해 훨씬 간단합니다.
+---------------------------------+
|          Connection ID          |
+---------------------------------+
|Opcode | Msg ID |    Block #     |
+---------------------------------+
- Connection ID - 32-bit value로 connection negotiation 중 결정됩니다.
- Opcode - UDPROS는 여러 datagram type을 지원하는데, 이들을 명시하는 코드입니다.
- DATA0 (0) - ROS message의 가장 처음에 전송됩니다.
- DATAN (1) - 첫 전송 이후 계속해서 이 타입이 사용됩니다.
- PING (2) - heartbeat packet입니다.
- ERR (3) - 갑작스런 connection 단절 시 사용됩니다.
- Message ID - 새 메시지가 전송될 때마다 증가되며 데이터가 삭제되었는지 여부를 확인하는 데 사용되는 8비트 값입니다.
- Block # - opcode가 DATAN인 경우, 현재 datagram 번호가 되며, opcode가 DATA0이 아닌 이상 0을 갖고, 전체 ROS message의 개수를 나타냅니다.
추가 특징
- ROS messages는 다수의 Subscriber를 가질 수 있습니다.
- 첫 datagram은 전체 datagrams의 수를 담게 됩니다.
- connection negotiation 중 사용할 최대 message per datagram이 결정됩니다.
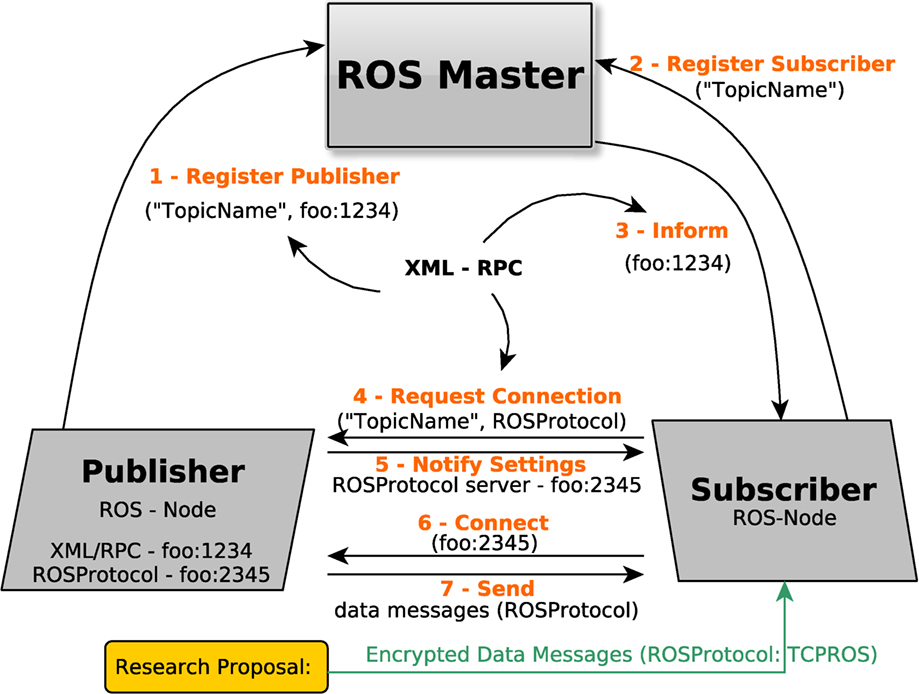
ROS의 통신 시스템 총정리
ROS Master와 Node에 의해 Topic과 Service가 이루어지는 과정을 총정리해봅시다.

- roscore 명령어를 통해 Node간 접속을 주관하고 URI 주소/포트를 등록받는 ROS Master를 구동시킵니다.

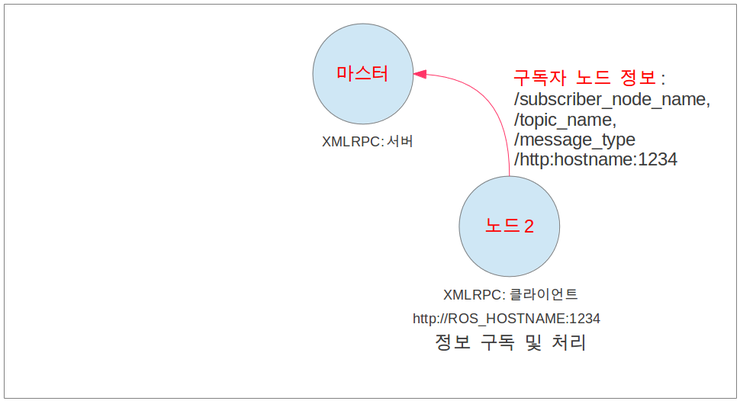
- rosrun 혹은 roslaunch에 의해 Node가 실행됩니다. Subscriber Node가 구동되는 과정에서, Node 자신의 이름, Topic 이름, Message Type, URI 주소와 포트가 주고 받아집니다.
- 다음으로, Publisher Node가 구동되며 Subscriber와 마찬가지로 Topic 등록을 위해 Master와 각종 데이터를 주고 받습니다.
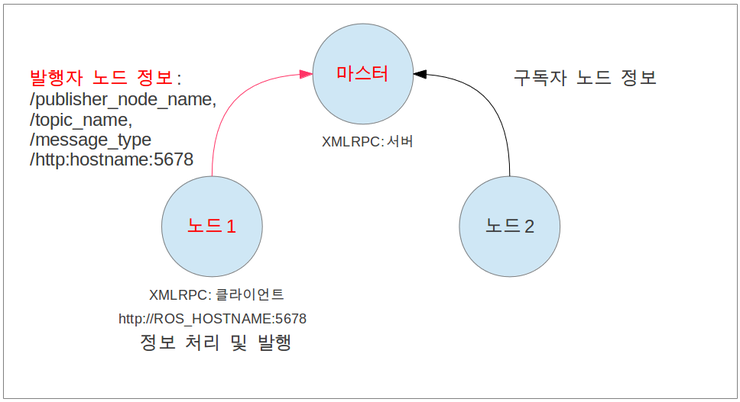
- ROS Master가 Subscriber Node에게 Publisher의 정보를 전달하고, 이때, XML-RPC를 이용하여 통신합니다.
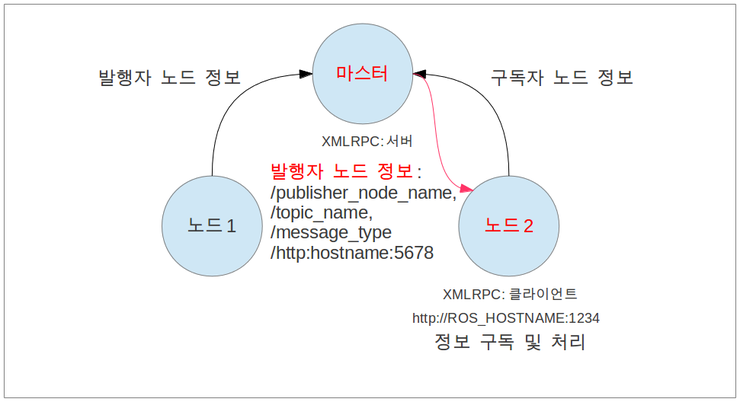
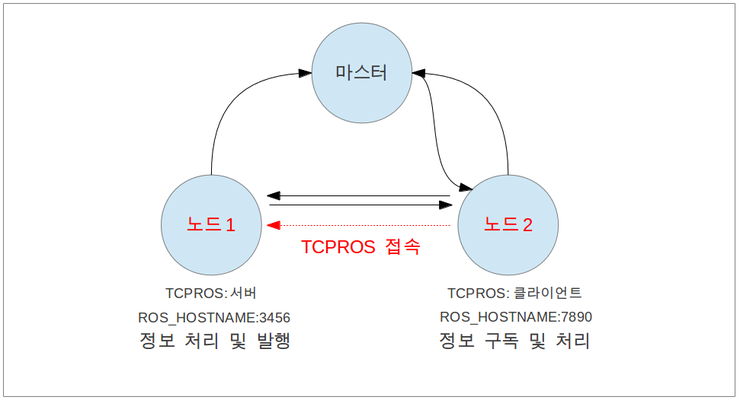
- Subscriber Node는 ROS Master로부터 Publisher의 정보를 받아 해당 Node에게 직접 접속 요청을 합니다. Node 이름, Topic 이름, 방식(TCPROS 또는 UDPROS)과 같은 정보를 XMLRPC 를 이용하여 통신하게 됩니다.

- Publisher Node는 Subscriber Node에게 접속 응답을 하게 되고, 자신의 TCP 서버의 정보인 URI주소와 포트를 XMLRPC 를 이용하여 전달하게 됩니다.
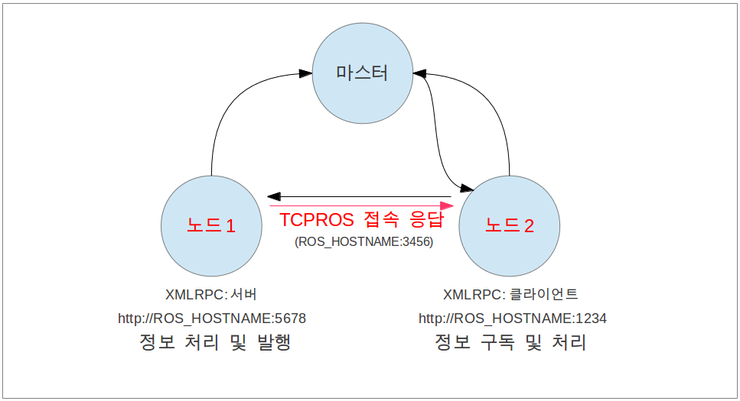
- Subscriber Node는 TCPROS를 통해 클라이언트를 만들고, Publisher Node와 직접 연결합니다.
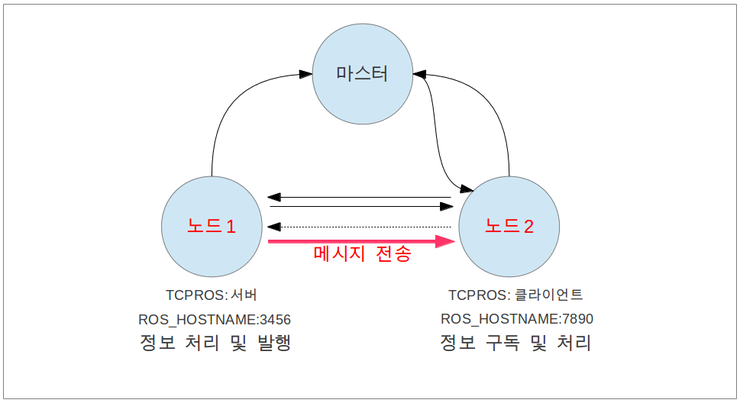
- 이제부터, Publisher Node는 Subscriber Node에게 정해진 메시지를 전송하게 됩니다.
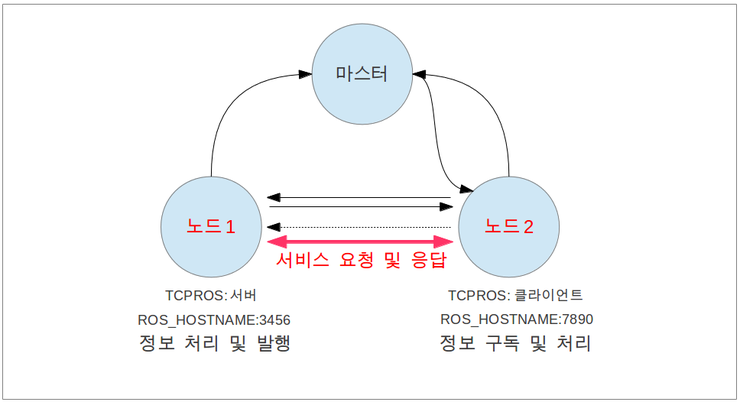
- Service의 경우 Topic과 달리 1회성 연결이기 때문에, 접속, 서비스 요청, 서비스 응답이 수행되고 서로간의 접속을 끊게 됩니다. 이후 Service 통신을 다시 진행해야 하는 경우 처음부터 다시 진행해야 합니다.
- Topic 접속의 종료 시, Node의 종료 시에도 각 Node들은 ROS Master에게 XML-RPC를 통해 종료 Message를 주고받습니다.
ROS Packet Analysis Demo
ROS 내부의 통신이 이루어지는 과정을 배운 만큼 WireShark를 통해 실제 오가는 패킷을 분석해 봅시다.
- Wireshark 설치
sudo apt update
sudo apt install wireshark

sudo wireshark
- ROS Master는 기본적으로 11311 포트를 사용하도록 설정되어있습니다. 현재 IP의 11311 포트 패킷을 분석하여 roscore 실행 시 오가는 패킷들을 살펴보겠습니다.
ip.addr == <my-ip-addr> || tcp.port == 11311

# Terminal
roscore
- TCP handshake가 이루어진 뒤 parameter server, logger, roslaunch, rosgraph, statistics_window_max_size를 비롯하여 다양한 서비스가 Request, Response를 통해 초기화됩니다.
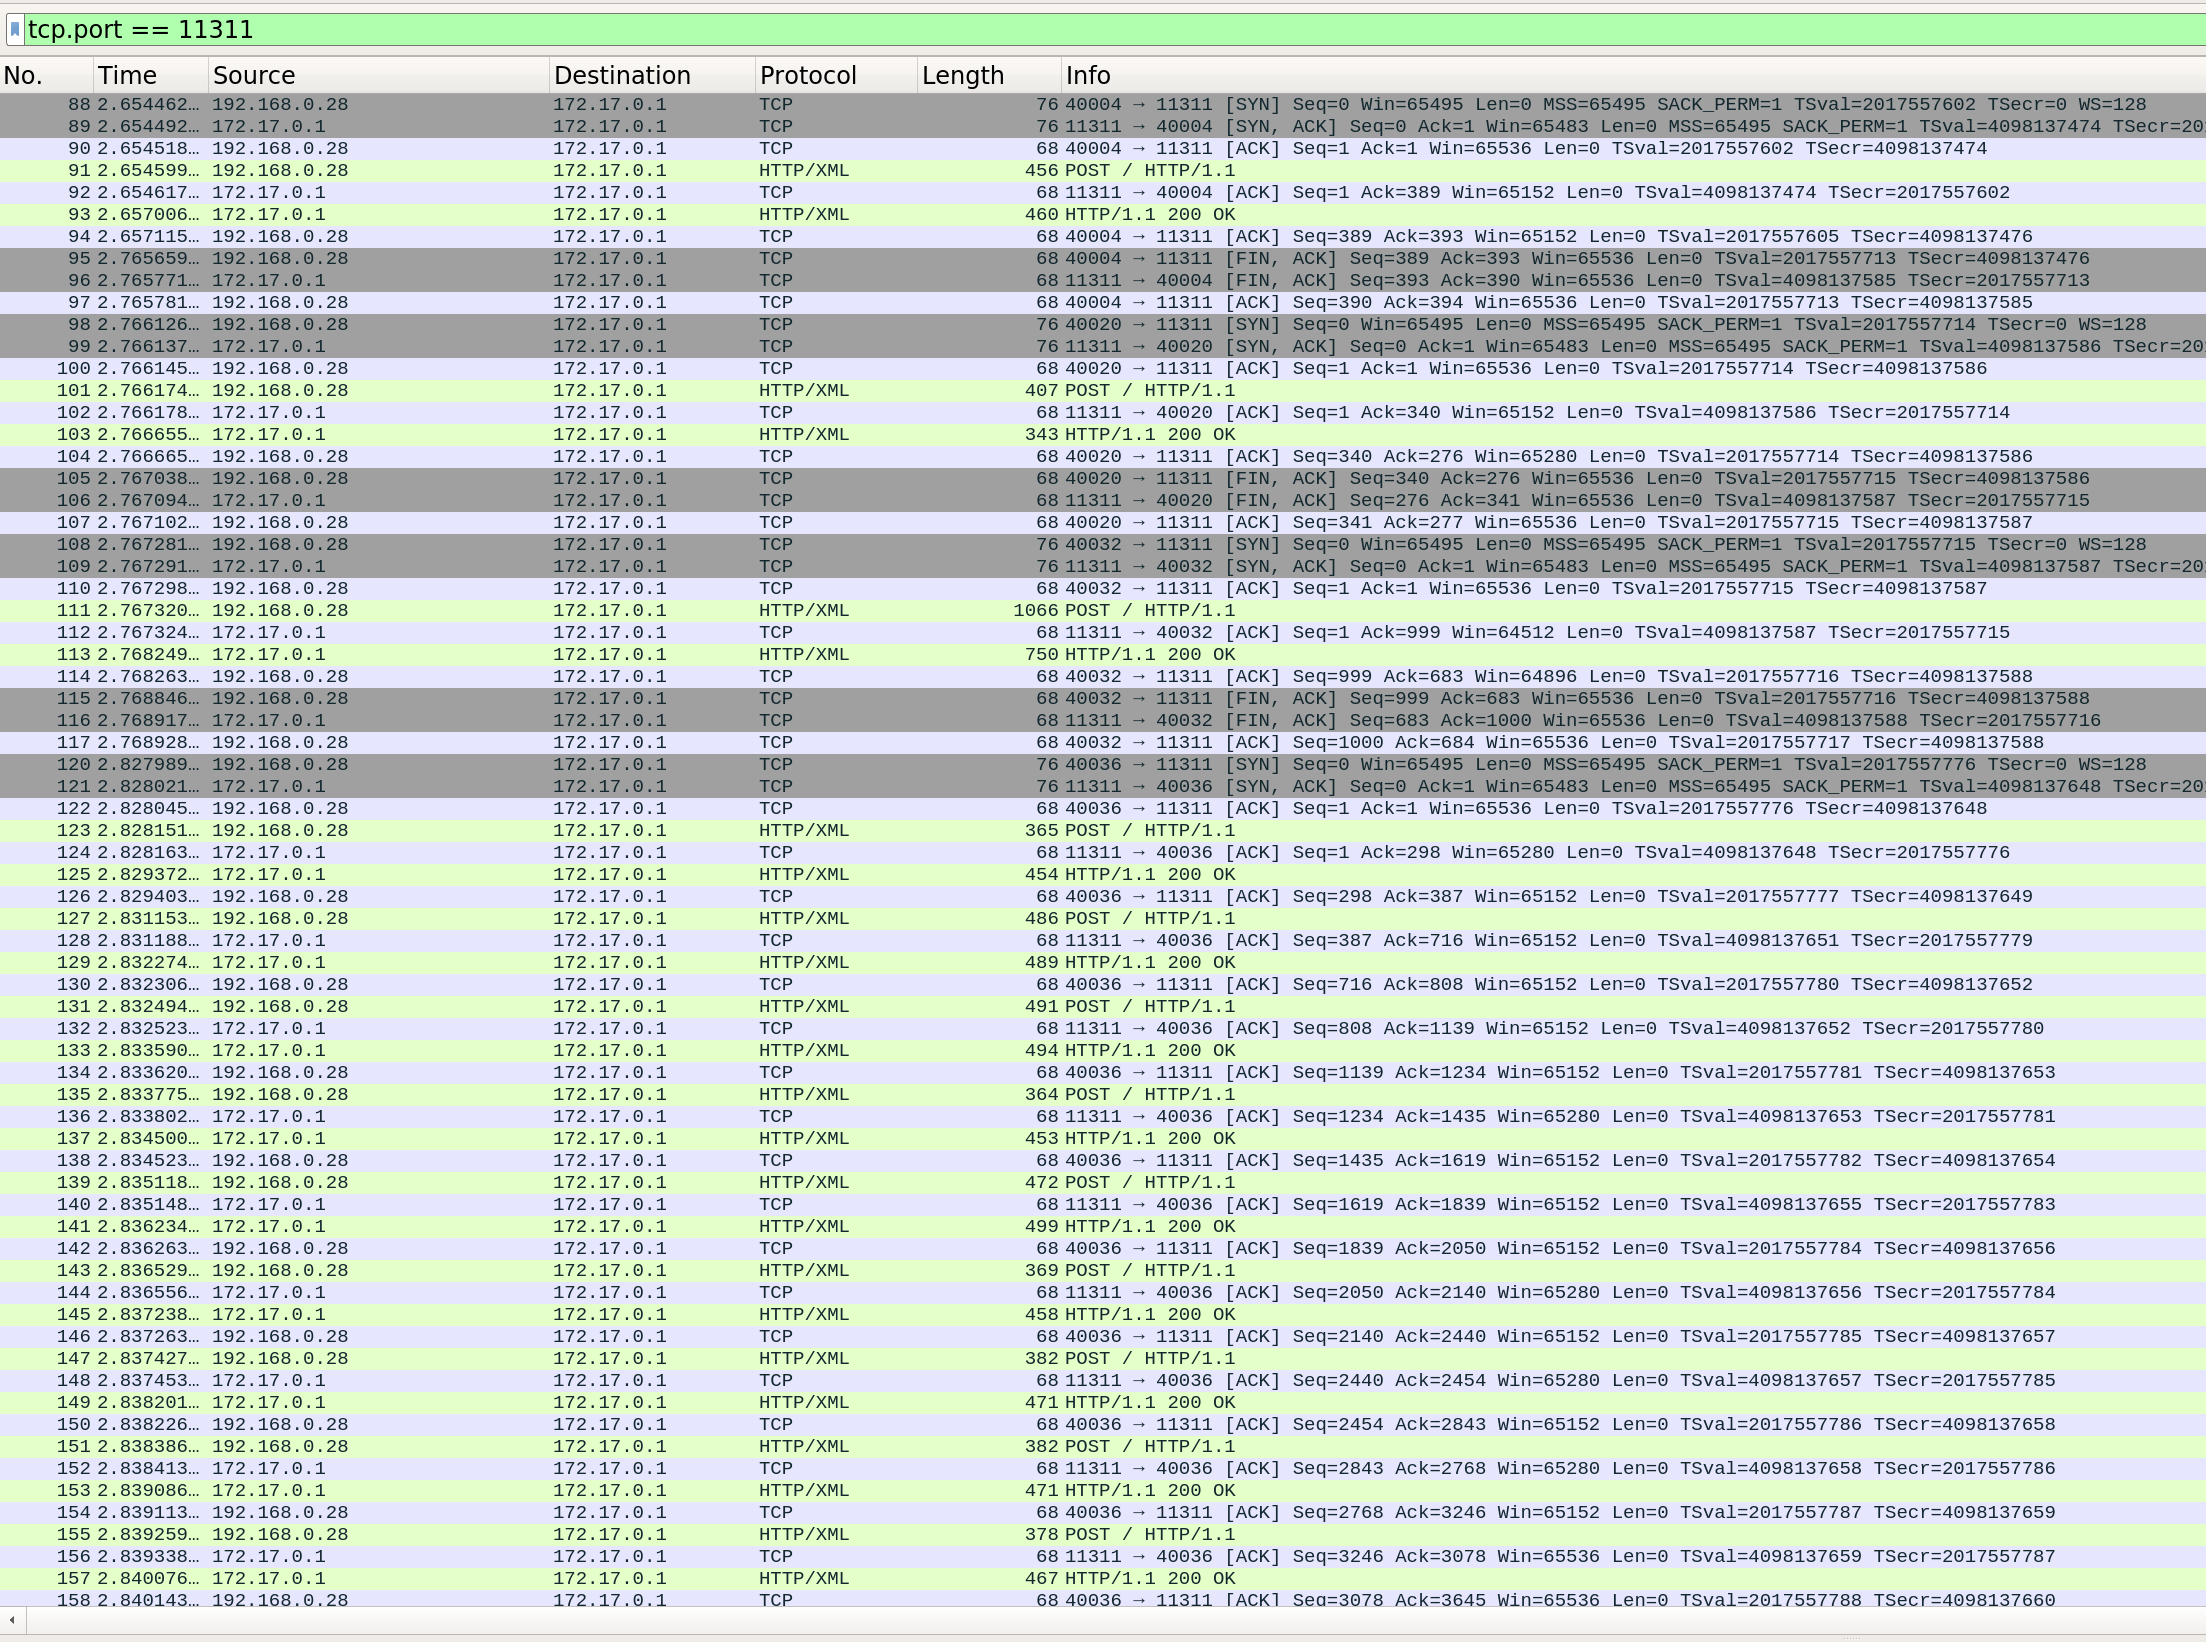
ROS Master를 종료할 시에도 실행되고 있는 모든 서비스들은 11311포트를 통해 종료 신호를 Request-Response 합니다.
- 이번에는 Publisher를 실행한 뒤, ROS Master와 오가는 패킷을 살펴봅시다.
rostopic pub /chatter std_msgs/String "hello"
- 패킷을 살펴보면, XMLRPC를 통해 Topic Publisher의 포트와 이름, Topic 이름과 Message type 정보를 확인할 수 있습니다.
<methodCall>
    <methodName>
        registerService
        </methodName>
    <params>
        <param>
            <value>
                <string>
                    /rostopic_18957_1673097448137
                    </string>
                </value>
            </param>
        <param>
            <value>
                <string>
                    /rostopic_18957_1673097448137/get_loggers
                    </string>
                </value>
            </param>
        <param>
            <value>
                <string>
                    rosrpc://166.104.135.89:44311
                    </string>
                </value>
            </param>
        <param>
            <value>
                <string>
                    http://166.104.135.89:33575/
                    </string>
                </value>
            </param>
        </params>
    </methodCall>
<?xml
    version='1.0'
    ?>
<methodCall>
    <methodName>
        registerPublisher
        </methodName>
    <params>
        <param>
            <value>
                <string>
                    /rostopic_18957_1673097448137
                    </string>
                </value>
            </param>
        <param>
            <value>
                <string>
                    /chatter
                    </string>
                </value>
            </param>
        <param>
            <value>
                <string>
                    std_msgs/String
                    </string>
                </value>
            </param>
        <param>
            <value>
                <string>
                    http://166.104.135.89:33575/
                </string>
            </value>
        </param>
    </params>
</methodCall>
- Connection Header를 실제로 확인해보겠습니다. rostopic echo를 실행한 뒤 패킷의 data field를 살펴봅니다.
$ rostopic echo /chatter
data: "hello"
---
- 실제 /chatter topic의 정보를 조회해보면 data 필드의 결과와 일치하는 것을 확인 가능합니다.
$ rostopic info /chatter
Type: std_msgs/String

Publishers:
 * /rostopic_18957_1673097448137 (http://166.104.135.89:33575/)

Subscribers: None
- /chatter Topic Subscriber를 실행하고, topic publisher의 포트(현재는 33575)로 오가는 패킷을 분석해보겠습니다.
ip.addr == <my-ip-addr> || tcp.port == 33575
(/chatter publisher의 포트가 33575였음)
- Topic echo를 통해 Subscriber를 실행합니다.
$ rostopic echo /chatter
data: "hello"
---
- 우선, 생성된 Subscriber 정보는 아래와 같습니다.
$ rostopic info /chatter
Type: std_msgs/String

Publishers:
 * /rostopic_18957_1673097448137 (http://166.104.135.89:33575/)

Subscribers:
 * /rostopic_21890_1673098174449 (http://166.104.135.89:36479/)
- 패킷을 살펴보면, Subscriber에 대한 정보와 데이터 타입에 대한 정보가 XML-RPC를 통해 오고 간 것을 확인할 수 있습니다.
<methodCall>
    <methodName>
        registerPublisher
        </methodName>
    <params>
        <param>
            <value>
                <string>
                    /rostopic_21890_1673098174449
                    </string>
                </value>
            </param>
        <param>
            <value>
                <string>
                    /rosout
                    </string>
                </value>
            </param>
        <param>
            <value>
                <string>
                    rosgraph_msgs/Log
                    </string>
                </value>
            </param>
        <param>
            <value>
                <string>
                http://166.104.135.89:36479/
                </string>
            </value>
        </param>
    </params>
</methodCall>
<methodResponse>
    <params>
        <param>
            <value>
                <array>
                    <data>
                        <value>
                            <int>
                                1
                                </int>
                            </value>
                        <value>
                            <string>
                                current system state
                                </string>
                            </value>
                        <value>
                            <array>
                                <data>
                                    <value>
                                        <array>
                                            <data>
                                                <value>
                                                    <string>
                                                        /rosout_agg
                                                        </string>
                                                    </value>
                                                <value>
                                                    <string>
                                                        rosgraph_msgs/Log
                                                        </string>
                                                    </value>
                                                </data>
                                            </array>
                                        </value>
                                    <value>
                                        <array>
                                            <data>
                                                <value>
                                                    <string>
                                                        /rosout
                                                        </string>
                                                    </value>
                                                <value>
                                                    <string>
                                                        rosgraph_msgs/Log
                                                        </string>
                                                    </value>
                                                </data>
                                            </array>
                                        </value>
                                    <value>
                                        <array>
                                            <data>
                                                <value>
                                                    <string>
                                                        /chatter
                                                        </string>
                                                    </value>
                                                <value>
                                                    <string>
                                                        std_msgs/String
                                                    </string>
                                                </value>
                                            </data>
                                        </array>
                                    </value>
                                </data>
                            </array>
                        </value>
                    </data>
                </array>
            </value>
        </param>
    </params>
</methodResponse>
다음으로, turtlesim을 통해 topic message data의 변화를 살펴보고자 합니다.
- turtlesim을 실행시킨 뒤 rosnode info를 통해 각종 정보들을 조회합니다. 사용중인 통신 방법 (TCPROS), Node의 포트 번호 등 다양한 정보들이 조회됩니다.
$ rosrun turtlesim turtlesim_node
$ rosnode info /turtlesim
--------------------------------------------------------------------------------
Node [/turtlesim]
Publications:
 * /rosout [rosgraph_msgs/Log]
 * /turtle1/color_sensor [turtlesim/Color]
 * /turtle1/pose [turtlesim/Pose]

Subscriptions:
 * /turtle1/cmd_vel [unknown type]

Services:
 * /clear
 * /kill
 * /reset
 * /spawn
 * /turtle1/set_pen
 * /turtle1/teleport_absolute
 * /turtle1/teleport_relative
 * /turtlesim/get_loggers
 * /turtlesim/set_logger_level

contacting node http://166.104.135.89:39875/ ...
Pid: 29120
Connections:
 * topic: /rosout
    * to: /rosout
    * direction: outbound (33435 - 166.104.135.89:60856) [26]
    * transport: TCPROS
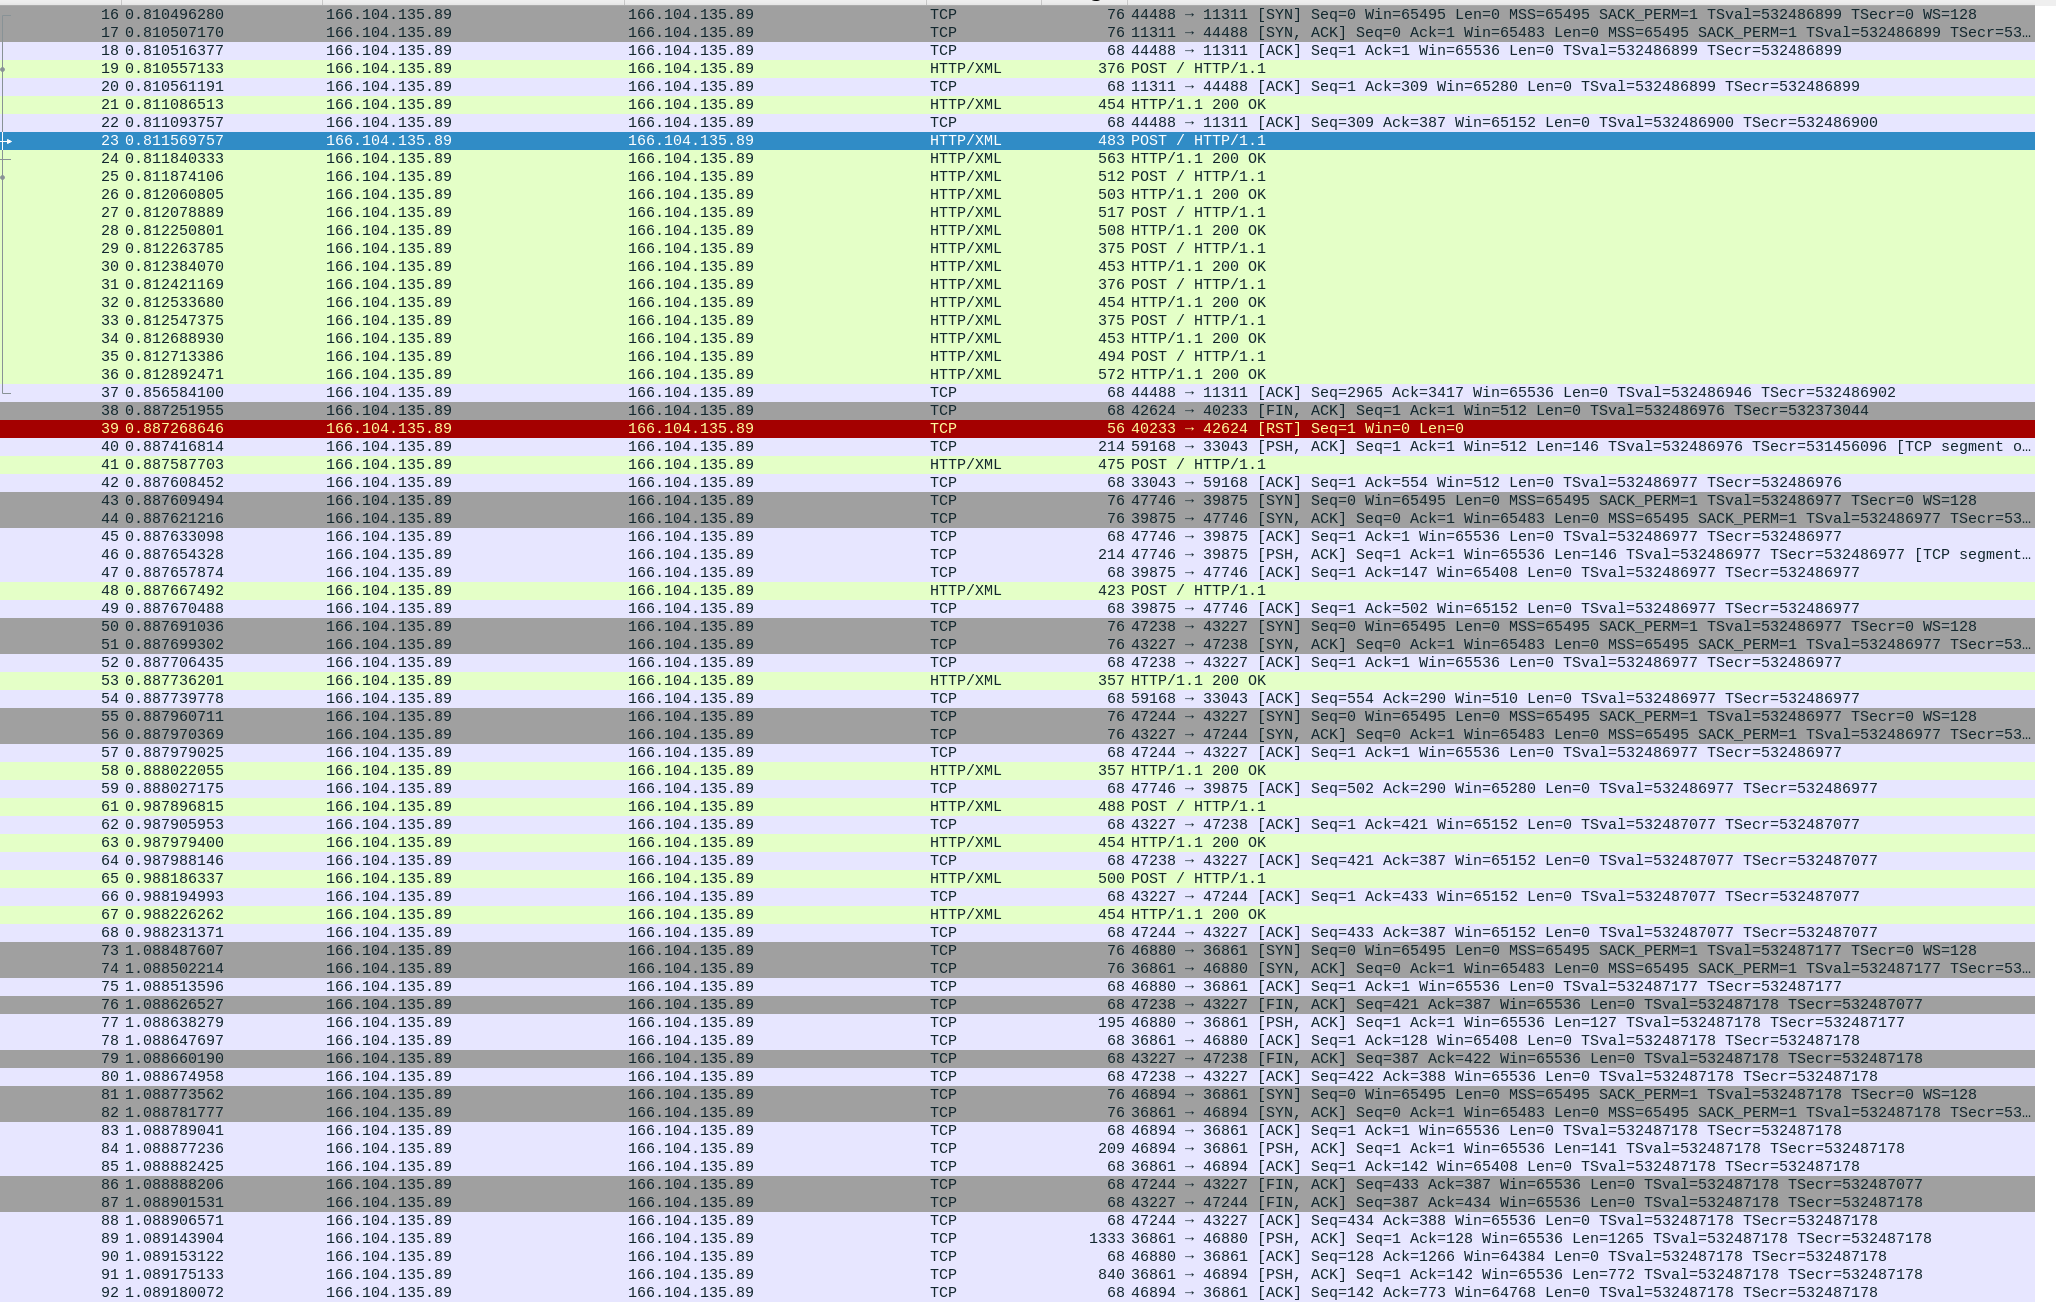
- rostopic info를 통해 cmd_vel topic에 대한 정보를 조회하였습니다. 사용중인 포트 번호를 확인한 뒤 wireshark를 통해 해당 포트로 오가는 패킷을 분석합니다.
$ rostopic info /turtle1/cmd_vel
Type: geometry_msgs/Twist

Publishers: None

Subscribers:
 * /turtlesim (http://166.104.135.89:39875/)
- wireshark 필터 조건문
ip.addr == <my-ip> || tcp.port == 39875
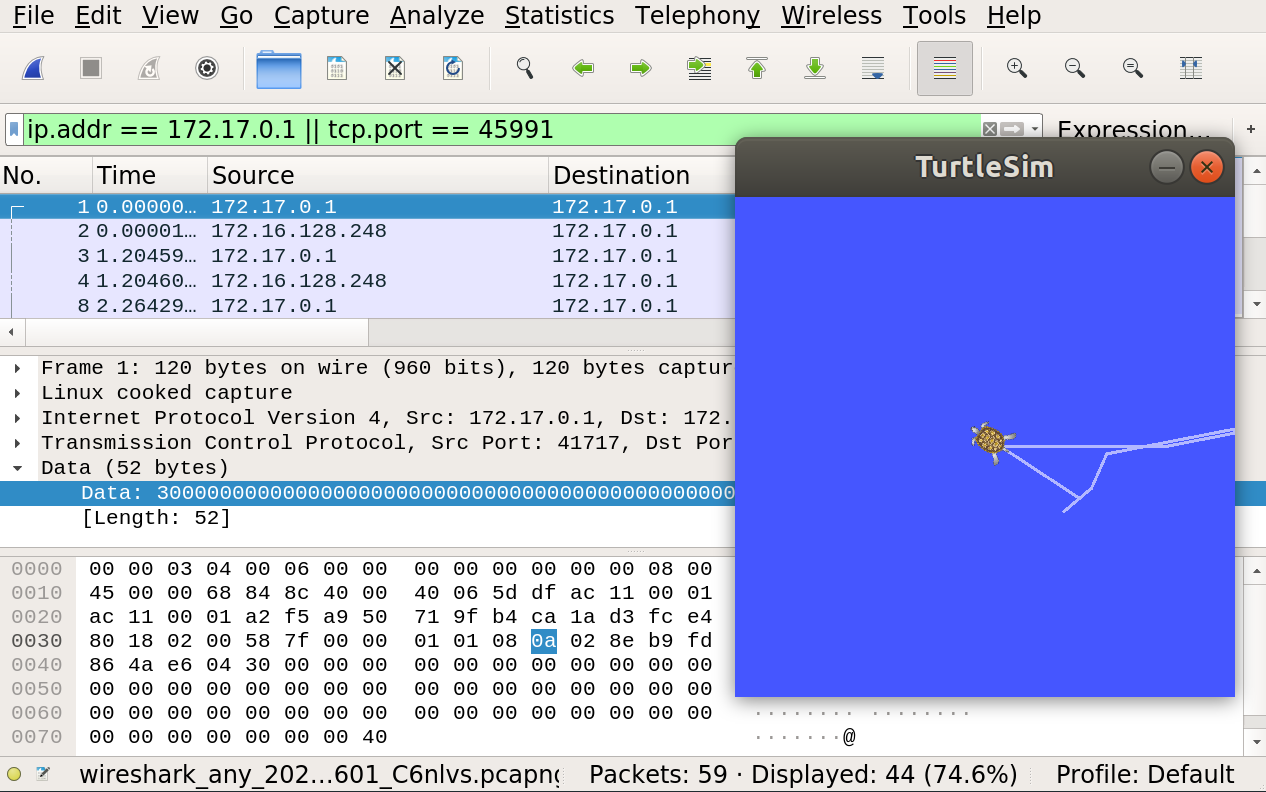
- teleop key를 통해 거북이의 조종을 준비하고, 해당 작업 중 발생한 패킷을 분석합니다.
rosrun turtlesim turtle_teleop_key
XML-RPC 통신들이 이루어진 뒤로, TCP 통신이 이어지는 모습을 확인할 수 있습니다.
TCP Data 필드의 내용에는 아래와 같은 데이터가 포함되어 있습니다.
callerid=/teleop_turtle
latching=0'md5sum=acffd30cd6b6de30f120938c17c593fbjmessage_definition=##
## Severity level constants
##
byte DEBUG=1 #debug level
byte INFO=2  #general level
byte WARN=4  #warning level
byte ERROR=8 #error level
byte FATAL=16 #fatal/critical level
##
## Fields
##
Header header
byte level
string name # name of the node
string msg # message
string file # file the message came from
string function # function the message came from
uint32 line # line the message came from
string[] topics # topic names that the node publishes

================================================================================
MSG: std_msgs/Header
# Standard metadata for higher-level stamped data types.
# This is generally used to communicate timestamped data
# in a particular coordinate frame.
#
# sequence ID: consecutively increasing ID
uint32 seq
#Two-integer timestamp that is expressed as:
# * stamp.sec: seconds (stamp_secs) since epoch (in Python the variable is called 'secs')
# * stamp.nsec: nanoseconds since stamp_secs (in Python the variable is called 'nsecs')
# time-handling sugar is provided by the client library
time stamp
#Frame this data is associated with
string frame_id

topic=/rosouttype=rosgraph_msgs/Log
callerid=/teleop_turtle
latching=0'md5sum=9f195f881246fdfa2798d1d3eebca84armessage_definition=# This expresses velocity in free space broken into its linear and angular parts.
Vector3  linear
Vector3  angular

================================================================================
MSG: geometry_msgs/Vector3
# This represents a vector in free space.
# It is only meant to represent a direction. Therefore, it does not
# make sense to apply a translation to it (e.g., when applying a
# generic rigid transformation to a Vector3, tf2 will only apply the
# rotation). If you want your data to be translatable too, use the
# geometry_msgs/Point message instead.

float64 x
float64 y
float64 z
topic=/turtle1/cmd_veltype=geometry_msgs/Twist
- teleop key에서 앞/뒤/CW/CCW와 같이 다양한 조종 신호를 publish해보고 이때의 TCP Data가 어떻게 변화하는지 확인해봅시다.
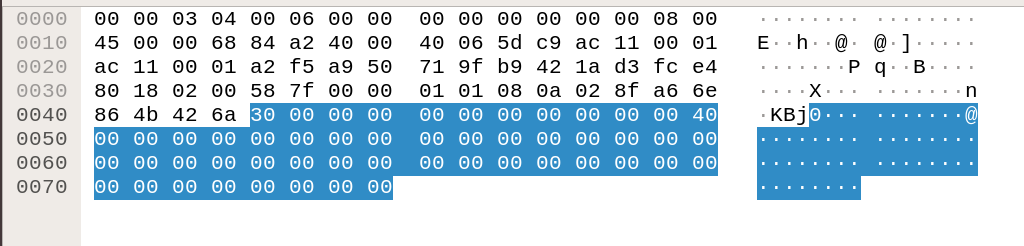
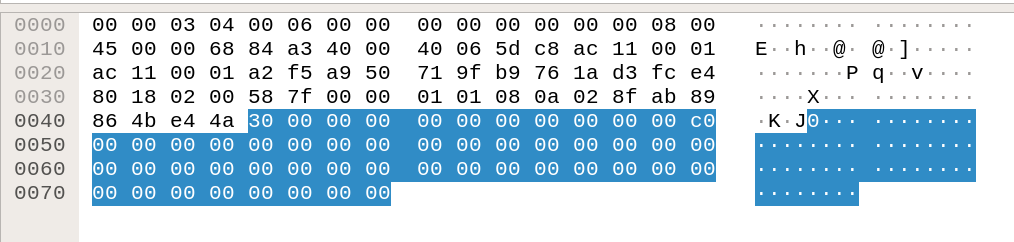
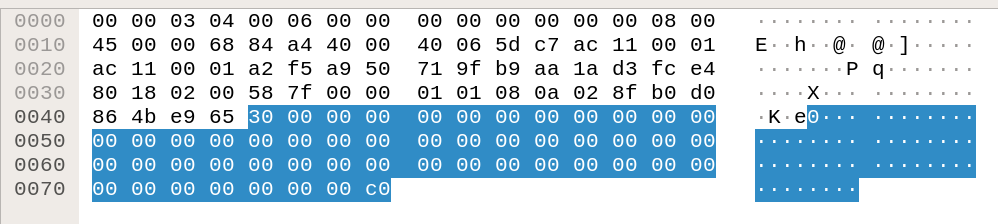
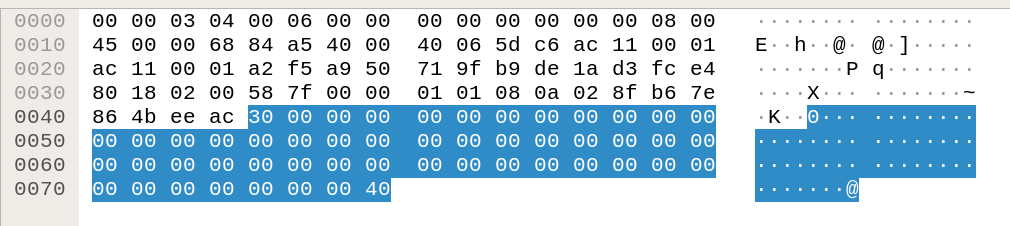
⇒ 기본적으로 sequence / timestamp가 변화하며, 미묘하게 data가 다른 것을 알 수 있습니다.
- 이렇게 topic message는 serialization이 되어 있으며, 공식 문서화 같이 MD5 sum을 사용합니다.
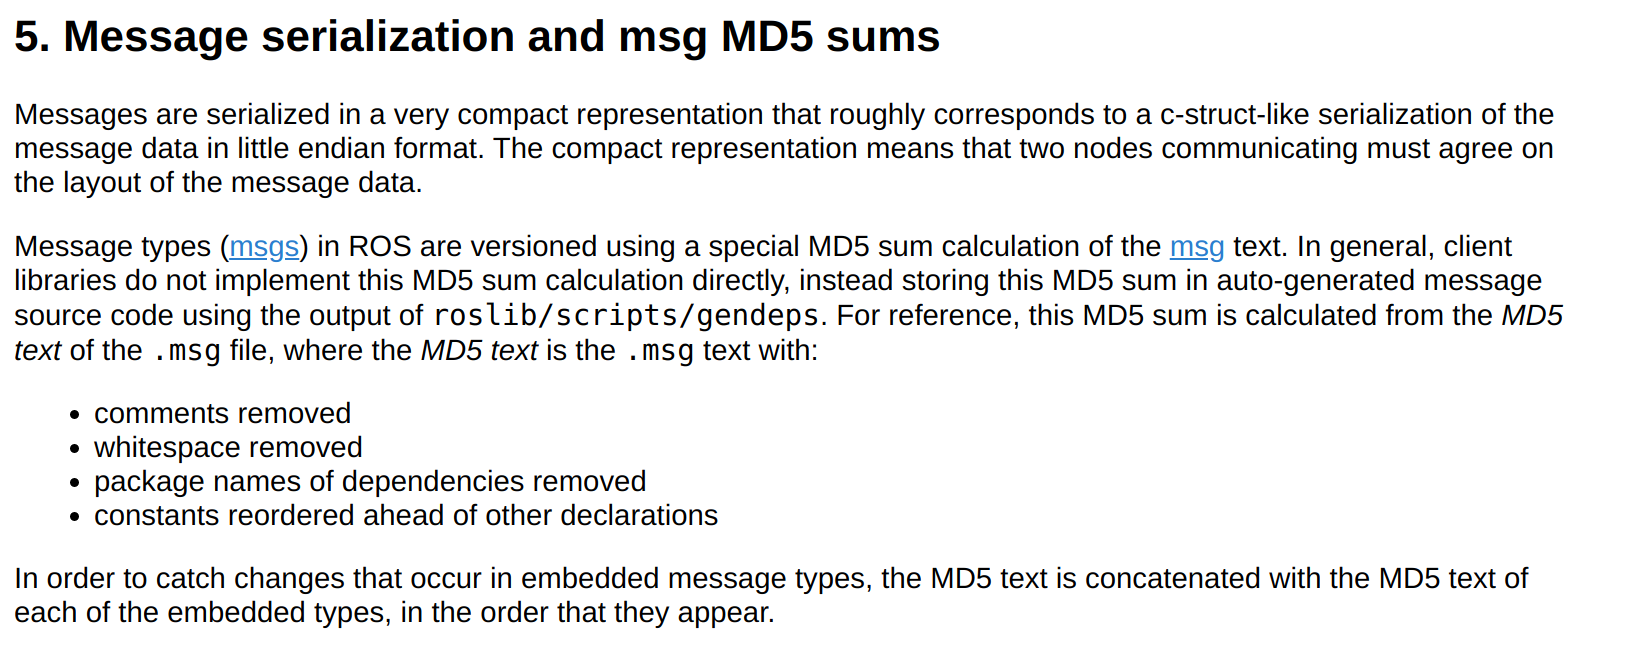
- image from : roswiki
ROS URI 설정
- ROS에는 다양한 환경 변수들이 존재합니다. 이들 중 Master가 사용할 IP와 Port를 설정하는 환경 변수가 있으며, 이는 아래와 같이 조회 가능합니다.
$ echo $ROS_MASTER_URI
http://192.168.0.1:11311
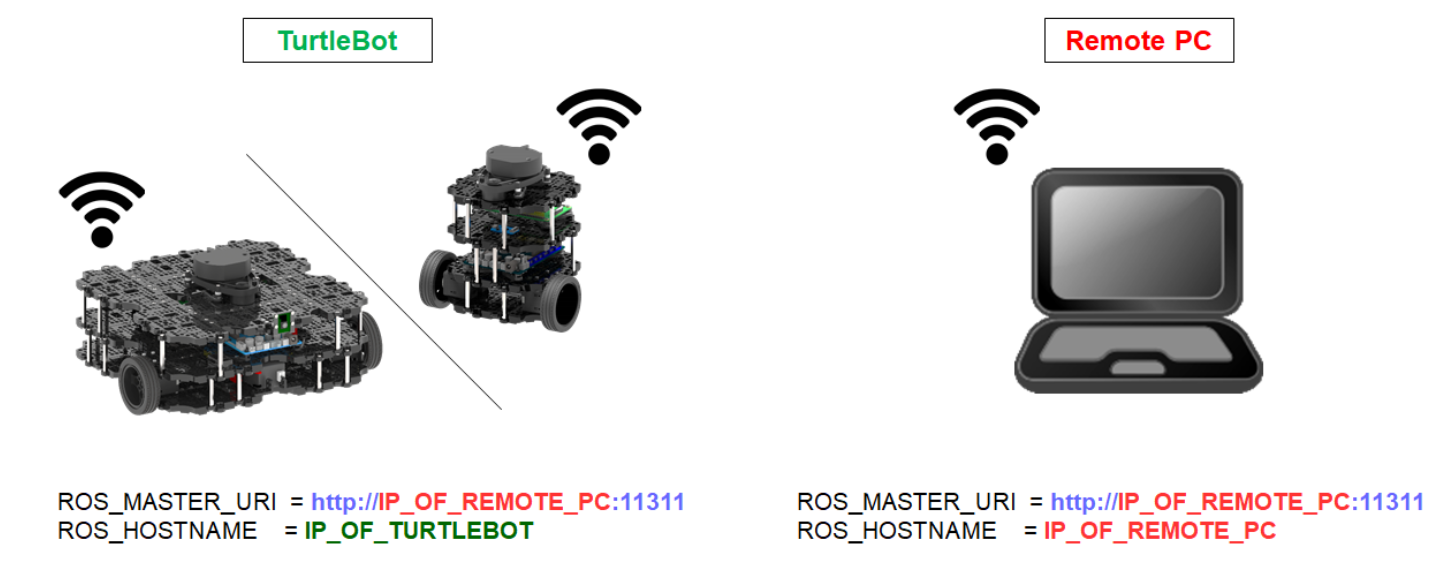
서로 다른 디바이스에서 동작하는 ROS 시스템일지라도 같은 MASTER URI를 갖도록 하면 원격 통신이 가능합니다. 이를 통해 원격 시각화와 원격 제어를 주로 실행합니다.
- image from : turtlebot3 git
ROS_MASTER_URI를 사용하는 방법은 다음과 같습니다.
- ROS_MASTER_URI=http://master-ip-addr:master-ip-port
- ROS_IP=<현재 디바이스의 ip-addr>
- ROS_HOSTNAME=<현재 디바이스의 hostname>
ROS_IP와 ROS_HOSTNAME는 서로 양립할 수 없고, 둘 중 하나를 사용할 수 있습니다.
- bashrc의 수정을 해두면, 새로운 터미널을 실행할 때마다 변경된 내용이 반영될 수 있어 편리합니다.
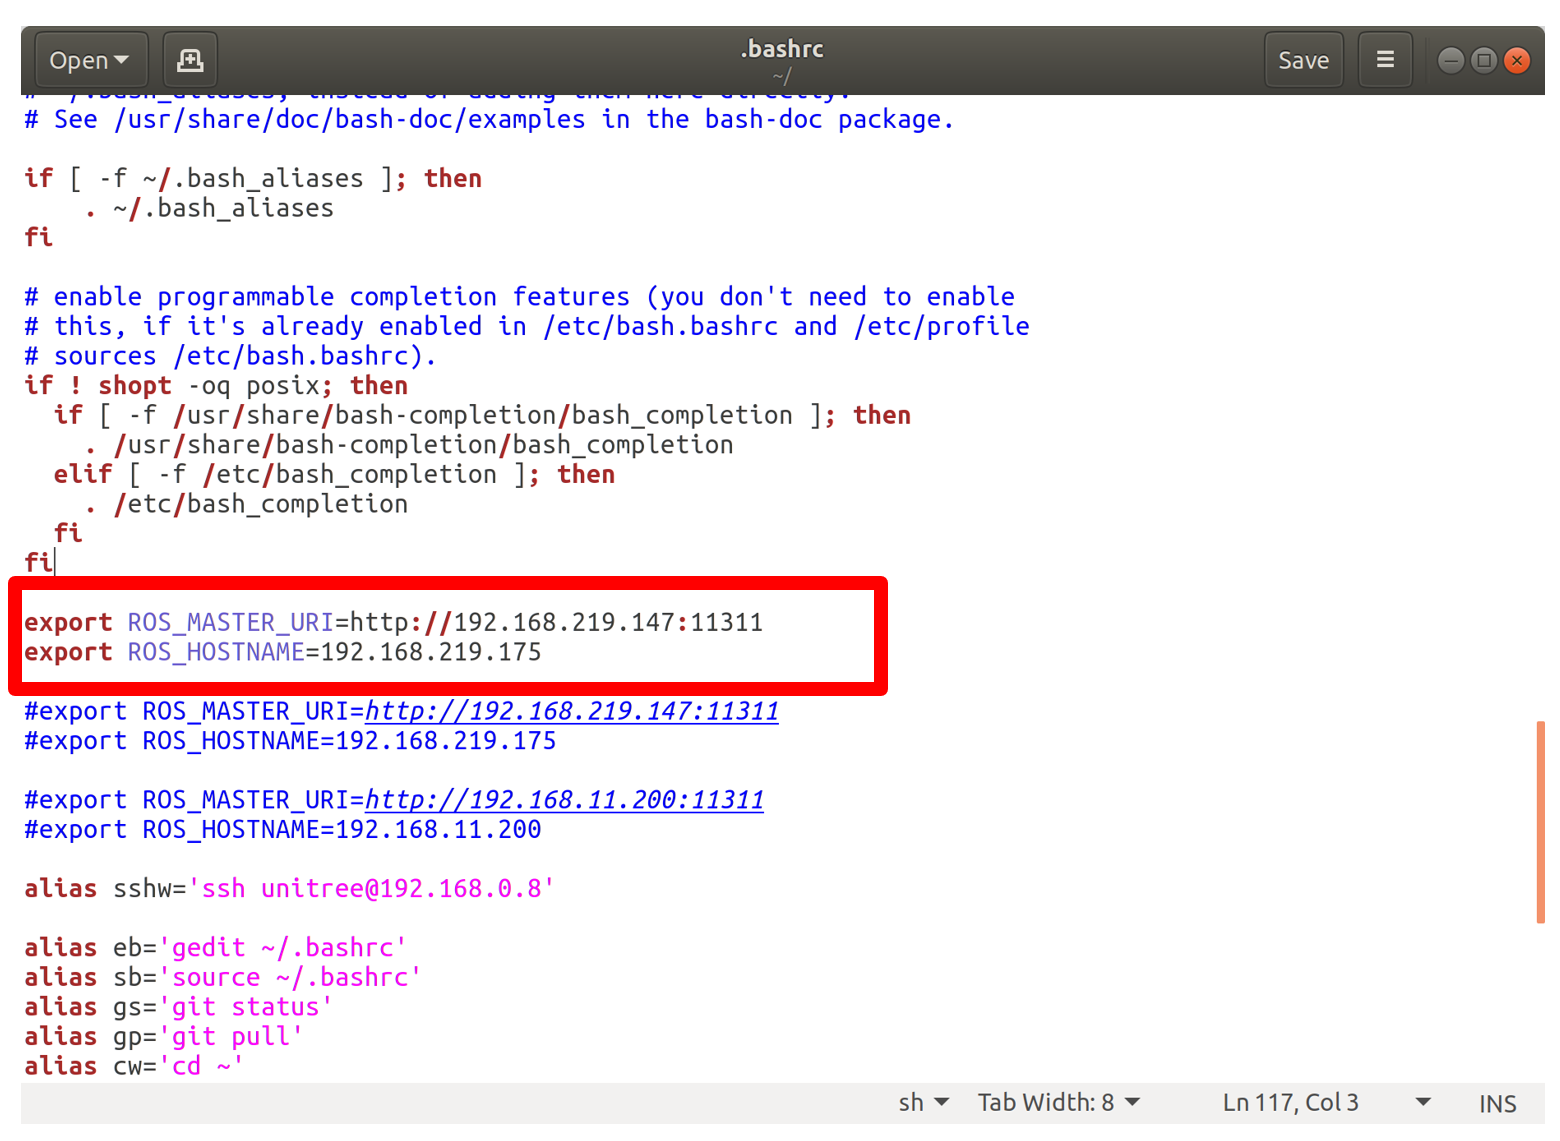
- 강의 초반, 저의 셋업을 따라오셨다면, ~/ros_menu/config.yaml을 수정하여 손쉽게 변경하실 수 있습니다.
Config:
  menu_enable: true
  ros_option: menu
  default_ros_domain_id: 30
Menu:
  ROS 1 noetic:
    option_num: 1
    ROS_version: 1
    distro_name: noetic
    ros1_path: /opt/ros/noetic
    master_ip: # set if roscore isn't on this computer
    cmds:
    # - source ${HOME}/catkin_ws/devel/setup.${shell}
    # - source_plugin openvino_bashrc
- 같은 네트워크를 사용하는 두 PC를 사용해서 원격으로 로봇을 조종해보는 실습을 진행해봅시다.
# PC 1 - ROS Master를 실행시키고 로봇 등장시키기
roslaunch smb_gazebo smb_gazebo.launch

# PC 2 - Master URI 변경 후 로봇 조종
rosrun teleop_twist_keyboard teleop_twist_keyboard.py
- image from : robots.nootrix
자료출처