Lecture11 - About DDS (2)
DDS의 IDL
DDS에서는 특정 언어에 의존적이지 않는 데이터 통신을 위해 IDL을 사용합니다.
IDL - Interface Description Language 또는 Interface Definition Language는 어느 한 언어에 국한되지 않는 언어중립적인 방법으로 인터페이스를 표현함으로써, 같은 언어를 사용하지 않는 컴포넌트 사이의 통신을 가능하게 합니다.
- OMG의 Interface Definition Language Version 3.5에 따른 사용 가능한 키워드들은 아래와 같습니다.
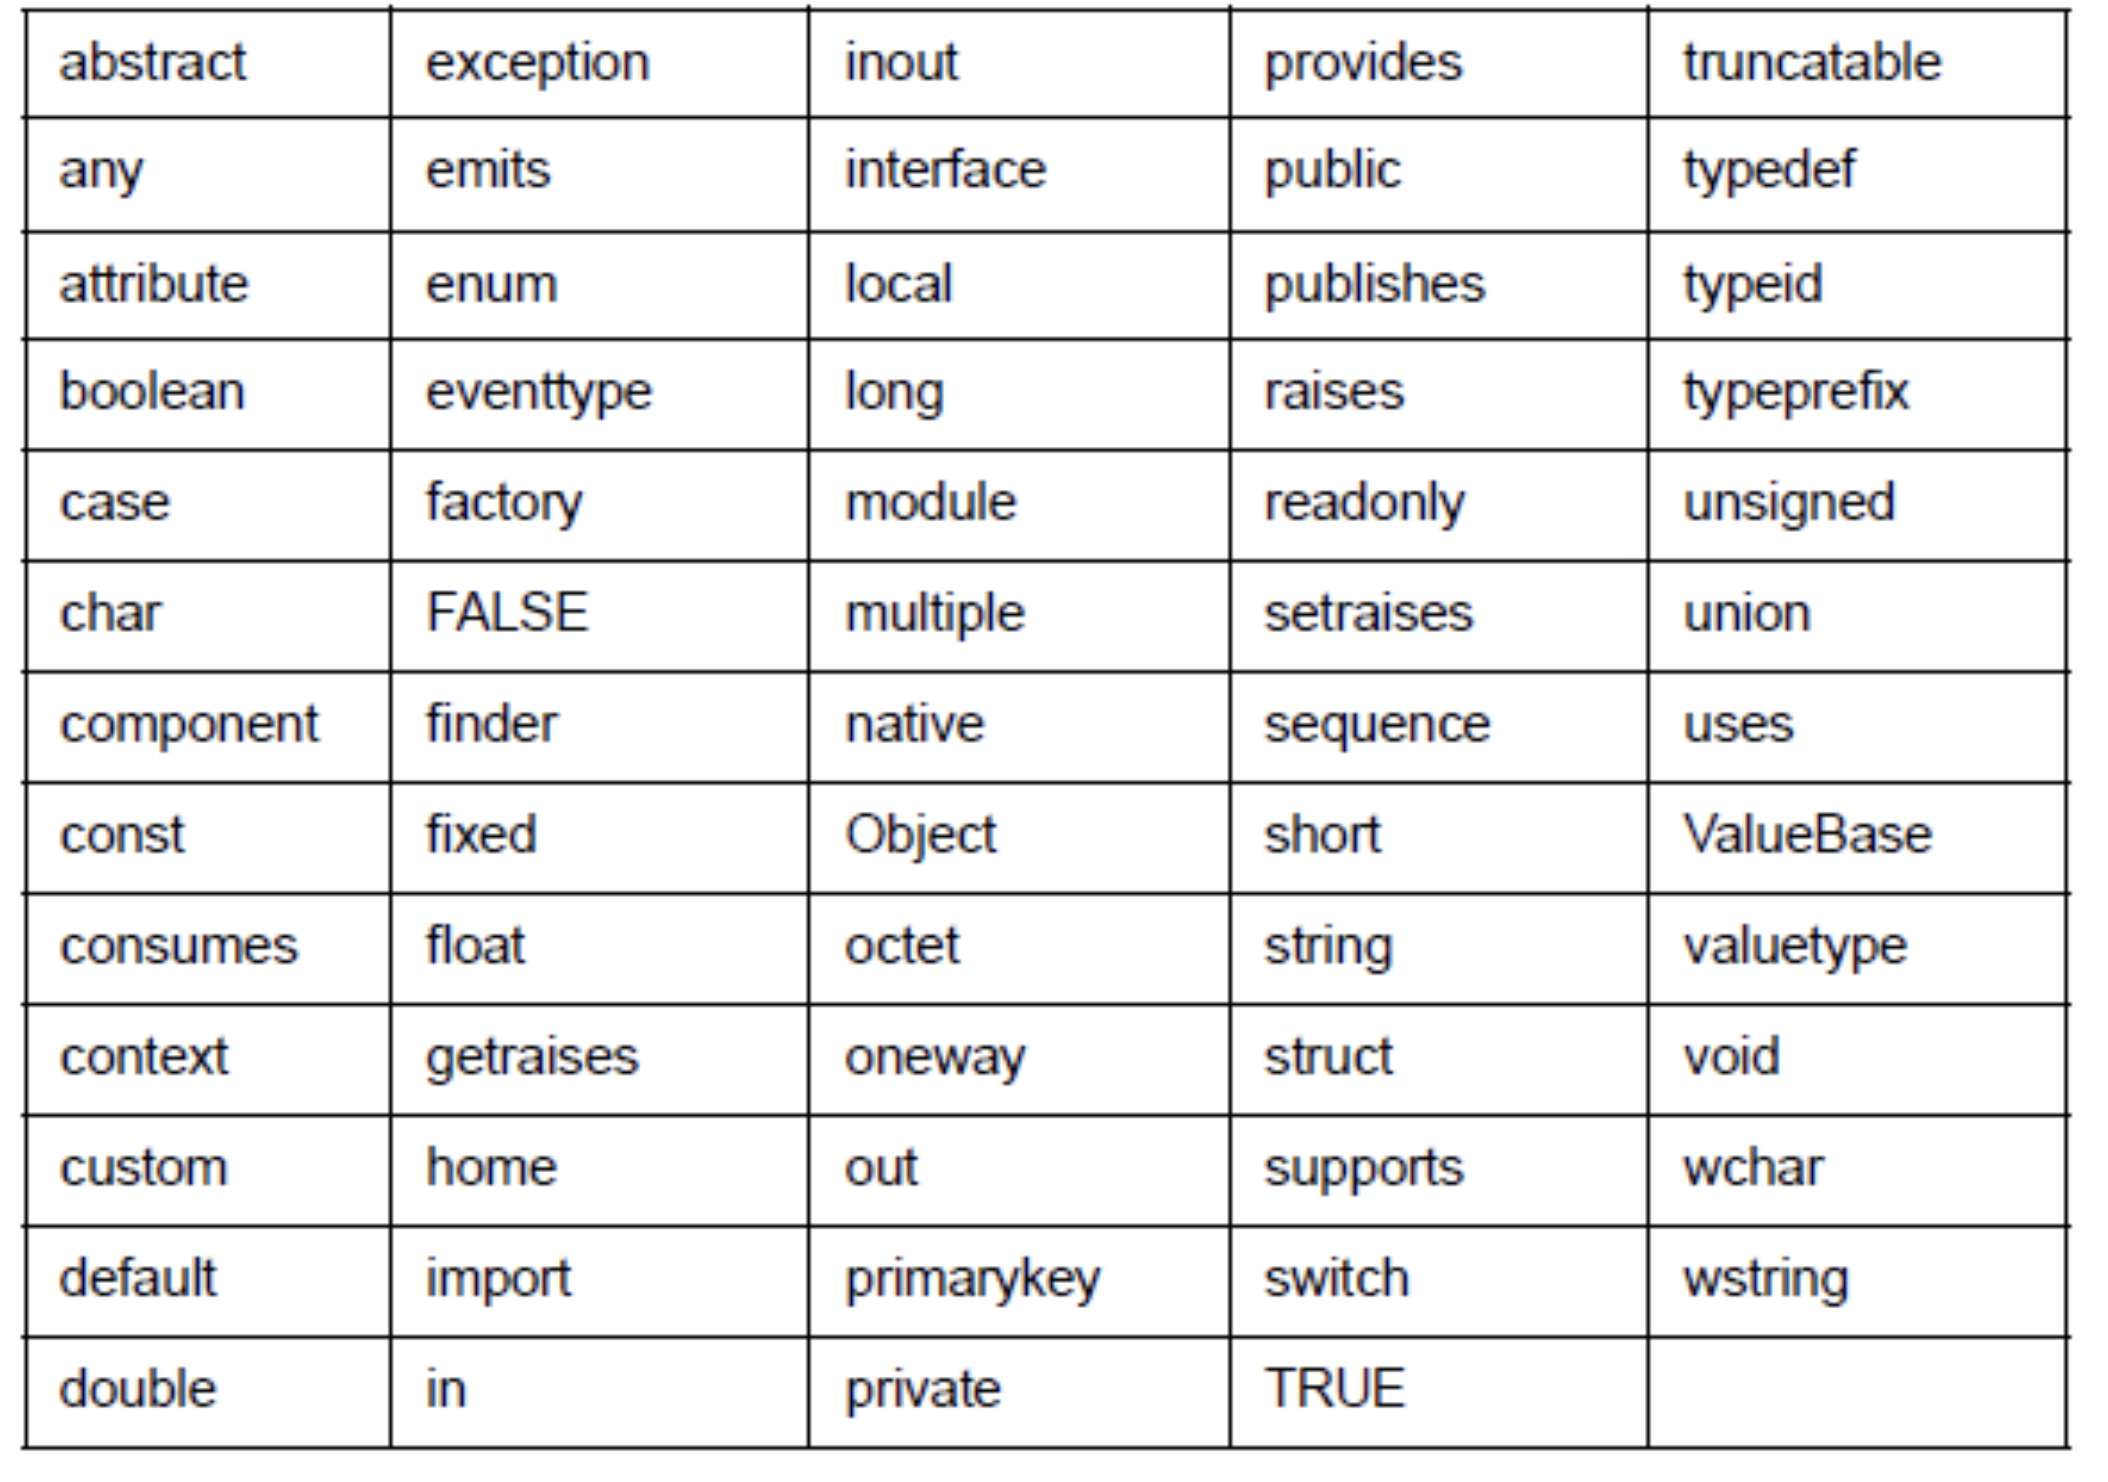
- image from : MDS 테크
ROS 2에서는 interface라는 이름으로 topic message, service srv, action action이 사용되었지요. 이들이 모두 IDL 타입을 갖기 때문에 rclpy, rclcpp, rcljava 모두에서 사용할 수 있는 것입니다.
custom interface를 빌드하게 되면, 해당 패키지 내부에 생성된 IDL들을 확인할 수 있습니다. build 폴더 내부 패키지 폴더에 진입하면 사진과 같이 다양한 언어를 지원하기 위한 설정 파일들이 위치하는 것을 확인 가능합니다.
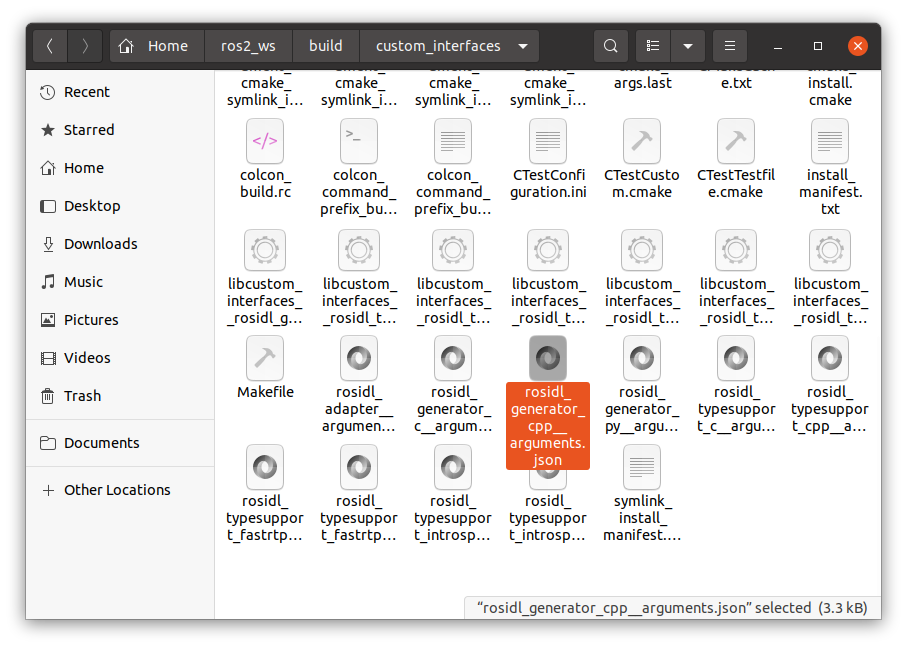
- rosidl_generator_py__arguments.json
{
  "package_name": "custom_interfaces",
  "output_dir": "/home/kimsooyoung/ros2_ws/build/custom_interfaces/rosidl_generator_py/custom_interfaces",
  "template_dir": "/opt/ros/foxy/share/rosidl_generator_py/cmake/../resource",
  "idl_tuples": [
    "/home/kimsooyoung/ros2_ws/build/custom_interfaces/rosidl_adapter/custom_interfaces:action/Parking.idl",
    "/home/kimsooyoung/ros2_ws/build/custom_interfaces/rosidl_adapter/custom_interfaces:srv/CircleTurtle.idl",
    "/home/kimsooyoung/ros2_ws/build/custom_interfaces/rosidl_adapter/custom_interfaces:srv/TurtleJail.idl"
  ],
  "ros_interface_dependencies": [
    "action_msgs:/opt/ros/foxy/share/action_msgs/msg/GoalInfo.idl",
    "action_msgs:/opt/ros/foxy/share/action_msgs/msg/GoalStatus.idl",
    "action_msgs:/opt/ros/foxy/share/action_msgs/msg/GoalStatusArray.idl",
    "action_msgs:/opt/ros/foxy/share/action_msgs/srv/CancelGoal.idl",
    "builtin_interfaces:/opt/ros/foxy/share/builtin_interfaces/msg/Duration.idl",
    "builtin_interfaces:/opt/ros/foxy/share/builtin_interfaces/msg/Time.idl",
    "unique_identifier_msgs:/opt/ros/foxy/share/unique_identifier_msgs/msg/UUID.idl"
  ],
...
생성된 IDL 파일 내부를 함께 살펴봅시다. custom_interfaces ⇒ rosidl_adapter ⇒ custom_interfaces ⇒ action 폴더 내부에 위치한 Parking.idl은 아래와 같은 IDL 형태를 띄고 있습니다.
- Parking.idl
// generated from rosidl_adapter/resource/action.idl.em
// with input from custom_interfaces/action/Parking.action
// generated code does not contain a copyright notice

module custom_interfaces {
  module action {
    @verbatim (language="comment", text=
      "goal definition")
    struct Parking_Goal {
      boolean start_flag;
    };
    struct Parking_Result {
      @verbatim (language="comment", text=
        "result definition")
      string message;
    };
    struct Parking_Feedback {
      @verbatim (language="comment", text=
        "feedback definition")
      float distance;
    };
  };
};
DDS RTPS 패킷 확인해보기 (wireshark)
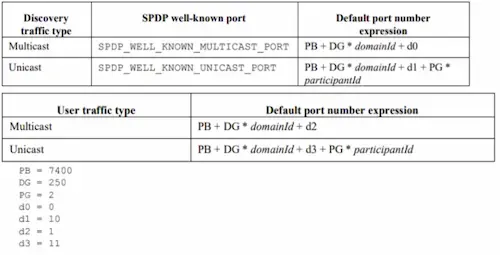
DDS RTPS의 well-know UDP/IP
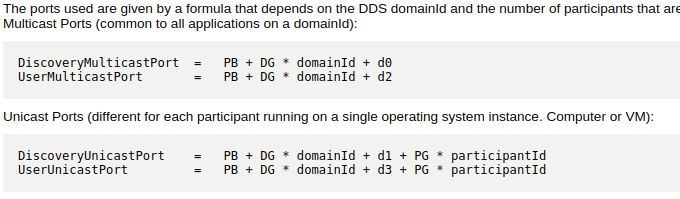
discovery과정에서 participant는 미리 정의된 rule에 따라 address와 port를 사용합니다. SPDP에서는 multicast의 address로 239.255.0.1 을 사용하고 아래와 같은 port 설정 rule을 따릅니다.
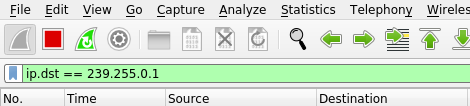
=> 따라서, wireshark 실행 시 destination option을 239.255.0.1로 설정합니다.
ip.dst == 239.255.0.1
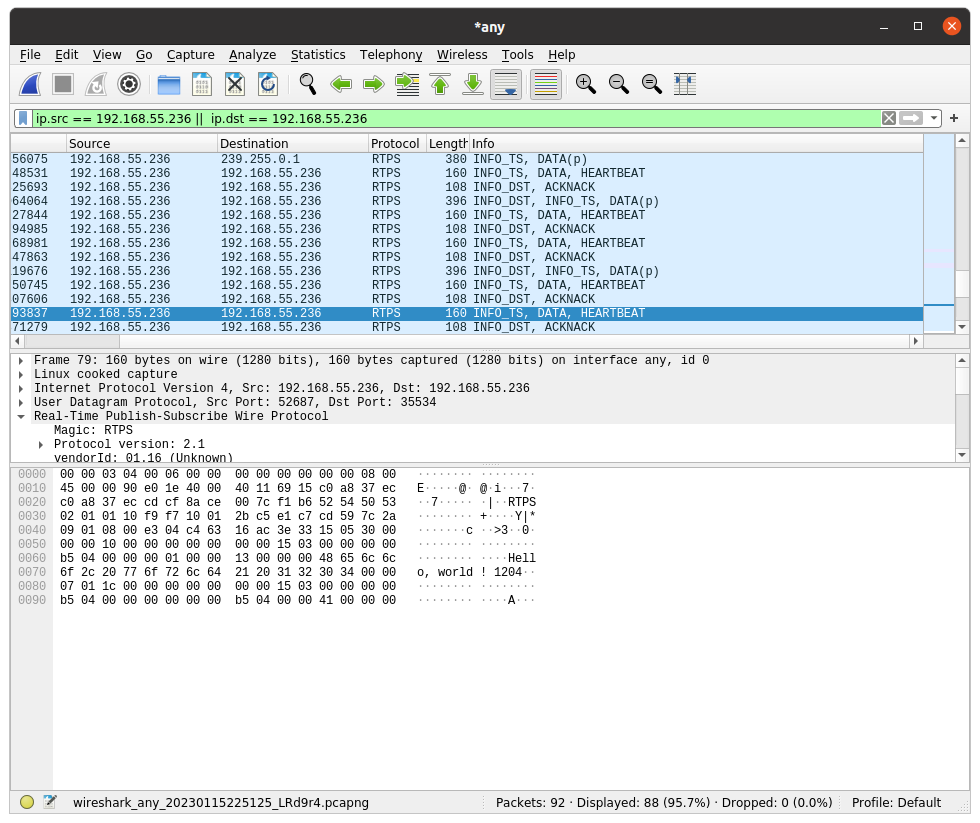
Publisher와 Subscriber는 서로의 Participant와 Endpoint를 찾고, 주기적으로 HEARBEAT와 ACKNACK를 주고받습니다. 이번에는 ROS 2 Publisher와 Subscriber를 실행시켜 보고 이들 사이 데이터를 주고받는 과정에서 RTPS 프로토콜이 어떻게 동작하는지, 패킷의 분석을 진행해보겠습니다.
- 터미널을 실행하여 topic publisher를 실행합니다.
$ ros2 run examples_rclcpp_minimal_publisher publisher_member_function
[INFO] [1673789194.561595897] [minimal_publisher]: Publishing: 'Hello, world! 0'
[INFO] [1673789195.061600207] [minimal_publisher]: Publishing: 'Hello, world! 1'
[INFO] [1673789195.561601140] [minimal_publisher]: Publishing: 'Hello, world! 2'
[INFO] [1673789196.061605037] [minimal_publisher]: Publishing: 'Hello, world! 3'
[INFO] [1673789196.561602313] [minimal_publisher]: Publishing: 'Hello, world! 4'
...
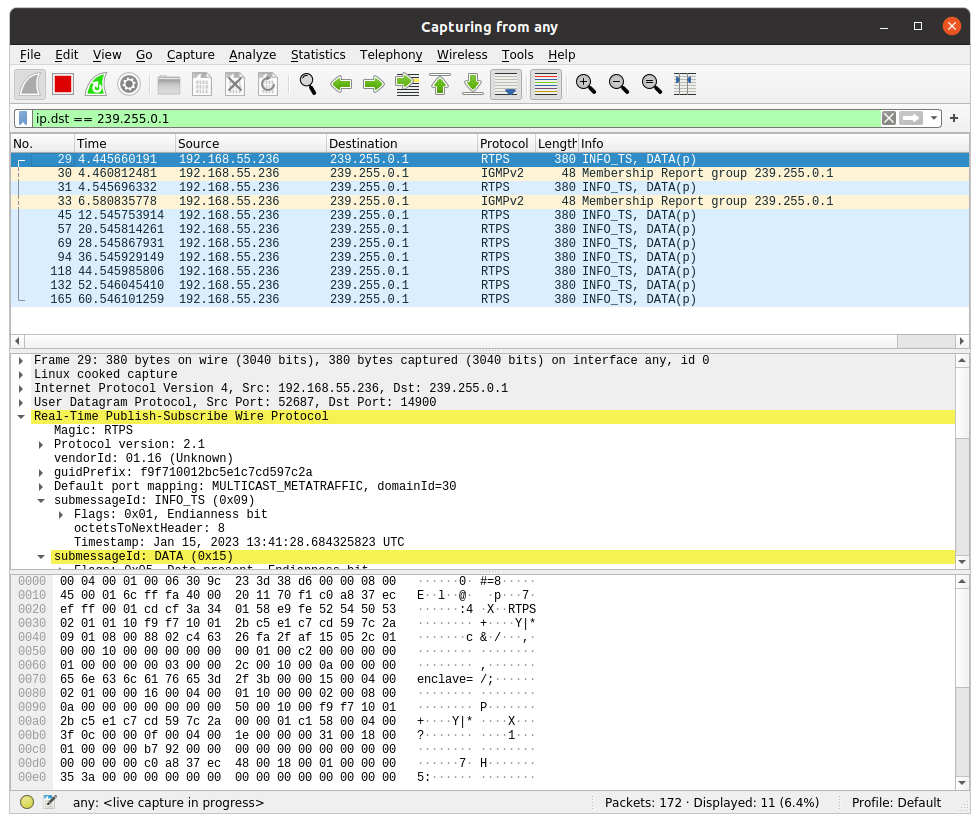
- publisher node가 일정 시간마다 multicast로 RTPS DATA(p)를 송신하는 모습을 확인할 수 있습니다.
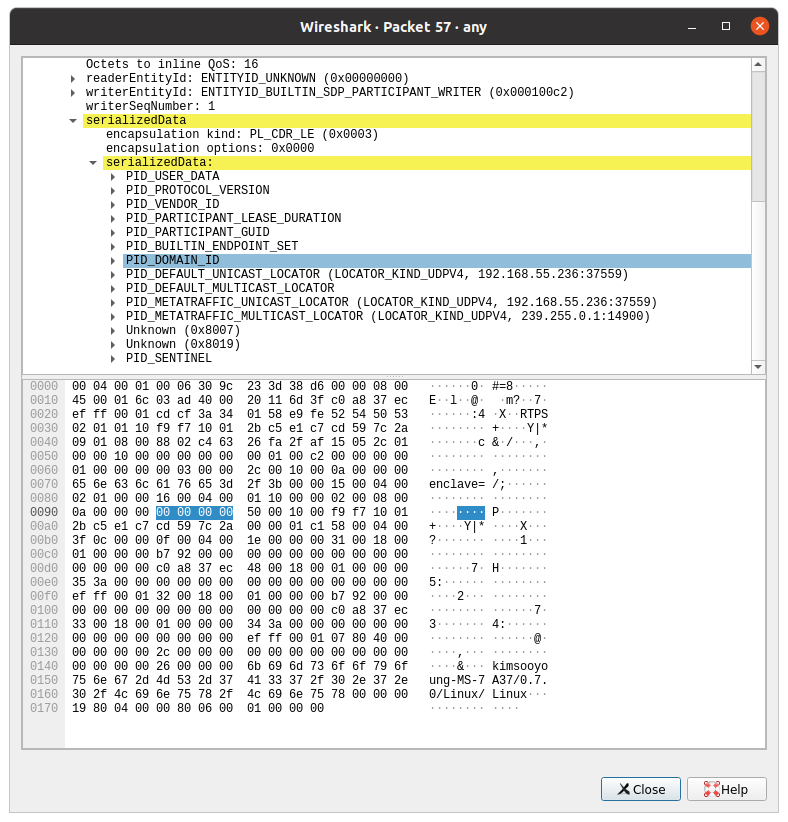
Publish하는 DATA(p)에는 DEFAULT_UNITCAST_LOCATOR, DEFAULT_MULTICAST_LOCATOR, METATRAFFIC_UNICAST_LOCATER, METATRAFFIC_MUTICAST_LOCATOR정보 등 particiapnt에 대한 정보가 담겨 있습니다.
더불어 현재 사용하고 있는 Domain ID는 30번이기 때문에, 14900포트를 Discovery Multicast Port로 사용하게 됩니다.
- topic sublisher를 실행하고 다시 패킷을 수집합니다.
$ ros2 run examples_rclcpp_minimal_subscriber subscriber_member_function
[INFO] [1673790688.700183037] [minimal_subscriber]: I heard: 'Hello, world! 1199'
[INFO] [1673790689.200236939] [minimal_subscriber]: I heard: 'Hello, world! 1200'
[INFO] [1673790689.700209001] [minimal_subscriber]: I heard: 'Hello, world! 1201'
[INFO] [1673790690.200257339] [minimal_subscriber]: I heard: 'Hello, world! 1202'
[INFO] [1673790690.700230772] [minimal_subscriber]: I heard: 'Hello, world! 1203'
...
- 패킷 초반부 publisher node와 subscriber node는 사이의 정보 교환(PDP)을 확인할 수 있습니다. subscribe node의 등록과, reader/writer Entity 사이 PDP가 교환되며, Data(w)는 publisher의 정보, Data(r)은 subscriber의 정보를 담고 있습니다.
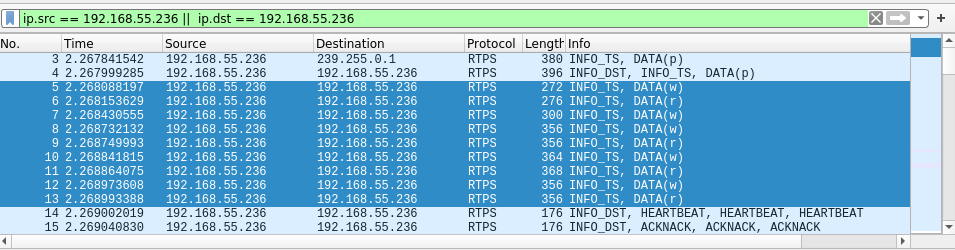
- PDP 이후 EDP는 데이터 타입 등 Topic에 대한 정보, QoS Profile등 많은 정보를 담고 있기 때문에 수차례 패킷 전송이 오고갑니다.
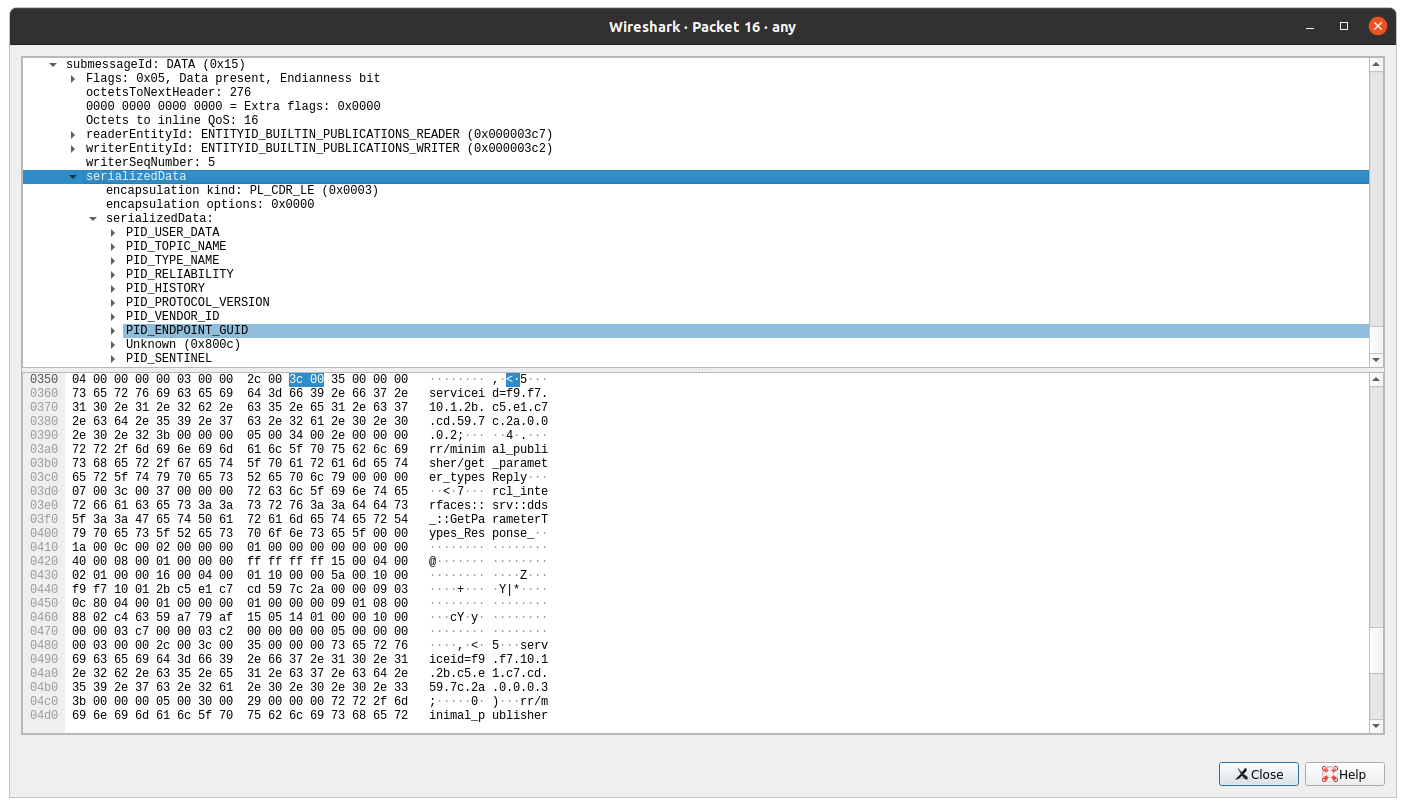
topic info verbose option을 사용하여 topic에 대한 정보와 패킷 정보를 비교해봅시다.
$ ros2 topic info /topic --verbose
Type: std_msgs/msg/String

Publisher count: 1

Node name: minimal_publisher
Node namespace: /
Topic type: std_msgs/msg/String
Endpoint type: PUBLISHER
GID: f9.f7.10.01.2b.c5.e1.c7.cd.59.7c.2a.00.00.15.03.00.00.00.00.00.00.00.00
QoS profile:
  Reliability: RMW_QOS_POLICY_RELIABILITY_RELIABLE
  Durability: RMW_QOS_POLICY_DURABILITY_VOLATILE
  Lifespan: 9223372036854775807 nanoseconds
  Deadline: 9223372036854775807 nanoseconds
  Liveliness: RMW_QOS_POLICY_LIVELINESS_AUTOMATIC
  Liveliness lease duration: 9223372036854775807 nanoseconds
...
- PDP와 EDP가 모두 끝나면, Publisher는 자신과 매칭 된 Subscriber에게 Topic을 Publish를 진행합니다. 주기적으로 아래 두 종류의 패킷이 반복되는 것을 확인 가능합니다.
- publisher의 DATA와 HEARTBEAT 패킷
- subscriber의 HEARTBEAT 수신 및 ACKNACK 송신 패킷
ROS 2 Domain ID
DDS 시간 살펴본 바와 같이 각 DDS Participant들은 특정 Domain에 속하게 됩니다. 기본적으로 ROS 2에서는 Domain ID 0을 사용하고 있으며, 같은 Domain ID를 사용하는 Participant들 사이에서만 Discovery와 통신이 가능합니다.
이번 시간에는 ROS 2의 Domain ID를 수정해보고, Domain ID를 설정할 시 주의해야 할 점들에 대해서도 알아보겠습니다.
- 우선, 예시를 통해 서로 다른 Domain ID를 갖는 Participant들을 실행해봅시다.
# Ternimal 1
ros2 topic pub -r 1 /string_topic std_msgs/String "{data: \"Hello from my 2ND domain\"}"
# Terminal 2
ROS_DOMAIN_ID=1 ros2 topic list
# Terminal 3
ros2 topic list
- 예시 결과에서 알 수 있듯이 통신을 위해서는 같은 Domain ID를 갖는 조건이 필수적입니다.
$ ros2 topic list
/parameter_events
/rosout
/string_topic
- Domain ID는 환경변수를 통해 변경할 수 있습니다. 터미널의 실행 시 Domain ID를 자동 적용하기 위해 ~/.bashrc를 수정하거나 config.yaml을 수정하시면 됩니다.
export ROS_DOMAIN_ID=<your_domain_id>

or

# edit ~/ros_menu/config.yaml
Config:
  menu_enable: true
  ros_option: menu
  default_ros_domain_id: 30
Menu:
  ...
  ROS 2 foxy:
    option_num: 2
    ROS_version: 2
    distro_name: foxy
    ros2_path: /opt/ros/foxy
    domain_id: # set if you don't want to use default domain id
    cmds:
- DDS는 Domain ID를 사용하여 Participant들이 사용할 UDP Port를 지정합니다. Port가 계산되는 방법은 아래와 같으며, 링크를 참고합니다. - 추가 링크
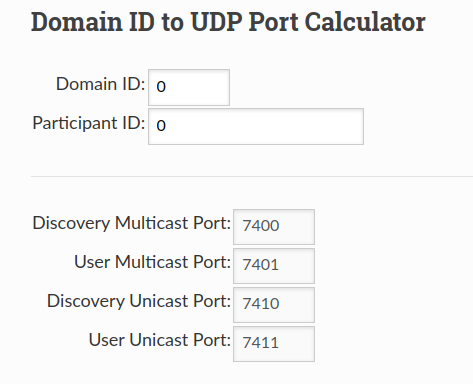
- ROS 2 공식 문서에서는 Domain ID와 Participant 순서에 따라 사용되는 포트 번호를 계산해주는 계산기를 제공하고 있습니다. 이를 통해 최대 가질 수 있는 Domain ID와 Participant 수를 확인해 보겠습니다. - 공식 문서 링크
Domain ID 설정 시 고려해야 할 요소들은 다음과 같습니다.
- 각 OS 별로 침범하면 안되는 포트 영역이 있습니다. (Linux - 32768-60999 / Windows & macOS - 49152-65535)
- 각 Participant당 2개의 Unicast Port를 사용합니다. 따라서, 하나의 Domain ID에서 사용할 수 있는 최대 Participant의 수는 120개 입니다. (ROS 2는 하나의 프로세스에서 여러 Node를 실행할 수 있기 때문에 Node를 120개까지 사용할 수 있는 것은 아닙니다.)
이러한 이유로 ROS 2 공식 문서에서는 0-101 사이의 Domain ID를 사용하기를 권장하고 있습니다.
ROS RMW와 다양한 DDS 벤더들
DDS 자체는 산업 표준이다보니 다양한 벤더들에서 제공되고 있습니다. ROS 2 설치 시 자동으로 Fast DDS가 사용되지만, 아래 표와 같이 다양한 DDS 벤더들이 존재하고 있습니다.
이렇게 다양한 DDS 벤더들에 맞추기 위해 ROS 2는 RMW(“ROS MiddleWare interface”)라는 패키지들을 제공합니다. 다른 벤더의 DDS를 사용하게 되면, 이 RMW를 바꿔줘야 하는 것입니다.
| Product name | License | RMW implementation | Status |
|---|---|---|---|
| eProsima Fast DDS | Apache 2 | rmw_fastrtps_cpp | Full support. Default RMW. Packaged with binary releases. |
| Eclipse Cyclone DDS | Eclipse Public License v2.0 | rmw_cyclonedds_cpp | Full support. Packaged with binary releases. |
| RTI Connext | commercial, research | rmw_connext_cpp | Full support. Support included in binaries, but Connext installed separately. |
| GurumNetworks GurumDDS | commercial | rmw_gurumdds_cpp | Community support. Support included in binaries, but GurumDDS installed separately. |
오픈소스인 Fast DDS, Cyclone DDS는 무료이지만, 더 좋은 성능을 위해서는 rti와 같은 유료 서비스를 사용하시기 바랍니다.
- apt를 통해 손쉽게 rmw를 설치할 수 있습니다.
$ sudo apt install ros-foxy-rmw
ros-foxy-rmw                              ros-foxy-rmw-fastrtps-dynamic-cpp
ros-foxy-rmw-connext-cpp                  ros-foxy-rmw-fastrtps-dynamic-cpp-dbgsym
ros-foxy-rmw-connext-cpp-dbgsym           ros-foxy-rmw-fastrtps-shared-cpp
ros-foxy-rmw-connext-shared-cpp           ros-foxy-rmw-fastrtps-shared-cpp-dbgsym
ros-foxy-rmw-connext-shared-cpp-dbgsym    ros-foxy-rmw-gurumdds-cpp
ros-foxy-rmw-cyclonedds-cpp               ros-foxy-rmw-gurumdds-cpp-dbgsym
ros-foxy-rmw-cyclonedds-cpp-dbgsym        ros-foxy-rmw-gurumdds-shared-cpp
ros-foxy-rmw-dbgsym                       ros-foxy-rmw-gurumdds-shared-cpp-dbgsym
ros-foxy-rmw-dds-common                   ros-foxy-rmw-implementation
ros-foxy-rmw-dds-common-dbgsym            ros-foxy-rmw-implementation-cmake
ros-foxy-rmw-fastrtps-cpp                 ros-foxy-rmw-implementation-dbgsym
ros-foxy-rmw-fastrtps-cpp-dbgsym
ROS 2 시스템 상에서 사용하는 DDS 벤더를 바꾸는 것은 환경변수를 설정하는 것으로 손쉽게 진행할 수 있습니다. (해당 DDS와 RMW가 설치되어 있다는 가정 하에) 더불어, 서로 다른 벤더의 DDS를 사용하고 있더라도 DDS 표준(SPDP와 SEDP)을 따르고 있다면 상호 통신이 가능합니다.
- Example - Fast DDS <> Cyclone DDS 상호간 Topic 통신
$ export RMW_IMPLEMENTATION=rmw_cyclonedds_cpp
$ ros2 run demo_nodes_cpp listener
[INFO]: I heard: [Hello World: 1]
[INFO]: I heard: [Hello World: 2]
[INFO]: I heard: [Hello World: 3]

$ export RMW_IMPLEMENTATION=rmw_fastrtps_cpp
$ ros2 run demo_nodes_cpp talker
[INFO]: Publishing: 'Hello World: 1'
[INFO]: Publishing: 'Hello World: 2'
[INFO]: Publishing: 'Hello World: 3'
예시의 실행에서 지연이 발생함으로 알 수 있듯이, 실제 제품을 제작할 때는 사용하는 RMW를 통일시켜주는 것을 추천합니다.
- 강의 개발환경에서 제공하는 설치 튜토리얼을 따라오셨다면 config.yaml 파일을 수정함으로 손쉽게 DDS Vendor를 변경하실 수 있습니다.
$ gedit ~/ros_menu/config.yaml

ROS 2 foxy:
    option_num: 2
    ROS_version: 2
    distro_name: foxy
    ros2_path: /opt/ros/foxy
    domain_id: # set if you don't want to use default domain id
    cmds:
    # - source ${HOME}/ros2_ws/install/local_setup.${shell}
      - source_plugin dds_bashrc 1
    # - source_plugin openvino_bashrc
제공되는 기본 DDS Vendor들은 아래와 같습니다.
| Number | DDS Vendor |
|---|---|
| 0 | Show Menu |
| 1 | Eclipse Cyclone DDS |
| 2 | OpenSplice |
| 3 | FastRTPS |
- dds_bashrc를 0으로 수정한 다음 새로운 터미널을 실행시키면, 아래와 같이 DDS를 선택하는 옵션이 등장합니다.
0) Do nothing
1) ROS 1 noetic
2) ROS 2 foxy
3) ROS2/ROS1_bridge
Please choose an option: 2
------------------------------------------------------
* ROS_DOMAIN_ID = 0
------------------------------------------------------
source /home/kimsooyoung/.ros_menu/plugins_bashrc/dds_bashrc 0
**** Choose DDS you want to use ****
1) Eclipse Cyclone DDS
2) OpenSplice CE
3) FastRTPS
Please choose an option 1-3:
참고자료