Lecture15. Advanced ROS 2, Package Management
ROS 2 Launch 심화
Launch arguments
ROS 2 launch file은 파이썬 사용함에 따라 다양한 기능을 직접 구현할 수 있습니다. 다수 모델 사용 시 반복 내용을 함수로 만들 수도 있고, 외부 파일이나 패키지를 import 할 수도 있지요. launch 패키지에서는 자주 사용되는 기능들을 미리 제공하고 있습니다. 이러한 기능을 통해 launch file을 좀 더 풍성하게 만들어 봅시다.
- 예제 실행 - use_rviz launch 옵션을 사용해봅시다.
ros2 launch src_gazebo empty_world.launch.py use_rviz:=true
ros2 launch src_gazebo empty_world.launch.py use_rviz:=false
⇒ use_rviz 값에 따라 rviz2 실행 여부가 결정됩니다.
- 이러한 launch argument는 LaunchConfiguration, DeclareLaunchArgument을 사용하여 구현할 수 있습니다.
from launch.actions import DeclareLaunchArgument
from launch.substitutions import LaunchConfiguration

def generate_launch_description():

    namespace = LaunchConfiguration('namespace')

    declare_namespace_cmd = DeclareLaunchArgument(
        'namespace',
        default_value='my_robot',
        description='Top-level namespace'
    )

    return LaunchDescription(
        [
            declare_namespace_cmd,
        ]
    )
| Description | |
|---|---|
| LaunchConfiguration | 생성할 argument의 이름을 넣어주면 argument 객체가 반환됩니다. |
| DeclareLaunchArgument | default_value를 통해 argument의 기본값을, description을 통해 설명을 적어둡니다. |
| declare_namespace_cmd | LaunchDescription에게 생성된 argument 객체를 전달해야 비로소 사용이 가능합니다. |
- declare_namespace_cmd의 값을 보고 싶은 경우가 있습니다. 하지만 이 객체 자체는 str 매직 메소드가 구현되어 있는 것이 아니어 print시 아래와 같은 결과를 얻습니다.
print(declare_namespace_cmd)

>>> result
<launch.actions.declare_launch_argument.DeclareLaunchArgument object at 0x7fc89a164730>
- 하지만 launch argument의 값을 볼 수 있는 LogInfo라는 기능이 제공되고 있습니다.
message_info = LogInfo(msg=LaunchConfiguration('namespace'))

return LaunchDescription(
        [
            declare_namespace_cmd,
            message_info,
        ]
    )
LaunchDescription에 객체들을 넣어줄 때 순서에 주의합니다.
- LogInfo 결과를 직접 확인해봅시다.
$ ros2 launch advanced_tutorial launch_arg_info.launch.py
[INFO] [launch]: Default logging verbosity is set to INFO
[INFO] [launch.user]: my_robot
- 실제 오픈소스 프로젝트를 살펴보아도 이러한 Launch argument를 수도 없이 확인할 수 있습니다. 아래 예시는 자율 주행을 위한 메타페키지인 nav2의 launch example입니다.
def generate_launch_description():
    # Get the launch directory
    bringup_dir = get_package_share_directory('nav2_bringup')
    launch_dir = os.path.join(bringup_dir, 'launch')

    # Create the launch configuration variables
    namespace = LaunchConfiguration('namespace')
    use_namespace = LaunchConfiguration('use_namespace')
    slam = LaunchConfiguration('slam')
    map_yaml_file = LaunchConfiguration('map')
    use_sim_time = LaunchConfiguration('use_sim_time')
    params_file = LaunchConfiguration('params_file')
    autostart = LaunchConfiguration('autostart')
    use_composition = LaunchConfiguration('use_composition')
    use_respawn = LaunchConfiguration('use_respawn')
    log_level = LaunchConfiguration('log_level')
Timer Action
대규모 gazebo 파일을 불러오거나, urdf에 수많은 mesh가 결합되어 있는 경우, 프로세스 로딩에 상당한 시간이 소요될 수 있습니다. Timer Action은 일정 시간동안 대기 이벤트를 걸 수 있어 이러한 상황을 다루기 용이합니다.
from launch.actions import TimerAction
...
    # Launch RViz
    rviz2 = Node(
        package="rviz2",
        executable="rviz2",
        name="rviz2",
        output="screen",
        arguments=["-d", rviz_config_file],
    )
...
return LaunchDescription([
    TimerAction(
        period=3.0,
        actions=[rviz2]
    ),
⇒ urdf 로딩이 끝난 뒤 rviz2를 실행하도록 해둔 예시입니다.
OnProcessExit
node 실행 시 순서를 지켜야 하는 경우 ex - model spawn 후 센서 데이터 처리 등 RegisterEventHandler와 OnProcessExit를 통해 실행 순서 로직을 구현할 수 있습니다.
from launch.actions import RegisterEventHandler
from launch.event_handlers import OnProcessExit
- 저의 경우 ros2_control을 사용할 때 주로 사용하고 있습니다.
    return LaunchDescription([
        declare_use_rviz,

        RegisterEventHandler(
            event_handler=OnProcessExit(
                target_action=spawn_entity,
                on_exit=[load_joint_state_broadcaster],
            )
        ),
        RegisterEventHandler(
            event_handler=OnProcessExit(
                target_action=load_joint_state_broadcaster,
                on_exit=[load_forward_position_controller],
            )
        ),
| Description | |
|---|---|
| target_action | 먼저 완료되어야 하는 Node |
| on_exit | target_action 종료 후 실행되어야 하는 Node |
IncludeLaunchDescription
- launch file은 매우 유연한 구현이 가능하도록 지원되며, 하나의 launch file에서 다른 launch file을 추가하는 것도 가능합니다.
from launch.actions import IncludeLaunchDescription
- 예를 들면, gazebo 상의 로봇을 위한 부분과 실제 로봇을 다루는 부분을 별도의 launch file로 분리한 뒤, main launch file에서는 이 둘을 스위칭하는 방식으로 구현할 수 있을 것입니다.
def generate_launch_description():

    launch_test_pkg = get_package_share_directory('launch_test_pkg')

    robot_spawn = IncludeLaunchDescription(
        PythonLaunchDescriptionSource(
            os.path.join(launch_test_pkg, 'launch','robot_spawn.launch.py')))

    rviz_launch = IncludeLaunchDescription(
        PythonLaunchDescriptionSource(
            os.path.join(launch_test_pkg, 'launch', 'start_rviz.launch.py')))

    return LaunchDescription([
        robot_spawn,
        rviz_launch,
    ])
IfCondition, UnlessCondition
- 조건문에 따라 정해진 Node가 실행되도록 할 수도 있습니다. 이를 위해 IfCondition과 UnlessCondition을 사용합니다.
from launch.conditions import IfCondition, UnlessCondition
- 아래 예시를 보면, Node => condition 항목에 execute LaunchConfiguration이 삽입된 모습을 볼 수 있으며, execute 값에 따라 turtlesim_node의 실행 여부를 관리할 수 있게 됩니다.
def generate_launch_description():

    execute = LaunchConfiguration('execute')

    declare_execute_cmd = DeclareLaunchArgument(
        'execute',
        default_value='true',
        description='whether to use namespace or not'
    )

    turtlesim_node = Node(
        package = 'turtlesim',
        executable = 'turtlesim_node',
        name = 'turtlesim_node',
        output='screen',
        condition=IfCondition(execute),
    )

    return LaunchDescription(
        [
            declare_execute_cmd,
            turtlesim_node,
        ]
    )
- 실제 예시를 통해 실습해봅시다.
$ ros2 launch advanced_tutorial ifcondition.launch.py execute:=false
[INFO] [launch]: All log files can be found below /home/kimsooyoung/.ros/log/2023-04-25-15-14-32-373647-kimsooyoung-XPS-13-9370-6088
[INFO] [launch]: Default logging verbosity is set to INFO
GroupAction
- 관련된 Node, launch file들을 한데 묶어 공통된 속성을 부여할 시 GroupAction을 사용하며, 주로 namespace를 지정할 때 많이 사용됩니다.
    turtle_group = GroupAction([
        PushRosNamespace(
            condition=IfCondition(use_namespace),
            namespace=namespace
        ),
- turtlesim에 namespace를 적용하는 실습을 해보겠습니다.
$ ros2 launch advanced_tutorial group_action.launch.py

$ ros2 topic list
/parameter_events
/rosout
/turtle1/cmd_vel
/turtle1/color_sensor
/turtle1/pose
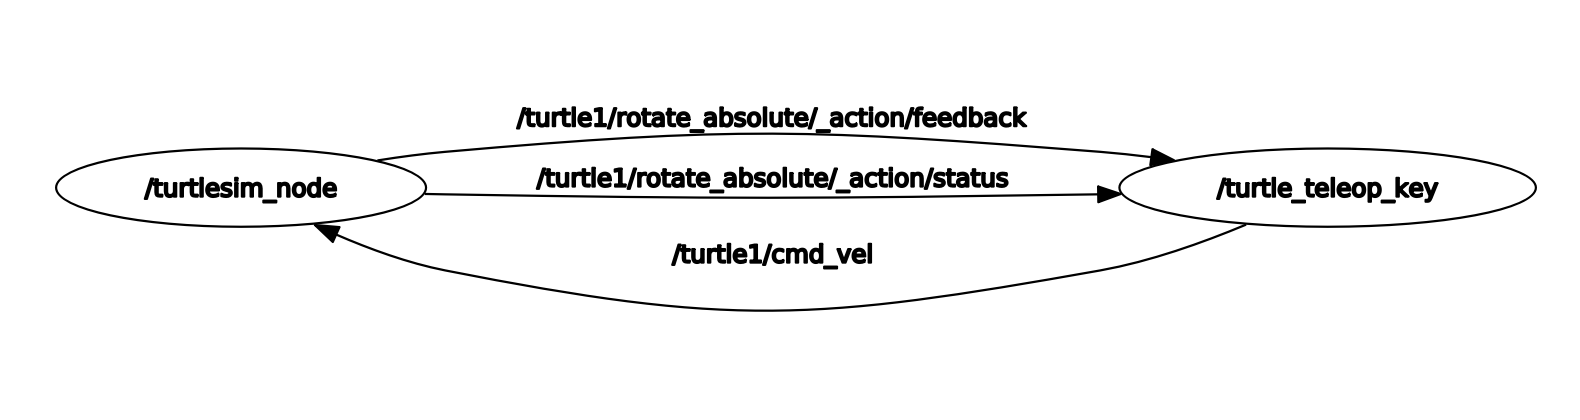
⇒ 별도 namespace 지정이 없으면 위와 같은 rqt_graph를 확인할 수 있습니다.
- launch argument를 통해 namespace를 적용시킨 뒤, topic list와 rqt_graph를 살펴봅시다.
$ ros2 launch advanced_tutorial group_action.launch.py use_namespace:=true namespace:=my_turtle

$ ros2 topic list
/my_turtle/turtle1/cmd_vel
/my_turtle/turtle1/color_sensor
/my_turtle/turtle1/pose
/parameter_events
/rosout
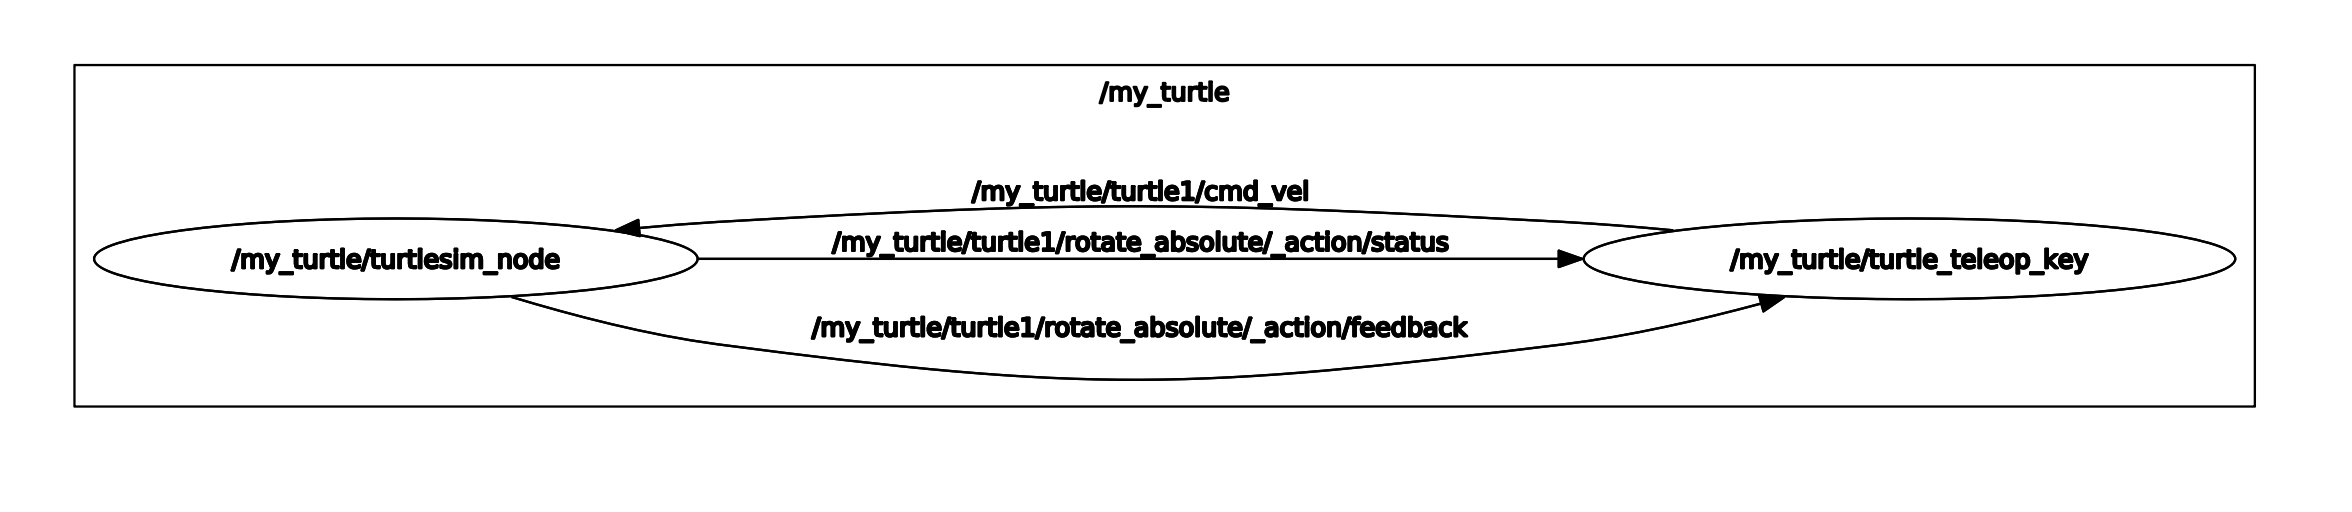
/my_turtle namespace가 적용된 모습을 확인할 수 있습니다. 👍
Executor and CallbackGroup
실제 센서, 제어기를 개발 하다보면 기존 코드와 ROS 2 코드를 연동해야 할 일이 많습니다. 기존 코드가 병렬 연산 형태로 개발되었다면 ROS 2의 Spin과 맞물려 Dead Lock이 발생할 수 있습니다. 이러한 경우를 다루기 위해 ROS 2의 Executor와 CallbackGroup에 대해 알아봅시다.
이번 튜토리얼은 모두 c++로 진행됩니다.
- 예시 package를 build하고 sourcing 합시다.
cbp cpp_multiproc_tutorial && source install/local_setup.bash
Dead Lock Example
- 예시를 실행해보면서 발생할 수 있는 문제상황을 고려해봅시다.
$ ros2 run cpp_multiproc_tutorial dead_lock
[INFO] [1682404393.717961395] [deadlock_example]: timer_cb_1
[INFO] [1682404398.718512552] [deadlock_example]: timer_cb_2
[INFO] [1682404400.719076263] [deadlock_example]: timer_cb_1
[INFO] [1682404405.719559218] [deadlock_example]: timer_cb_2
[INFO] [1682404407.719972272] [deadlock_example]: timer_cb_1
[INFO] [1682404412.720329962] [deadlock_example]: timer_cb_2
[INFO] [1682404414.720709183] [deadlock_example]: timer_cb_1
⇒ timer_cb_1이 5초 동안 sleep하는 동안 시스템을 독식해버립니다.
- 실제 코드는 다음과 같이 5초마다 timer_cb_1을, 2초마다 timer_cb_2를 실행하는 것이 목표였습니다.
void timer_cb_1(){
  RCLCPP_INFO(this->get_logger(), "timer_cb_1");

  // assume that something logic happens here
  std::this_thread::sleep_for(5s);
}

void timer_cb_2(){
  RCLCPP_INFO(this->get_logger(), "timer_cb_2");

  // assume that something logic happens here
  std::this_thread::sleep_for(2s);
}
- 여기에서, 아래와 같이 timer 주기를 5초, 2초라고 수정하면 동작은 잘 됩니다. 하지만, 이는 지금 우리가 원하는 상황을 표현하지 못합니다. 우리가 가정하는 상황은, timer callback안에서, ROS 2가 아닌 다른 무언가의 코드가 시스템을 점유하는 상황입니다.
DeadLockNode() : Node("deadlock_example"){

  timer_1 = this->create_wall_timer(
    5s, std::bind(&DeadLockNode::timer_cb_1, this)
  );

  timer_2 = this->create_wall_timer(
    2s, std::bind(&DeadLockNode::timer_cb_2, this)
  );
}
- main문은 다음과 같습니다. (rclcpp의 Default Executor인 Single Threaded Executor가 실행될 것입니다.
int main(int argc, char **argv){
  rclcpp::init(argc, argv);

  rclcpp::spin(std::make_shared<DeadLockNode>());

  rclcpp::shutdown();

  return 0;
}
MultiThreadedExecutor
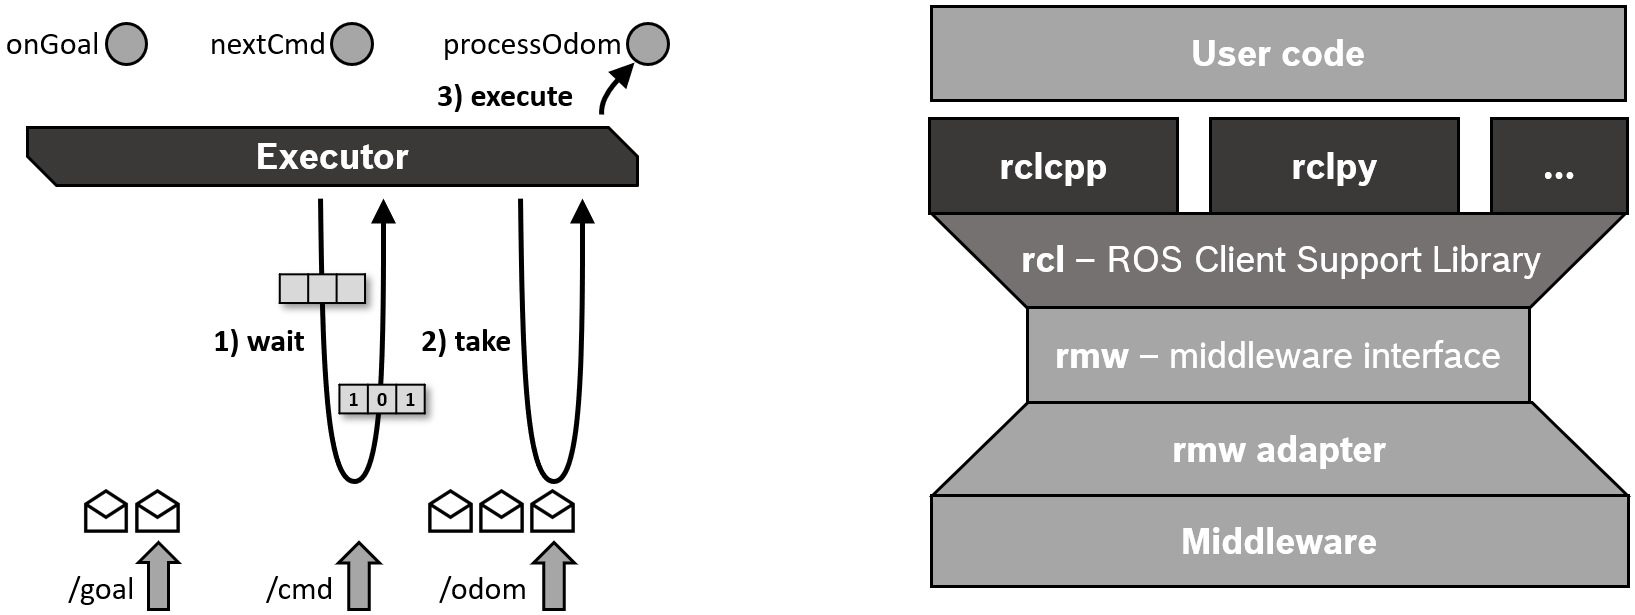
- rclcpp의 Executor는 그림과 같이 크게 3종류를 제공합니다. 지금까지는 기본인 SingleThreaded를 사용하였지만, MultThreaded도 사용해보겠습니다. 과연 문제를 해결해 줄 수 있을까요?

- main 문을 수정하고 다시 컴파일 => 실행해봅시다.
int main(int argc, char * argv[]){
  rclcpp::init(argc, argv);

  std::cout << "Max CPU Core : " << std::thread::hardware_concurrency() << std::endl;

  rclcpp::executors::MultiThreadedExecutor executor(rclcpp::executor::ExecutorArgs(), 2);
  auto test_node = std::make_shared<DeadLockNode>();

  executor.add_node(test_node);
  executor.spin();

  rclcpp::shutdown();
  return 0;
}
- 예시 실행 (8코어 랩탑에서 실행하였습니다.)
$ ros2 run cpp_multiproc_tutorial multi_executor
Max CPU Core : 8
[INFO] [1682404852.346859530] [deadlock_example]: timer_cb_1
[INFO] [1682404857.348183807] [deadlock_example]: timer_cb_1
[INFO] [1682404862.348802309] [deadlock_example]: timer_cb_1
[INFO] [1682404867.349427033] [deadlock_example]: timer_cb_1
[INFO] [1682404872.349906028] [deadlock_example]: timer_cb_1
[INFO] [1682404877.350774188] [deadlock_example]: timer_cb_1
[INFO] [1682404882.351478568] [deadlock_example]: timer_cb_1
[INFO] [1682404887.352284317] [deadlock_example]: timer_cb_1
[INFO] [1682404892.352806238] [deadlock_example]: timer_cb_1
⇒ 여전히 timer_cb_1이 시스템을 독식하고 있습니다.
이렇게 되는 이유가 무엇일까요??
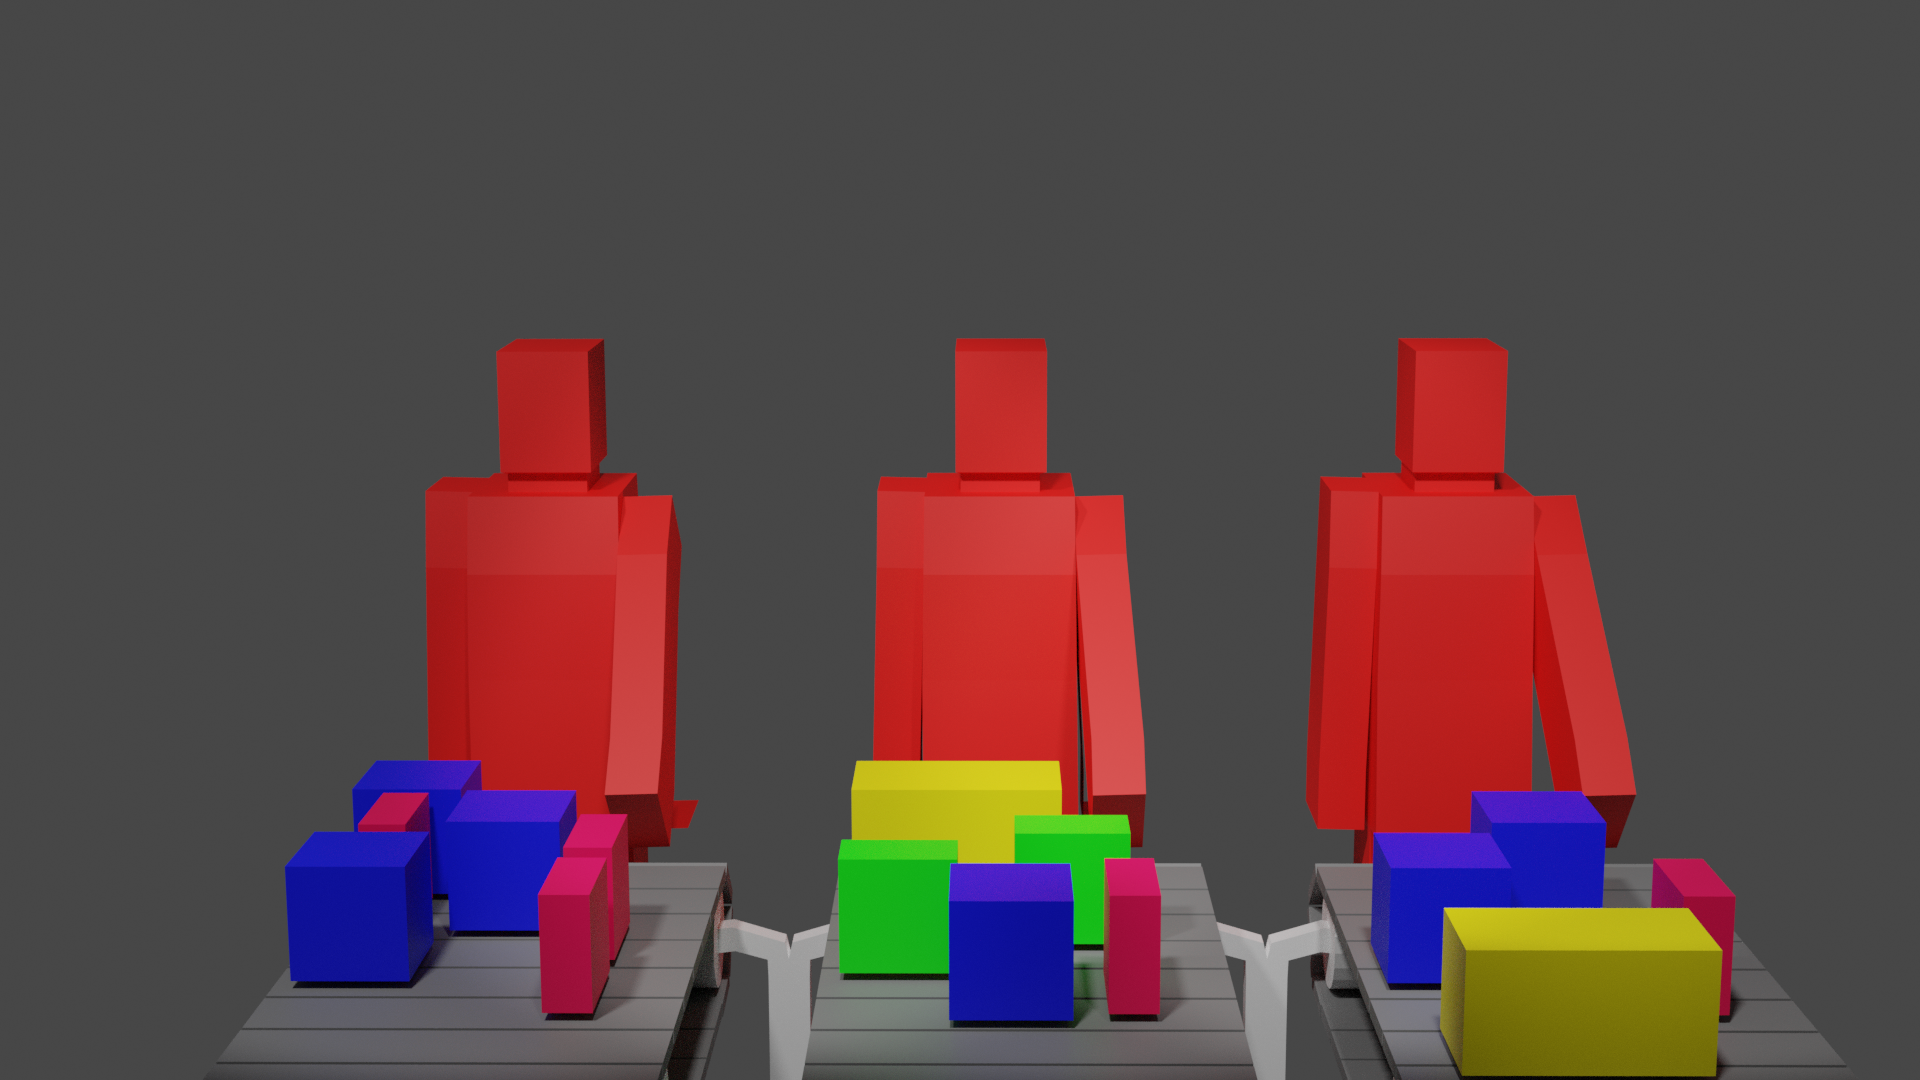
- 현재 상황을 그림으로 표현해보면 다음과 같습니다. 비록 multi-threaded executor가 실행되어 작업자가 3명이 있더라도 작업 라인이 1개밖에 없어 효율적이지 못한 것이지요.

Callback Group
- 이를 해결하는 방법은 각각의 timer 마다 독립적인 작업 라인을 구축하는 것입니다. 그리고 이를 위해 rclcpp에서는 Callback Group이라는 API를 제공하고 있습니다.
class DeadLockNode : public rclcpp::Node{
private:
  rclcpp::TimerBase::SharedPtr timer_1;
  rclcpp::TimerBase::SharedPtr timer_2;
  rclcpp::CallbackGroup::SharedPtr cb_group_1;
  rclcpp::CallbackGroup::SharedPtr cb_group_2;
- 각각의 Callback에 독립적인(MutuallyExclusive) Group을 구축하여 Executor들이 개별 Group을 다루도록 해봅시다.
cb_group_1 = this->create_callback_group(
  rclcpp::CallbackGroupType::MutuallyExclusive
);

cb_group_2 = this->create_callback_group(
  rclcpp::CallbackGroupType::MutuallyExclusive
);

timer_1 = this->create_wall_timer(
  200ms, std::bind(&DeadLockNode::timer_cb_1, this), cb_group_1
);

timer_2 = this->create_wall_timer(
  200ms, std::bind(&DeadLockNode::timer_cb_2, this), cb_group_2
);
- 사용하는 CPU 코어는 2개로 맞춰주겠습니다.
...
rclcpp::executors::MultiThreadedExecutor executor(
  rclcpp::executor::ExecutorArgs(), 2
);
auto test_node = std::make_shared<DeadLockNode>();
- 실행 결과, timer_cb_1은 5초마다, timer_cb_2는 2초마다 잘 실행되는 것이 확인됩니다! 계속 실행되면서 약간의 오차가 있지만 이는 timer call 주기 때문입니다.
$ ros2 run cpp_multiproc_tutorial callback_group
Max CPU Core : 8
[INFO] [1682405209.687586816] [deadlock_example]: timer_cb_1
[INFO] [1682405209.687668485] [deadlock_example]: timer_cb_2
[INFO] [1682405211.688211586] [deadlock_example]: timer_cb_2
[INFO] [1682405213.688626203] [deadlock_example]: timer_cb_2
[INFO] [1682405214.689019990] [deadlock_example]: timer_cb_1
[INFO] [1682405215.690033260] [deadlock_example]: timer_cb_2
[INFO] [1682405217.690549333] [deadlock_example]: timer_cb_2
[INFO] [1682405219.689435329] [deadlock_example]: timer_cb_1
[INFO] [1682405219.691070145] [deadlock_example]: timer_cb_2
...
- 지금 상황을 아까의 그림에 다시 비유해봅시다. Task들이 독자적인 Callback Group에서 실행되고, 각 Callback Group을 담당하는 Process가 있기 때문에 Delay 없이 모든 작업이 수월하게 실행됩니다.
ReentrantCallbackGroup
rclcpp에서 제공하는 또다른 Callback Group Option, Reentrant가 있습니다. 이를 사용해봅시다.
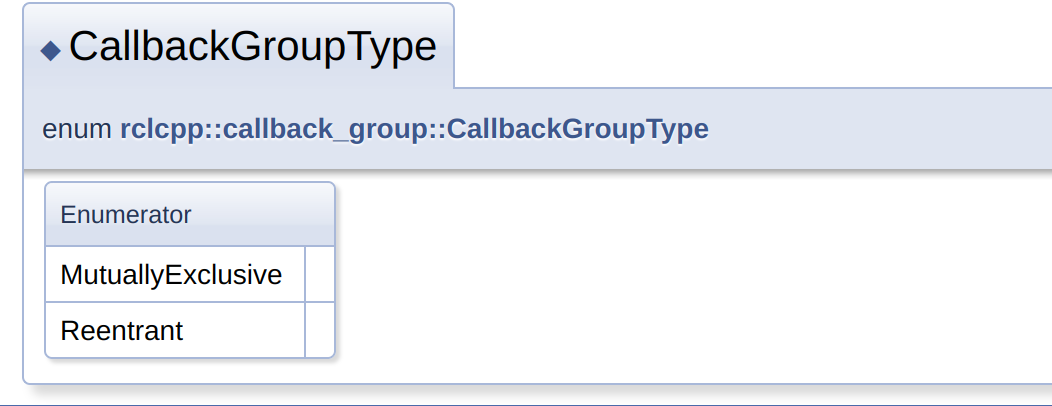
reference : https://docs.ros2.org/eloquent/api/rclcpp/namespacerclcpp_1_1callback__group.html
- Reentrant CallbackGroupType은 이름과 같이 Process와 Callback을 조율하여 가장 효율적인 실행을 제공합니다. 때문에 여러 callback이 같은 Group Option을 공유해도 문제 없습니다.
public:
  DeadLockNode() : Node("deadlock_example"){

    cb_group_1 = this->create_callback_group(
      rclcpp::CallbackGroupType::Reentrant
    );

    cb_group_2 = cb_group_1;
- 예시를 실행해봅시다. 별도 Group이 아니더라도 모든 Callback이 잘 실행됩니다.
$ ros2 run cpp_multiproc_tutorial reentrant_callback_group
Max CPU Core : 8
[INFO] [1682405497.174734254] [deadlock_example]: timer_cb_1
[INFO] [1682405497.174845897] [deadlock_example]: timer_cb_2
[INFO] [1682405499.175241117] [deadlock_example]: timer_cb_2
[INFO] [1682405501.175422765] [deadlock_example]: timer_cb_2
[INFO] [1682405502.175086294] [deadlock_example]: timer_cb_1
[INFO] [1682405503.175637456] [deadlock_example]: timer_cb_2
[INFO] [1682405505.175894939] [deadlock_example]: timer_cb_2
...
- 하지만, Reentrant CallbackGroupType도 사용하는 프로세서 자체가 적으면 Dead lock에 빠집니다.
class ReentrantNode : public rclcpp::Node{
private:
  rclcpp::TimerBase::SharedPtr timer_1;
  rclcpp::TimerBase::SharedPtr timer_2;
  rclcpp::TimerBase::SharedPtr timer_3;
  rclcpp::CallbackGroup::SharedPtr cb_group_1;
  rclcpp::CallbackGroup::SharedPtr cb_group_2;
  rclcpp::CallbackGroup::SharedPtr cb_group_3;

  void timer_cb_3(){
    RCLCPP_INFO(this->get_logger(), "timer_cb_3");

    // assume that something logic happens here
    std::this_thread::sleep_for(1s);
  }
  ...

rclcpp::executors::MultiThreadedExecutor executor(
  rclcpp::executor::ExecutorArgs(), 1
);
- 예시 실행 결과
$ ros2 run cpp_multiproc_tutorial reentrant_limited
Max CPU Core : 8
[INFO] [1682405732.583538668] [deadlock_example]: timer_cb_1
[INFO] [1682405737.584007252] [deadlock_example]: timer_cb_2
[INFO] [1682405739.584306750] [deadlock_example]: timer_cb_3
[INFO] [1682405740.585280574] [deadlock_example]: timer_cb_1
[INFO] [1682405745.585707617] [deadlock_example]: timer_cb_2
[INFO] [1682405747.586083455] [deadlock_example]: timer_cb_3
[INFO] [1682405748.586534268] [deadlock_example]: timer_cb_1
...
⇒ 본디 timer_cb_3는 1초마다 실행되어야 하는데 Dead Lock에 빠짐을 볼 수 있습니다.
- Core 3개로 늘려주면 정상 작동하는지 확인해봅시다.
rclcpp::executors::MultiThreadedExecutor executor(
  rclcpp::executor::ExecutorArgs(), 3
);
- 예시 실행 결과
$ ros2 run cpp_multiproc_tutorial reentrant_limited
Max CPU Core : 8
[INFO] [1682405809.551428499] [deadlock_example]: timer_cb_1
[INFO] [1682405809.551649918] [deadlock_example]: timer_cb_2
[INFO] [1682405809.551742931] [deadlock_example]: timer_cb_3
[INFO] [1682405810.552612691] [deadlock_example]: timer_cb_3
[INFO] [1682405811.552408971] [deadlock_example]: timer_cb_2
[INFO] [1682405811.552878292] [deadlock_example]: timer_cb_3
[INFO] [1682405812.553239899] [deadlock_example]: timer_cb_3
[INFO] [1682405813.552785030] [deadlock_example]: timer_cb_2
[INFO] [1682405813.553579643] [deadlock_example]: timer_cb_3
[INFO] [1682405814.552104332] [deadlock_example]: timer_cb_1
[INFO] [1682405814.553891457] [deadlock_example]: timer_cb_3
Intra-process communication and Node Composition
ROS 2 개발을 일반적으로 Node의 결합으로 이루어집니다.이를 통해 모듈화, 코드 재사용이 가능하지만 성능 저하가 초래되는 경우가 많습니다. ROS 1에서는 Nodelet이라는 것으로 이를 해결하고자 하였는데, 이는 기본적으로 하나의 프로세스에서 다수의 Node를 구현하고자 하는 작업입니다.
이러한 작업을 통해 메모리 최적화와 동적 Node load / unload가 가능한 것이지요. 그리고 이를 이어받은 ROS 2에서는 Node Composition이라는 이름으로 같은 기능을 제공하고 있습니다.
- 예시를 통해 Node Composition이 왜 필요한지 살펴봅시다.
ros2 run composition_tutorial image_pipeline_all_in_one
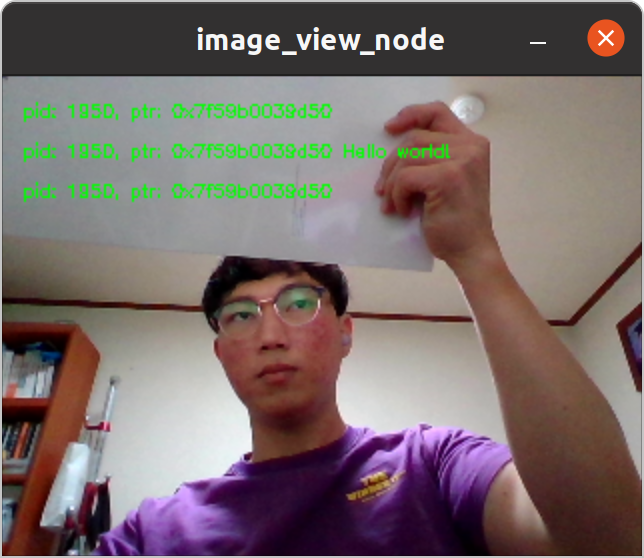

⇒ 현재 3개의 Node가 실행중에 있습니다. 각각의 Node로 Image data가 전송되고 있지요.
⇒ 이미지에 찍힌 데이터 주소에 주목합시다.
- 이번에는 다른 상황을 실행해보겠습니다.
ros2 launch composition_tutorial image_pipeline_extra.launch.py
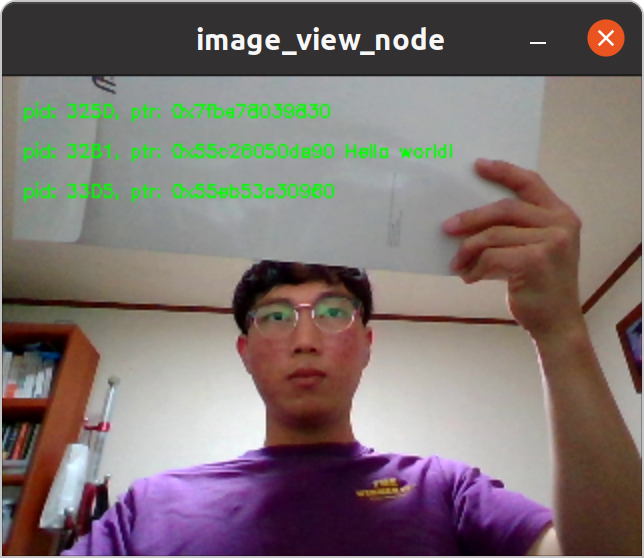
Node를 거치면서 메모리 생성, 복사가 반복되기 때문에 주소가 모두 다른 것을 확인할 수 있습니다.
- 실제 top을 통해 메모리 효율을 비교해보겠습니다.
PID USER      PR  NI    VIRT    RES    SHR S  %CPU  %MEM     TIME+ COMMAND
927 kimsooy+  20   0  625328  86892  47116 S  17.9   0.5   1:18.92 Xorg
1217 kimsooy+  20   0 4604400 269984 111132 S  13.6   1.7   1:45.35 gnome-shell
4095 kimsooy+  20   0 1565920 102108  73140 S  11.9   0.6   0:01.13 image_pipeline_
PID USER      PR  NI    VIRT    RES    SHR S  %CPU  %MEM     TIME+ COMMAND
927 kimsooy+  20   0  607300  86892  47116 R  18.8   0.5   1:11.38 Xorg
2332 kimsooy+  20   0 1130.9g 258892 126436 S  16.8   1.6   1:15.52 chrome
1217 kimsooy+  20   0 4595376 269984 111132 R  15.2   1.7   1:36.03 gnome-shell
4030 kimsooy+  20   0 1034768  77124  58520 S   8.3   0.5   0:01.99 camera_node
4034 kimsooy+  20   0 1341172  98136  70164 S   5.6   0.6   0:01.71 image_view_node
4032 kimsooy+  20   0  811272  74320  55924 S   4.6   0.5   0:01.21 watermark_node
이 둘의 차이는 Intra-process communication의 사용 유무입니다. Node ⇒ Node로 메모리가 전달되면서 불필요한 복사가 반복되면 메모리 효율이 저하됩니다.
Intra-process communication Programming
image_pipeline_all_in_one 코드와 예시를 통해 이를 어떻게 구현할 수 있는지 확인해봅시다.
- 생성자 Option에서 use_intra_process_comms을 사용하였습니다.
CameraNode(
    const std::string & output, const std::string & node_name = "camera_node",
    bool watermark = true, int device = 0, int width = 320, int height = 240)
  : Node(node_name, rclcpp::NodeOptions().use_intra_process_comms(true)),

WatermarkNode(
    const std::string & input, const std::string & output, const std::string & text,
    const std::string & node_name = "watermark_node")
  : Node(node_name, rclcpp::NodeOptions().use_intra_process_comms(true)){

// Node which receives sensor_msgs/Image messages and renders them using OpenCV.
class ImageViewNode : public rclcpp::Node{
public:
  explicit ImageViewNode(const std::string & input, const std::string & node_name = "image_view_node",
    bool watermark = true) : Node(node_name, rclcpp::NodeOptions().use_intra_process_comms(true)){
- Topic data 생성 시 unique_ptr, weak_ptr, SharedPtr을 사용한 모습도 보입니다.
// Create a new unique_ptr to an Image message for storage.
sensor_msgs::msg::Image::UniquePtr msg(new sensor_msgs::msg::Image());
msg->step = static_cast<sensor_msgs::msg::Image::_step_type>(frame_.step);

// Create a publisher on the input topic.
pub_ = this->create_publisher<sensor_msgs::msg::Image>(output, qos);
std::weak_ptr<std::remove_pointer<decltype(pub_.get())>::type> captured_pub = pub_;

// Create a subscription on the input topic.
sub_ = this->create_subscription<sensor_msgs::msg::Image>(
  input, rclcpp::SensorDataQoS(),[node_name, watermark](const sensor_msgs::msg::Image::SharedPtr msg) {
메모리 복사가 아닌 소유권 이전으로 최적화를 구현한 것입니다.
- 이번 예시에서는 SingleThreadedExecutor를 사용하여 Executor에 3개의 Node를 직접 추가하였습니다.
int main(int argc, char * argv[]){

  rclcpp::init(argc, argv);
  rclcpp::executors::SingleThreadedExecutor executor;
  ...
  executor.add_node(camera_node);
  executor.add_node(watermark_node);
  executor.add_node(image_view_node);

  executor.spin();
지금 시점에서 Intra-comm이 필요한 이유는 모두 이해하셨으리라 생각합니다. 비록 이러한 구현이 가능은 하지만, ROS 개발자들은 이를 좀 더 쉽고 동적으로 할 수는 없을지 고민하였습니다.
ROS 2 Node Composition
Node Composition의 기본 개념은 각 Node를 런타임에 로드되는 공유 라이브러리인 “Composition"로 작성한다는 것입니다. 이러한 방식으로, 다음과 같은 것이 가능합니다
- 각각의 Composition을 개별 프로세스에서 실행
- 단일 프로세스에서 여러 노드를 실행하여 오버헤드를 낮추고 통신 효율성을 높이기
- Composition 예시 실행을 위한 준비를 해봅시다.
sudo apt install ros-foxy-ros2cli* -y
sudo apt install ros-foxy-composition -y
다음으로, 기본 예시를 통해 Composition을 다루기 위한 CLI를 살펴보겠습니다.
- 현재 사용 가능한 모든 components 조회
$ ros2 component types
(... components of other packages here)
composition
  composition::Talker
  composition::Listener
  composition::NodeLikeListener
  composition::Server
  composition::Client
- composition cli example - 순서는 다음과 같습니다.
- component container 실행
- component load
- component unload
# Terminal 1 - execute component_container
ros2 run rclcpp_components component_container

# Terminal 2 - check available container
ros2 component list
/ComponentManager
- component를 load 해봅시다.
# Terminal 1 - load built-in publisher component
ros2 component load /ComponentManager composition composition::Talker
> Loaded component 1 into '/ComponentManager' container node as '/talker'

# Container 실행 terminal 확인
[INFO] [1682422159.067057665] [talker]: Publishing: 'Hello World: 1'
[INFO] [1682422160.066962102] [talker]: Publishing: 'Hello World: 2'
[INFO] [1682422161.066817081] [talker]: Publishing: 'Hello World: 3'
[INFO] [1682422162.066801139] [talker]: Publishing: 'Hello World: 4'
...

# Terminal 2 - load built-in subscriber component
ros2 component load /ComponentManager composition composition::Listener
> Loaded component 2 into '/ComponentManager' container node as '/listener'

# Container 실행 terminal 확인
[INFO] [1682422159.067057665] [talker]: Publishing: 'Hello World: 1'
[INFO] [1682422160.066962102] [talker]: Publishing: 'Hello World: 2'
[INFO] [1682422161.066817081] [talker]: Publishing: 'Hello World: 3'
[INFO] [1682422162.066801139] [talker]: Publishing: 'Hello World: 4'
...
- ComponentManager의 하위 component로 talker와 listener가 등록되어 있는 것을 확인할 수 있습니다.
ros2 component list
/ComponentManager
   1  /talker
   2  /listene
- component의 unload는 다음과 같습니다. 지금은 1개의 component 밖에 없기 때문에 id는 1이 됩니다.
ros2 component unload /ComponentManager <id>
Composition Programming
Composition은 내용이 까다롭고 디버깅도 쉽지 않습니다. 때문에 절차를 나누어 차근차근 작은 부분부터 함께 프로그래밍 실습을 해보도록 하겠습니다.
- 기본 구조와 Export
- Data Forwarding
- Composition Container
- ComposableNodeContainer를 통한 launch
- 실 사용 사례 ⇒ ZED Stereo Camera
- 기본 구조와 Export - 아주 간단한 코드를 통해 Node Composition의 기초부터 익혀봅시다.
- Node 생성
- CMakeLists.txt 수정 후 Export
- Component 생성 및 실행 확인
- basic_component.cpp - 필수로 구현해야 하는 부분들을 살펴봅시다.
#include "rclcpp/rclcpp.hpp"
#include "std_msgs/msg/string.hpp"

using namespace std::chrono_literals;

namespace composition_tutorial {

class BasicComponent : public rclcpp::Node {
public:
  explicit BasicComponent(const rclcpp::NodeOptions & options)
  : Node("BasicComponent", options), count_(0){
    // Create a publisher of "std_mgs/String" messages on the "chatter" topic.
    pub_ = create_publisher<std_msgs::msg::String>("chatter", 10);

    // Use a timer to schedule periodic message publishing.
    timer_ = create_wall_timer(1s, std::bind(&BasicComponent::on_timer, this));
  }

protected:
  void on_timer(){
    auto msg = std::make_unique<std_msgs::msg::String>();
    msg->data = "Hello World: " + std::to_string(++count_);
    RCLCPP_INFO(this->get_logger(), "Publishing: '%s'", msg->data.c_str());
    std::flush(std::cout);

    // Put the message into a queue to be processed by the middleware.
    // This call is non-blocking.
    pub_->publish(std::move(msg));
  }

private:
  size_t count_;
  rclcpp::Publisher<std_msgs::msg::String>::SharedPtr pub_;
  rclcpp::TimerBase::SharedPtr timer_;
};

}  // namespace composition

#include "rclcpp_components/register_node_macro.hpp"

// Register the component with class_loader.
// This acts as a sort of entry point, allowing the component to be discoverable when its library
// is being loaded into a running process.
RCLCPP_COMPONENTS_REGISTER_NODE(composition_tutorial::BasicComponent)
- 요점들을 정리하면 다음과 같습니다.
| Description | |
|---|---|
| namespace 지정 | 패키지 이름으로 설정하는 것이 일반적입니다. |
| explicit 생성자 | 일반 Node가 아닌 Component로의 사용을 위해 생성자 explicit 키워드를 사용합니다. |
| smart_pointer | on_timer에서 사용되는 msg 데이터가 shared_ptr 타입인 것을 볼 수 있었습니다. 메모리 최적화를 위해 다음 Component에게 pointer를 전달합니다. |
| register_node_macro | component register 매크로를 통해 구현한 Component를 ROS 2 시스템에 등록합니다. 이 기능은 Foxy기준 C++ 패키지만 지원합니다. |
- CMakeLists.txt 수정 후 Export - 아래의 template에 맞추어 Component를 빌드하고 export합니다. Component 자체는 shared library이며 때문에 Container 실행 후 런타임에 load / unload가 가능합니다.
- add_library
- target_compile_definitions
- ament_target_dependencies
- rclcpp_components_register_nodes
- install
add_library(basic_component SHARED src/basic_component.cpp)
target_compile_definitions(basic_component PRIVATE "COMPOSITION_TUTORIAL_BUILDING_DLL")
ament_target_dependencies(basic_component
  "rclcpp"
  "rclcpp_components"
  "std_msgs"
)
rclcpp_components_register_nodes(basic_component "composition_tutorial::BasicComponent")
set(node_plugins "${node_plugins}composition_tutorial::BasicComponent;$<TARGET_FILE:basic_component>\n")

install(TARGETS
  basic_component
  ARCHIVE DESTINATION lib
  LIBRARY DESTINATION lib
  RUNTIME DESTINATION bin
)
| Description | |
|---|---|
| add_library | 현재 실행 파일을 만드는 것이 아니라 라이브러리를 생성하는 것이므로 add_executable이 아닌 add_library를 사용합니다. |
| target_compile_definitions | basic_component는 라이브러리이므로 특정 타겟에만 해당하는 컴파일 옵션을 정의합니다. |
| ament_target_dependencies | 일반적인 종속석 linking입니다. |
| rclcpp_components_register_nodes | 이 부분이 새롭게 등장한 내용인데요, 사실 main 함수가 없어도 실행 가능한 Node를 만들 수 있습니다. 지금은 라이브러리를 빌드하기 위한 커멘드로 사용되었지만 이는 이후에 다시 살펴보겠습니다. |
| set | node_plugins에 새롭게 컴파일한 basic_component를 추가합니다. |
| install | build 폴더에 위치시켜 ros2 component 커멘드 라인을 사용할 수 있도록 합니다. |
- Component 생성 및 실행 확인 - component cli를 통해 생성된 Component를 확인하고 실행해봅시다.
# Component 생성 확인
$ ros2 component types
composition_tutorial
  composition_tutorial::BasicComponent

# Container 실행
$ ros2 run rclcpp_components component_container

# 실행 중인 Container 확인 후 component load
$ ros2 component list
/ComponentManager

$ ros2 component load /ComponentManager composition_tutorial composition_tutorial::BasicComponent

# Container 실행 Terminal에서 로그 확인
> [INFO] [1682466495.013826879] [BasicComponent]: Publishing: 'Hello World: 1'
⇒ 지금은 cpp 파일에 최소한의 구현을 했지만 보통 헤더를 분리하고 visibility control을 통해 외부에서 접근할 수 있는 범위를 제한합니다.
⇒ 실제 제품 개발 시 보안이 적용되어야 하는 부분이라면 Node코드 대신 Component를 제공하는 방법도 있습니다.
Compile-time composition
component로 동적 load / unload가 가능하지만 시스템 통합을 위해 manual 통합 코드를 작성하거나, launch file을 사용할 수 있습니다.
- 직접 component들을 실행시키는 main 코드를 작성하는 경우입니다. 일전 image_pipeline_all_in_one을 통해 예시를 살펴봅시다.
int main(int argc, char * argv[])
{
  rclcpp::init(argc, argv);
  rclcpp::executors::SingleThreadedExecutor executor;

  // Connect the nodes as a pipeline: camera_node -> watermark_node -> image_view_node
  std::shared_ptr<CameraNode> camera_node = nullptr;
  try {
    camera_node = std::make_shared<CameraNode>("image");
  } catch (const std::exception & e) {
    fprintf(stderr, "%s Exiting ..\n", e.what());
    return 1;
  }
  auto watermark_node =
    std::make_shared<WatermarkNode>("image", "watermarked_image", "Hello world!");
  auto image_view_node = std::make_shared<ImageViewNode>("watermarked_image");

  executor.add_node(camera_node);
  executor.add_node(watermark_node);
  executor.add_node(image_view_node);
Composition using launch actions
- composition container와 실행될 component들을 명시하는 launch action도 사용할 수 있습니다. (talker와 listener, Component Manager를 함께 실행하는 launch file을 작성해보았습니다.)
ros2 launch composition_tutorial talk_listen.launch.py
import launch
from launch_ros.actions import ComposableNodeContainer
from launch_ros.descriptions import ComposableNode

def generate_launch_description():
    """Generate launch description with multiple components."""
    container = ComposableNodeContainer(
            name='my_container',
            namespace='',
            package='rclcpp_components',
            executable='component_container',
            composable_node_descriptions=[
                ComposableNode(
                    package='composition',
                    plugin='composition::Talker',
                    name='talker'),
                ComposableNode(
                    package='composition',
                    plugin='composition::Listener',
                    name='listener')
            ],
            output='screen',
    )

    return launch.LaunchDescription([container])
- Component Manager는 rqt_graph를 통해 구별하기 쉽지 않습니다. 따라서 적절한 이름을 부여하는 것이 디버깅에 용이합니다.
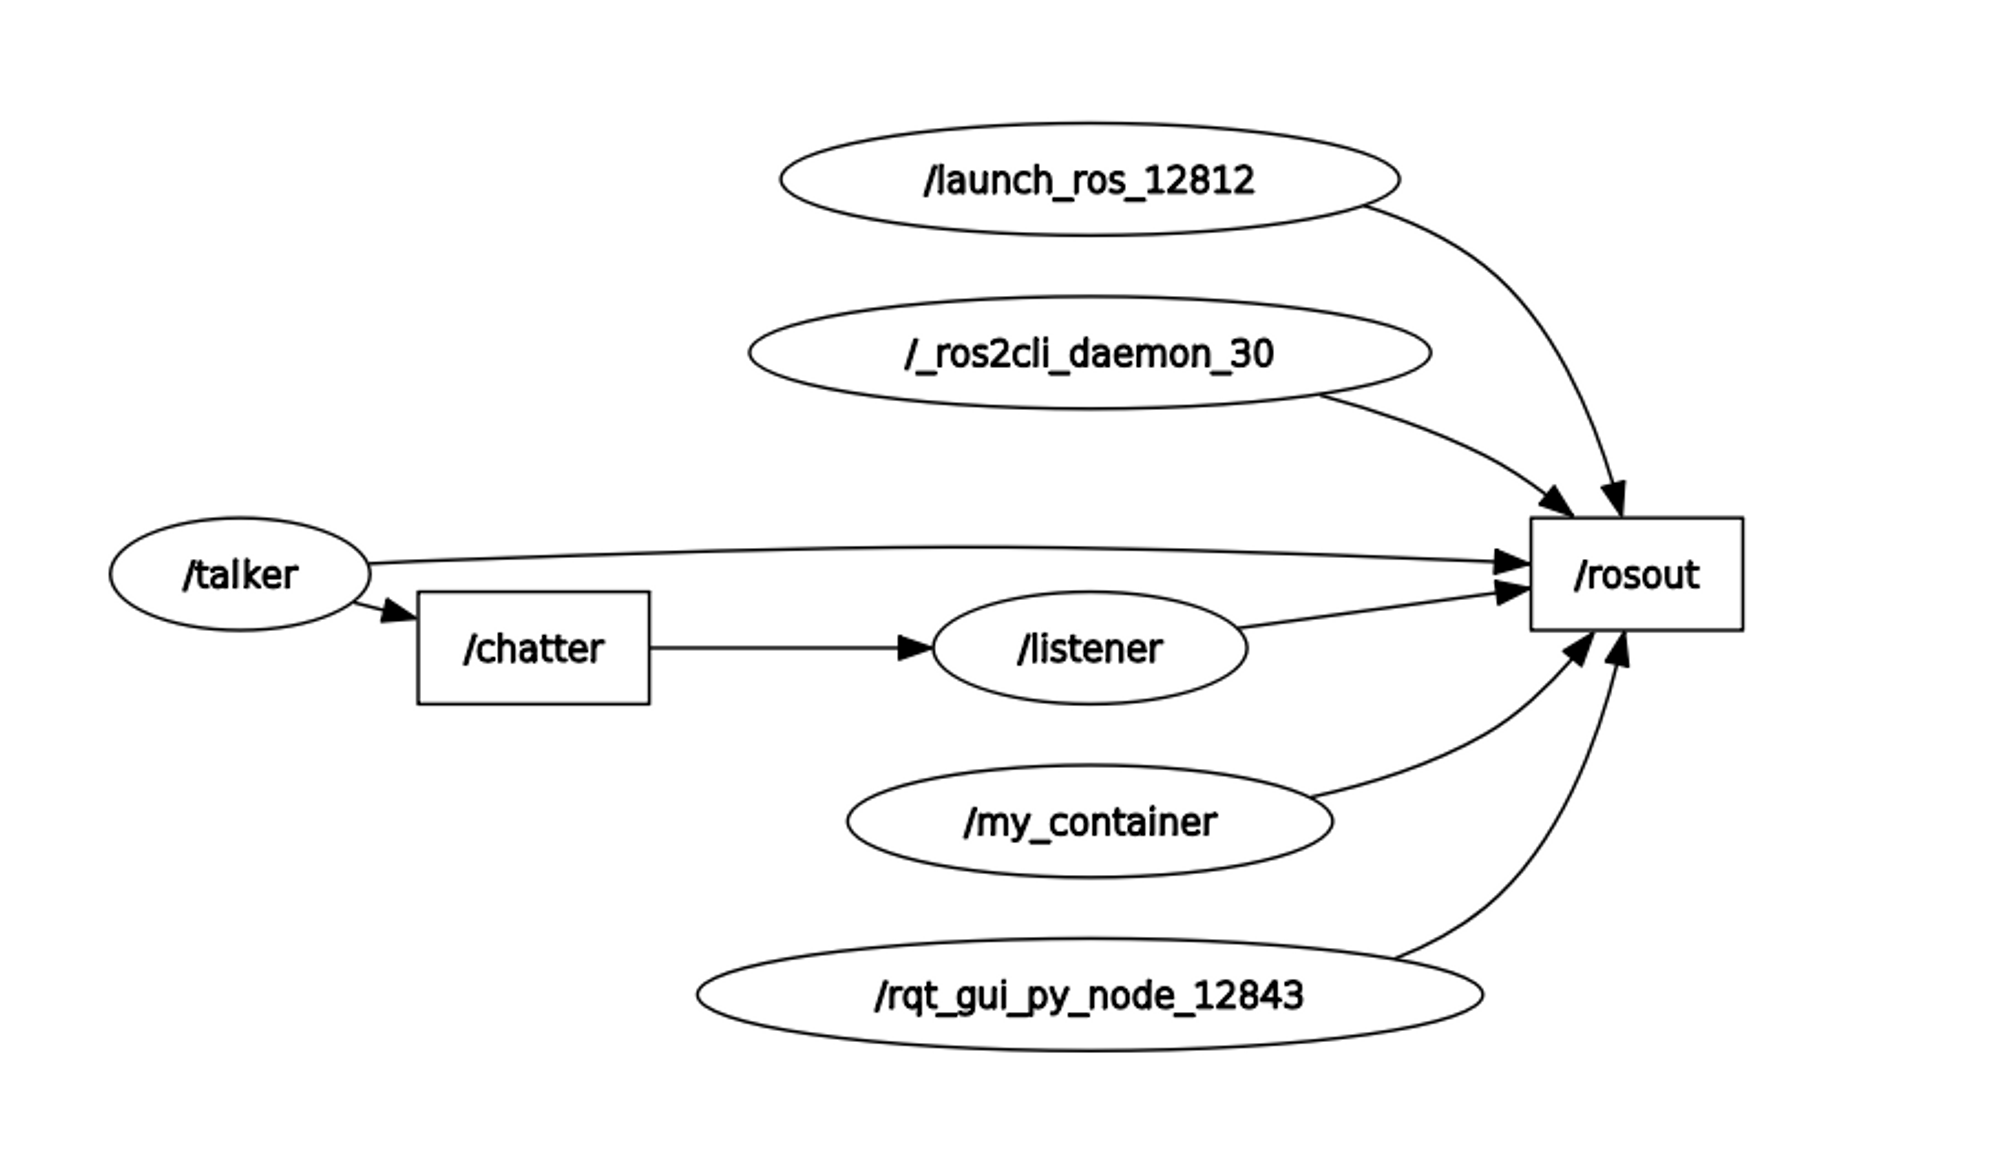
- 기본 Container 이름은 /ComponentManager 이지만, remapping을 통해 namespace를 지정하거나 이 이름을 바꿀 수 있습니다.
# container remapping
ros2 run rclcpp_components component_container --ros-args -r __node:=MyContainer -r __ns:=/ns
ros2 component list
> /ns/MyContainer

# Remap node name
ros2 component load /ns/MyContainer composition composition::Talker --node-name talker3 --node-namespace /ns2
ros2 component list
/ns/MyContainer
  1  /ns2/talker3
- component에게 매개변수도 전달할 수 있습니다. use_intra_process_comms 옵션을 매개변수로 제어해 보겠습니다.
ros2 component load /ComponentManager composition composition::Talker -e use_intra_process_comms:=true
구현과 사용에 대해서는 이정도 설명하고, 추가 자료는 링크로 남기겠습니다.
Component를 shared library로 export하고 다른 package에서 import하여 사용하기 - Ament best practice for sharing libraries
실 사용 사례 - ZED ros2 composition
composition의 중요성과 사용에 대해 좀 더 확실히 알 수 있는 예시를 가져와 보았습니다.
Stereo Labs의 ZED Camera는 Composition을 사용하여 보다 효율적인 rgb convert, format conversion을 제공하고 있습니다. 코드를 통해 함께 살펴봅시다.⇒ 출처 : https://www.stereolabs.com/docs/ros2/ros2-composition/
- zed_rgb_convert_component.hpp - composition인 ZedRgbCvtComponent가 구현되어 있습니다.
namespace stereolabs
{

class ZedRgbCvtComponent : public rclcpp::Node
{
public:
  ZED_CVT_COMPONENT_PUBLIC
  explicit ZedRgbCvtComponent(const rclcpp::NodeOptions & options);

  virtual ~ZedRgbCvtComponent() {}

protected:
  void camera_callback(
    const sensor_msgs::msg::Image::ConstSharedPtr & img,
    const sensor_msgs::msg::CameraInfo::ConstSharedPtr & cam_info);

private:
  // Publisher
  image_transport::CameraPublisher mPubBgr;

  // Subscriber
  image_transport::CameraSubscriber mSubBgra;

  // QoS parameters
  rclcpp::QoS mVideoQos;
};

}  // namespace stereolabs

#endif  // ZED_RGB_CONVERT_COMPONENT_HPP_
- zed_rgb_convert_component.cpp - 메모리 최적화를 위해 ConstSharedPtr 타입 input, output을 사용하고 있는 모습을 확인할 수 있습니다.
void ZedRgbCvtComponent::camera_callback(
  const sensor_msgs::msg::Image::ConstSharedPtr & img,
  const sensor_msgs::msg::CameraInfo::ConstSharedPtr & cam_info)
{
  // Check for correct input image encoding
  if (img->encoding != sensor_msgs::image_encodings::BGRA8) {
    RCLCPP_ERROR(get_logger(), "The input topic image requires 'BGRA8' encoding");
    exit(EXIT_FAILURE);
  }

  // Convert BGRA to BGR using OpenCV
  void * data = const_cast<void *>(reinterpret_cast<const void *>(&img->data[0]));
  cv::Mat bgra(img->height, img->width, CV_8UC4, data);
  cv::Mat bgr;

  cv::cvtColor(bgra, bgr, cv::COLOR_BGRA2BGR);

  // Create the output message and copy coverted data
  std::shared_ptr<sensor_msgs::msg::Image> out_bgr = std::make_shared<sensor_msgs::msg::Image>();

  out_bgr->header.stamp = img->header.stamp;
  out_bgr->header.frame_id = img->header.frame_id;
  out_bgr->height = bgr.rows;
  out_bgr->width = bgr.cols;

  int num = 1;  // for endianness detection
  out_bgr->is_bigendian = !(*reinterpret_cast<char *>(&num) == 1);

  out_bgr->step = bgr.step;

  size_t size = out_bgr->step * out_bgr->height;
  out_bgr->data.resize(size);

  out_bgr->encoding = sensor_msgs::image_encodings::BGR8;
  memcpy(reinterpret_cast<char *>((&out_bgr->data[0])), &bgr.data[0], size);

  // Publish the new image message coupled with camera info from the original message
  mPubBgr.publish(out_bgr, cam_info);
}
camera_callback의 목표는 cv::cvtColor를 통해 BGRA (CV_8UC4)을 BGR (CV_8UC4) 타입으로 변환하는 것입니다.
- ZedCamera Composition과 ZedRgbCvtComponent Composition을 함께 사용하는 별도 Executor를 만들어 제공하고 있습니다.
int main(int argc, char * argv[]){
    setvbuf(stdout, NULL, _IONBF, BUFSIZ);

    rclcpp::init(argc, argv);

    rclcpp::executors::MultiThreadedExecutor exec;
    rclcpp::NodeOptions options;

    // Enable intraprocess communication
    options.use_intra_process_comms(true);

    // Add ZedCamera node
    auto zed_node = std::make_shared<stereolabs::ZedCamera>(options);
    exec.add_node(zed_node);

    // Add ZedRgbCvtComponent node
    auto zed_cvt_node = std::make_shared<stereolabs::ZedRgbCvtComponent>(options);
    exec.add_node(zed_cvt_node);

    exec.spin();

    rclcpp::shutdown();

    return 0;
}
이는 물론 launch file로도 가능할 것입니다. 😁