Lecture5. ROS 2 Communication Mechanisms
이번 시간에는 ROS 2의 핵심인 3가지 통신 메커니즘(Topic,Service, Action)에 대해서 개념을 다잡고 넘어가고자 합니다. 프로그래밍은 없지만, 각각의 통신 메커니즘들에 대해 반드시 숙지하고 넘어가시기 바랍니다!
ROS 2 Topic
- 3강의 husky 예시 실행 후 살펴보았던 rqt_graph 이미지입니다.
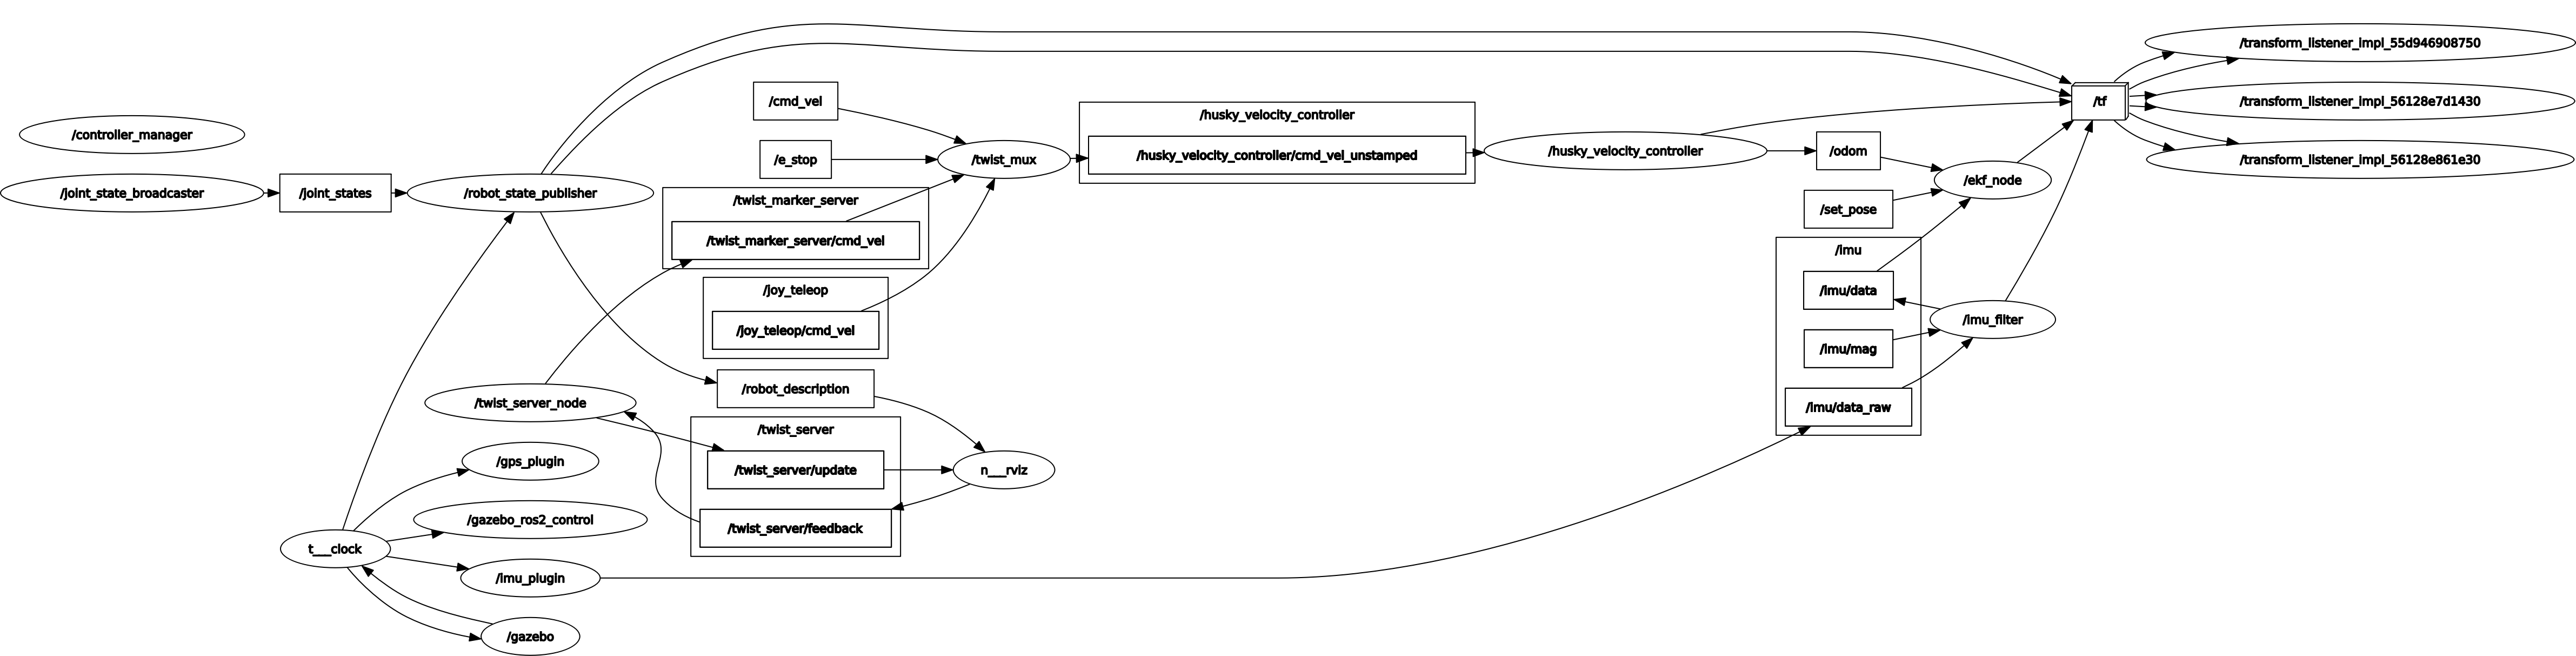
⇒ 위 그림에서 동그라미는 Node를 뜻하고, 화살표는 topic을 뜻하는데요, 첫번째로 이 Topic이라는 것이 무엇인지 배워보고자 합니다.
- Topic은 Node들 사이에 데이터(Message)가 오가는 길(Bus)의 이름이며, 적절한 이름으로 데이터를 송수신하지 않으면 원하는 동작을 수행할 수 없습니다. ROS 2에서 사용하는 DDS는 목적지를 정해두고 통신하는 것이 아니라 통신 매개체의 ID를 통해 송수신하기 때문에 기존 웹 기반 통신과는 다른 개념임을 상기드립니다.
image from : docs.ros.org
- Topic은 N:N 통신이 가능합니다. (여러 Node들로부터 데이터를 받을 수 있고, 전송 시에도 여러 Node들에게 전송이 가능합니다. 하지만 대부분 1:N 혹은 1:1, N:1로 사용합니다.)
image from : docs.ros.org
topic을 통해 데이터가 전달되는 과정은 다음과 같습니다.
- 데이터를 보내는 주체인 publisher는 데이터를 받는 주체, subscriber를 지정한 뒤, topic을 통해 원하는 정보를 전달합니다. 이것을 topic publish라고 부르지요.
- 반대로, 데이터를 받는 주체인 subscriber 입장에선 topic을 통해 데이터를 받게 되며 이것은 topic subscribe라고 불립니다.
ROS 2 Topic msg
- 로봇 프로그래밍 시 센서, 제어 데이터를 비롯하여 다양한 유형의 데이터들이 Topic을 통해 오고 갑니다. ROS에서는 이러한 데이터 형식을 msg(Message)라는 형태로 제공하며, 원하는 데이터에 적합한 topic msg를 사용하면 더욱 효율적인 로봇 프로그래밍이 가능해집니다.
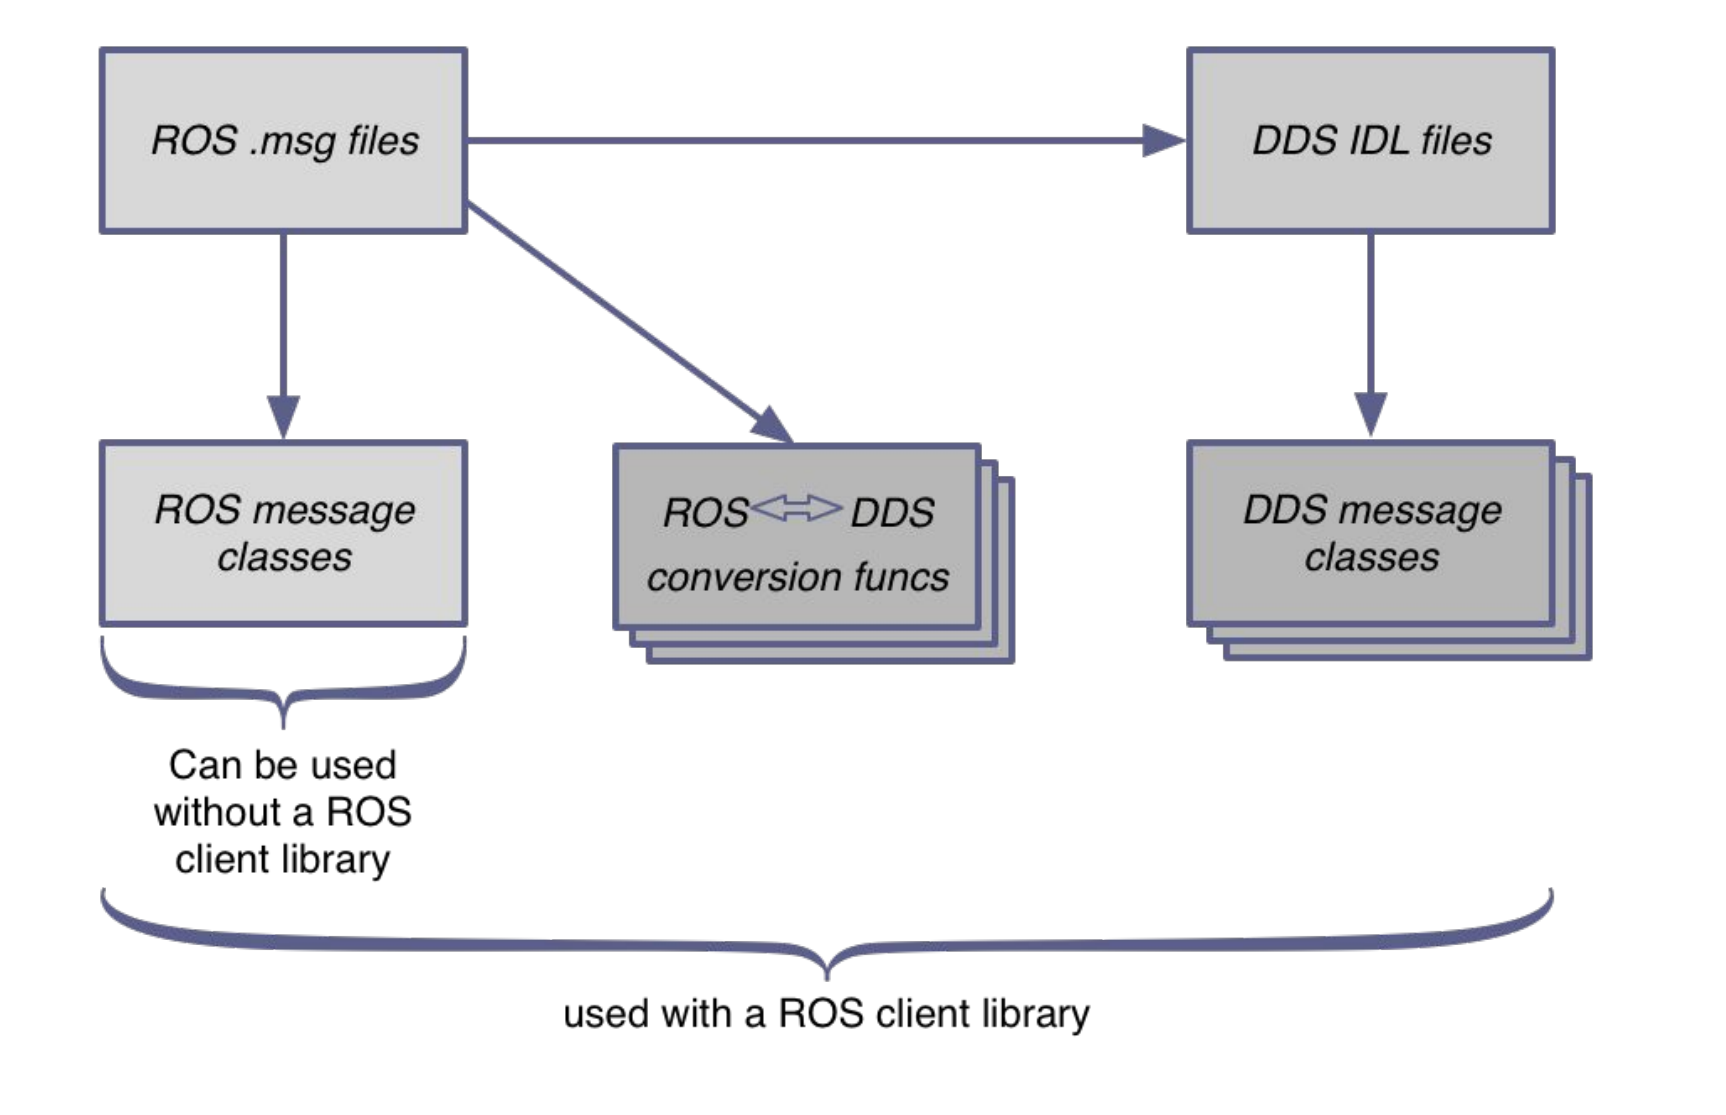
image from : ethz.ch
- ROS 1과 ROS 2는, msg를 구분하는 필드에서 차이를 보입니다.
| ROS 1 | geometry_msgs/Twist |
|---|---|
| ROS 2 | geometry_msgs/msg/Twist |
- 세부 필드 정보를 위해 구글링을 하면 ROS 1 결과가 나올 때가 있는데 해당하는 필드를 중간에 추가해주시면 됩니다.
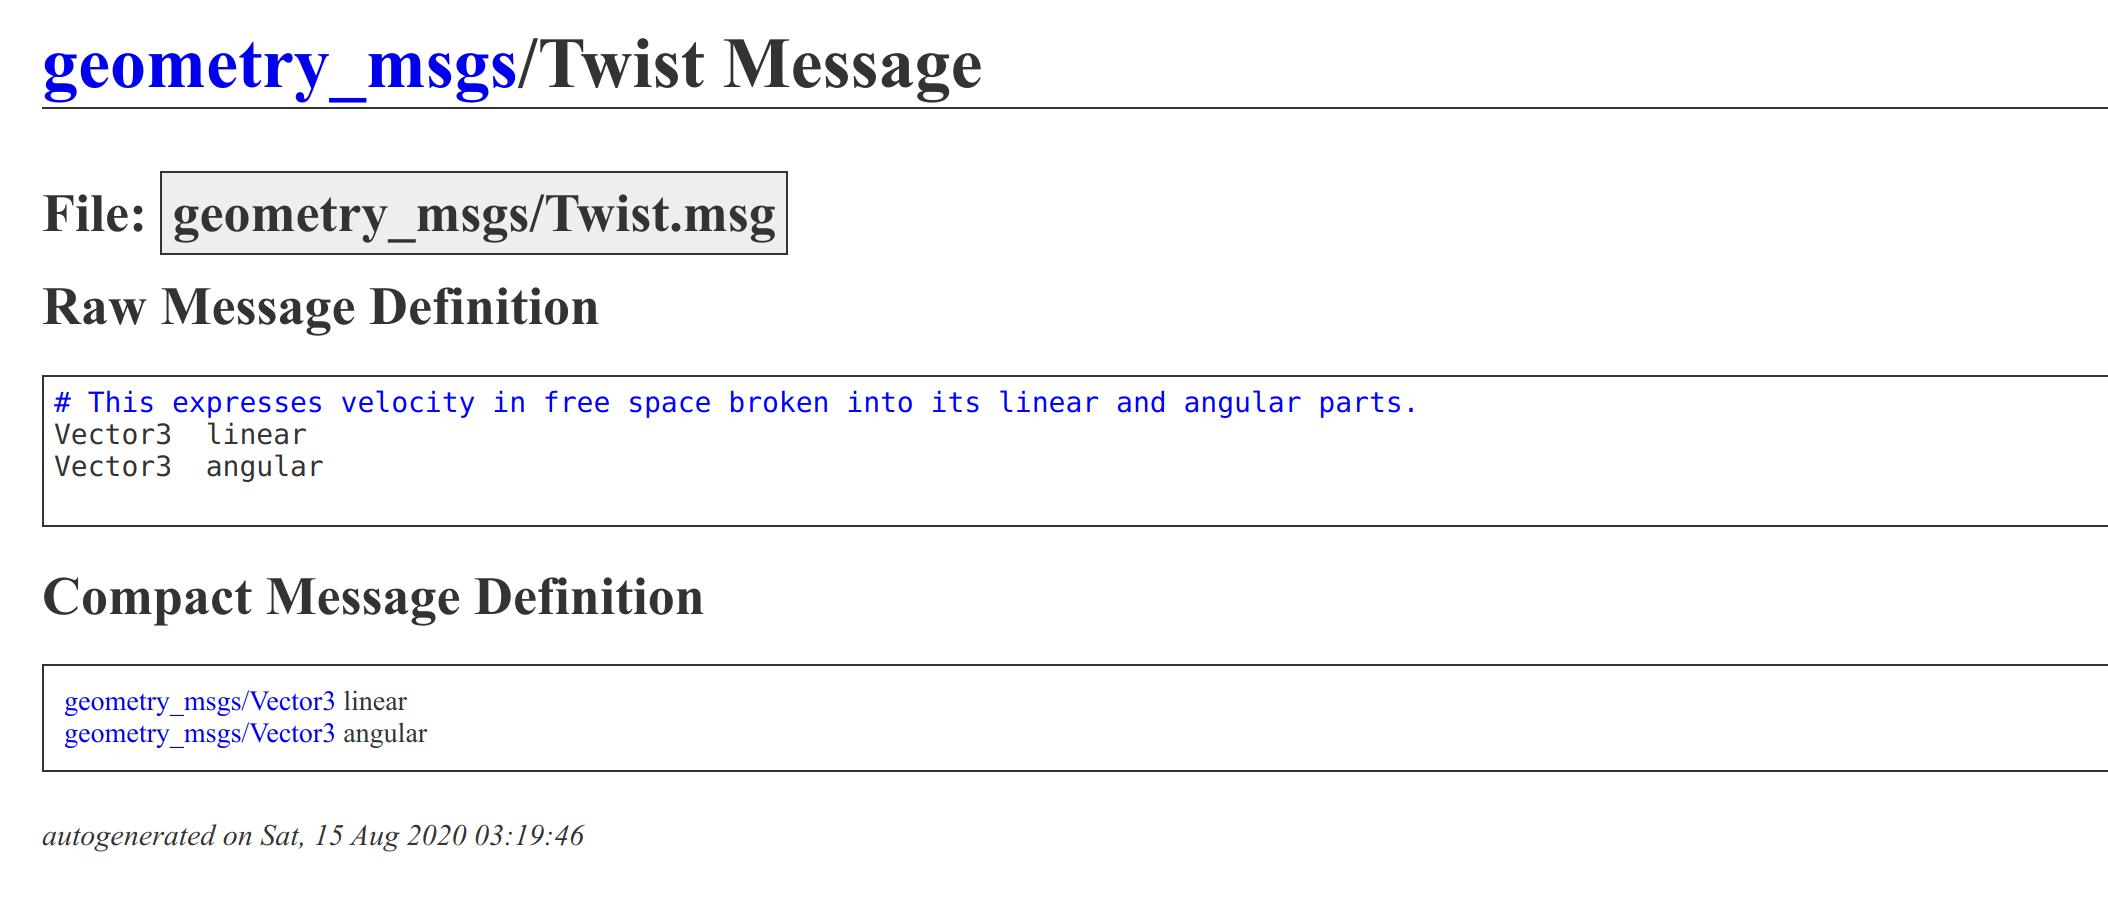
- 출처 : http://docs.ros.org/
ROS 2 Topic CLI
ROS에서는 topic에 대한 정보, 파싱, 송수신과 같은 여러 인터페이싱이 가능하도록 CLI를 제공하고 있습니다. topic과 msg에 대한 CLI들을 살펴봅시다!
- 이번 예시를 위해 2개의 터미널을 실행하고 아래와 같은 명령어를 각각 입력합니다. (그리고 세번째 터미널에서 이어지는 학습을 진행하시면 됩니다.)
# Terminal 1
$ ros2 topic pub /chatter std_msgs/String "data: Hello ROS Developers"
# Terminal 2
$ ros2 topic echo /chatter
- ros2 topic list ⇒ 사용중인 topic list 조회
$ ros2 topic list
/topic_a
/topic_b
...
/clock
/parameter_events
/performance_metrics
/rosout
- ros2 topic info ⇒ 특정 topic에 대한 자세한 정보 조회
$ ros2 topic info /chatter
Type: std_msgs/msg/String
Publisher count: 1
Subscription count: 1
⇒ verbose option을 통해 더욱 자세한 내용을 알 수 있지만 지금은 넘어가겠습니다.
$ ros2 topic info /chatter --verbose
Type: std_msgs/msg/String

Publisher count: 1

Node name: _ros2cli_84037
Node namespace: /
Topic type: std_msgs/msg/String
Endpoint type: PUBLISHER
GID: 30.06.10.01.46.68.e4.44.22.bd.f2.21.00.00.08.03.00.00.00.00.00.00.00.00
QoS profile:
  Reliability: RMW_QOS_POLICY_RELIABILITY_RELIABLE
  Durability: RMW_QOS_POLICY_DURABILITY_VOLATILE
  Lifespan: 9223372036854775807 nanoseconds
  Deadline: 9223372036854775807 nanoseconds
  Liveliness: RMW_QOS_POLICY_LIVELINESS_AUTOMATIC
  Liveliness lease duration: 9223372036854775807 nanoseconds

Subscription count: 1

Node name: _ros2cli_84065
Node namespace: /
Topic type: std_msgs/msg/String
Endpoint type: SUBSCRIPTION
GID: 48.95.10.01.ea.a0.fa.d5.31.c6.85.40.00.00.08.04.00.00.00.00.00.00.00.00
QoS profile:
  Reliability: RMW_QOS_POLICY_RELIABILITY_BEST_EFFORT
  Durability: RMW_QOS_POLICY_DURABILITY_VOLATILE
  Lifespan: 9223372036854775807 nanoseconds
  Deadline: 9223372036854775807 nanoseconds
  Liveliness: RMW_QOS_POLICY_LIVELINESS_AUTOMATIC
  Liveliness lease duration: 9223372036854775807 nanoseconds
- ros2 topic type ⇒ 해당 topic이 사용중인 msg 조회
$ ros2 topic type /chatter
std_msgs/msg/String
- ros2 interface show ⇒ 특정 msg 정보 조회
$ ros2 interface show std_msgs/msg/String
# This was originally provided as an example message.
# It is deprecated as of Foxy
# It is recommended to create your own semantically meaningful message.
# However if you would like to continue using this please use the equivalent in example_msgs.

string data
- ros2 topic echo ⇒ 특정 topic 데이터를 엿볼 수 있습니다.
$ ros2 topic echo /chatter
...
data: Hello ROS Developers
---
data: Hello ROS Developers
---
- ros2 topic hz ⇒ topic의 publish/subscribe 주기를 분석할 수 있습니다.
$ ros2 topic hz /chatter
average rate: 1.000
	min: 1.000s max: 1.000s std dev: 0.00013s window: 3
average rate: 1.000
	min: 1.000s max: 1.000s std dev: 0.00017s window: 5
...
- ros2 topic pub ⇒ 프로그래밍 없이 터미널 라인에서 publish가 가능합니다. (단, 주로 간단한 문자열 정도에만 사용되며 이미지 데이터 등에는 사용이 불가합니다.)
$ ros2 topic pub /chatter std_msgs/String "data: Hello ROS Developers"
...
publishing #1: std_msgs.msg.String(data='Hello ROS Developers')

publishing #2: std_msgs.msg.String(data='Hello ROS Developers')

publishing #3: std_msgs.msg.String(data='Hello ROS Developers')
- ROS 2 Topic CLI 정리
| CMD | Description |
|---|---|
| ros2 topic list | 전체 topic 조회 |
| ros2 topic info | 특정 topic 정보 조회 |
| ros2 topic type | 특정 topic type 조회 |
| ros2 interface show | msg type 조회 |
| ros2 topic echo | topic 엿보기 |
| ros2 topic hz | topic pub/sub 주기 조회 |
| ros2 topic pub | 간단한 publish |
ROS 2 Service
Topic에 이어 ROS의 통신 메커니즘 두번째로 Service를 배워보겠습니다.
- Client Node가 Server Node로 request를 주면, 해당 request에 대응하는 적절한 response가 다시 Client에게로 전달됩니다. 이 과정을 Service Call이라고 부릅니다.
image from : docs.ros.org
- 하나의 Service Server에는 여러 Client Node가 request 할 수 있지만, Server는 동시에 여러 request를 처리하지는 못합니다. 두 Node에서 동시에 request가 왔다면, 조금이라도 먼저 통신한 Node의 작업을 우선 진행하고, 그동안 다른 Node는 기다리고 있어야 합니다.
image from : https://docs.ros.org/en/foxy/Tutorials/Services/Understanding-ROS2-Services.html
Service 개념 정리
- Service를 요청하는 주체를 Service Client라고 하며, Service 요청 자체를 Request(혹은 Call)라고 합니다.
- Service를 요청받는 주체를 Service Server라고 하며, Service Server는 Request에 대한 응답, 즉 Service Response를 다시 Service Client에게 회답합니다.
- Request와 Response를 위해 사용되는 데이터 타입은 srv라고 하며 Request와 Response로 나뉩니다.
Service의 중요한 특징 ⇒ 하나의 Service Server에 여러 Client가 request 할 수 있지만, Server는 동시에 여러 request를 처리하지 못합니다.
image from : docs.ros.org
마지막으로, Topic과 비교하여 Service의 특징을 알아봅시다.
- 1:1 통신 : Topic publish를 하면 여러 Node가 Subscribe 가능합니다. 반면, Service는 request가 온 대상에게만 response를 줍니다.
- 순차적 통신 : Service Server는 동시에 여러 request를 처리할 수 없습니다. 현재 작업중인 request가 처리될 때 까지 다른 request는 기다리고 있어야 합니다.
- 단발성 : Topic은 대부분 지속적으로 publish를 진행하는 반면, Service는 1회성 통신입니다.
ROS 2 Service CLI
Service는 Topic과는 다르게 일회성이기 때문에 CLI를 사용할 일이 매우 잦습니다. 자주 사용되는 만큼 얼른 학습해봅시다!
- 이번 학습을 위해 일전의 husky simulator를 실행하겠습니다.
ros2 launch husky_gazebo husky_playpen.launch.py
- ros2 service list ⇒ 전체 service list를 조회합니다.
$ ros2 service list
/controller_manager/configure_and_start_controller
/controller_manager/configure_controller
/controller_manager/describe_parameters
...
- ros2 service type ⇒ 특정 service에 대한 정보를 조회합니다. (사용되는 type 정도를 알 수 있습니다.)
$ ros2 service type /controller_manager/configure_and_start_controller
controller_manager_msgs/srv/ConfigureStartController
- ros2 interface show ⇒ Topic의 msg와 유사하게, Service에는 srv가 존재하는데요, 이 타입에 대한 자세한 정보를 조회할 수 있습니다.
$ ros2 interface show controller_manager_msgs/srv/ConfigureStartController
# The ConfigureStartController service allows you to configure and start a single controller
# inside controller_manager

# To configure and start a controller, specify the "name" of the controller.
# The return value "ok" indicates if the controller was successfully
# configured and started or not.

string name
---
bool ok
서비스 타입 중간에 보이는 - - - 부분은 request와 response의 구분자라고 생각하시면 됩니다.
- ros2 service call ⇒ 커멘드 라인 상에서 Service Call을 할 수 있습니다. 간단한 service를 실행해보겠습니다.
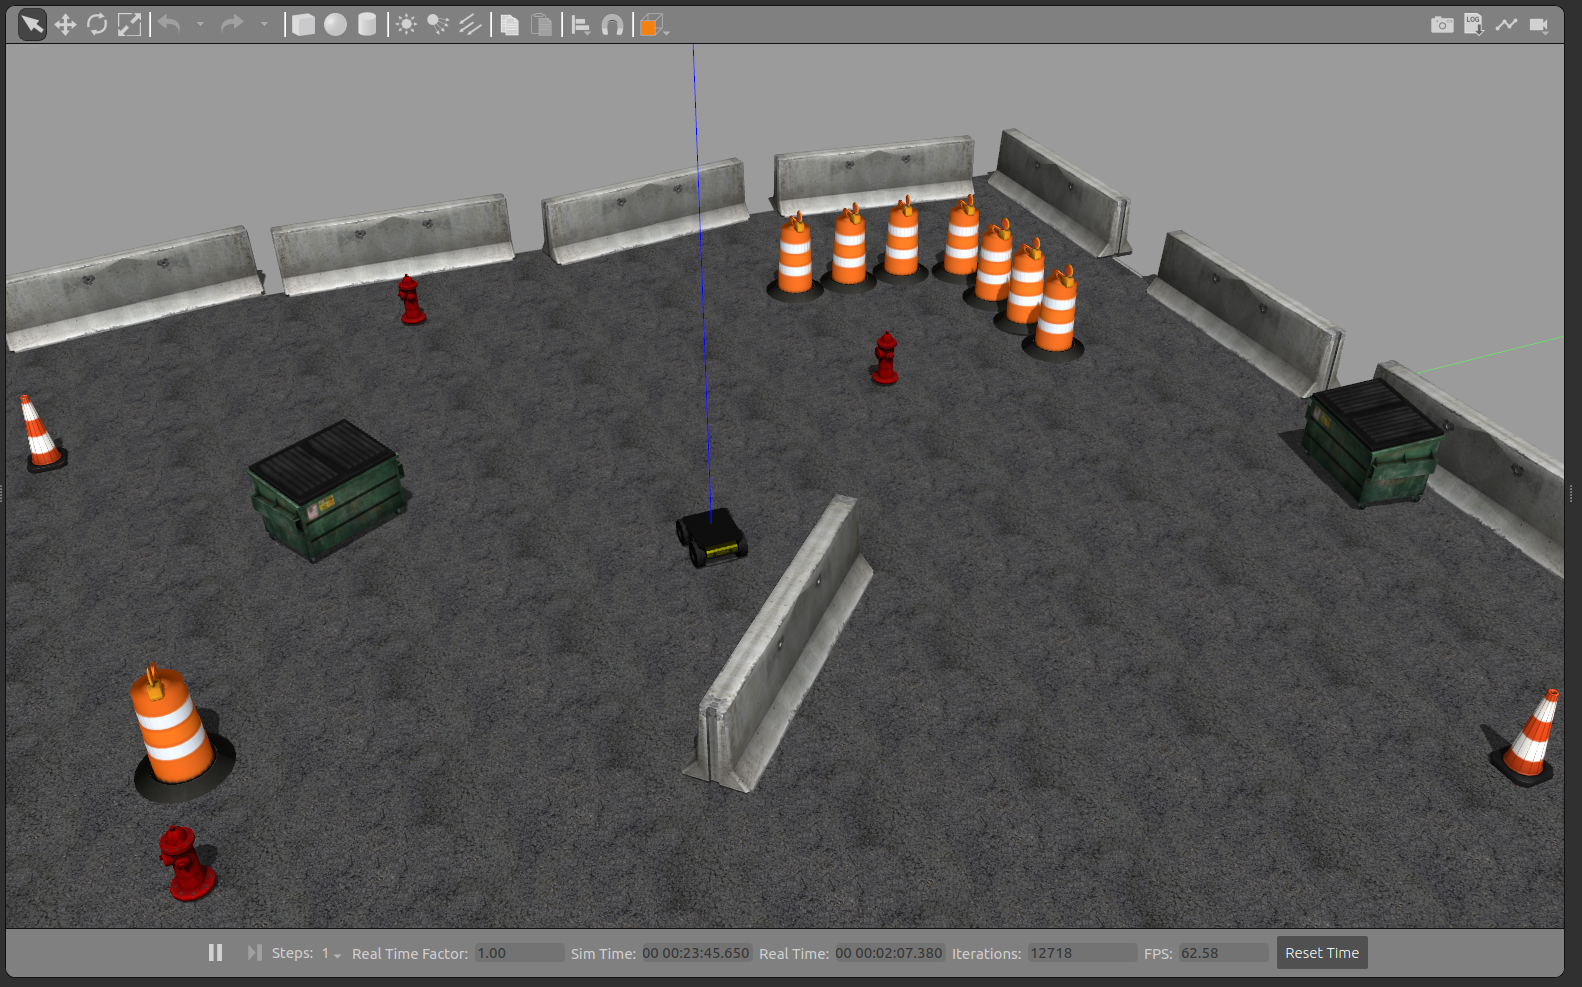
$ ros2 service call /get_model_list gazebo_msgs/srv/GetModelList {}
requester: making request: gazebo_msgs.srv.GetModelList_Request()

response:
gazebo_msgs.srv.GetModelList_Response(header=std_msgs.msg.Header(stamp=builtin_interfaces.msg.Time(sec=1594, nanosec=330000000), frame_id=''), model_names=['ground_plane', 'jersey_barrier', 'jersey_barrier_0', 'jersey_barrier_1', 'jersey_barrier_2', 'jersey_barrier_3', 'jersey_barrier_4', 'jersey_barrier_5', 'jersey_barrier_6', 'jersey_barrier_7', 'jersey_barrier_8', 'jersey_barrier_9', 'jersey_barrier_10', 'jersey_barrier_11', 'jersey_barrier_12', 'jersey_barrier_13', 'jersey_barrier_14', 'fire_hydrant', 'fire_hydrant_0', 'fire_hydrant_1', 'Dumpster', 'Dumpster_0', 'jersey_barrier_15', 'Construction Cone', 'Construction Barrel', 'Construction Cone_0', 'Construction Barrel_0', 'asphalt_plane', 'Construction Barrel_1', 'Construction Barrel_2', 'Construction Barrel_3', 'Construction Barrel_4', 'Construction Barrel_5', 'Construction Barrel_6', 'Construction Barrel_7', 'Construction Cone_1', 'husky'], success=True)
⇒ Gazebo 상에 존재하는 모델들의 리스트를 response로 받았습니다. (gazebo ros에서 이러한 기능들이 제공됩니다.)
- ROS 2 Service CLI 정리
| CMD | Description |
|---|---|
| ros2 service list | 전체 Service 리스트 |
| ros2 service type | 특정 Service가 사용하는 데이터 타입 조회 |
| ros2 interface show | 특정 srv에 대한 자세한 정보 조회 |
| ros2 service call | 터미널을 통해 Service Call |
ROS 2 Action
ROS 2의 마지막 통신 메커니즘인 Action을 배워보겠습니다.
- 복습 차원에서 Service의 중요한 특징 한 가지를 복기해보겠습니다. 하나의 Service Server에 여러 Client가 request 할 수 있지만, Server는 동시에 여러 request를 처리하지 못합니다.
- image from : docs.ros.org
Action은 바로 이러한 Service의 단점을 극복하기 위해 탄생한 통신 메커니즘입니다. Action은 Service와 Topic의 특성을 모두 갖고 있으며, 실제로 가장 늦게 탄생한 통신 메커니즘입니다.
Action의 특징
- action client는 action server가 Result를 보내기 전까지 마냥 기다리지 않고, 다른 일을 할 수 있습니다.
- action client는 Result Response를 받기 전에도 지속적으로 Feedback을 받을 수 있습니다.
- 따라서, Feedback을 받고 있다가, 뭔가 잘못 돌아가고 있다는 것을 감지한 경우 cancel을 할 수도 있습니다.
⇒ 하지만, 여러 request를 동시에 작업하는 것이나, Feedback 중에 topic subscribe와 같은 작업은 본질적으로 불가합니다. 이에 대한 해결 방법도 후에 살펴보겠습니다.

사진과 같이 Action Client와 Server가 주고받는 내용은 크게 5가지가 있습니다.
- Client ⇒ Server, Goal Request (service request와 유사합니다.)
- server ⇒ client, Goal Response
- client ⇒ server, Result Request
- server ⇒ client, Feedback (topic과 유사합니다.)
- server ⇒ client, Result Response
만약 4번 도중 cancel이 발생하면 Action은 종료됩니다.
이렇게 Action은 Topic, Service의 특징을 모두 갖고 있으며 Feedback 결과에 따라 Cancel이라는 추가 기능까지 갖추고 있는 복잡한 통신 메커니즘입니다.
ROS 2 Action CLI
- 이번 예시를 위해 turtlesim이라는 프로그램을 실행시킨 뒤, 실습을 진행해봅시다.
sudo apt install ros-foxy-turtlesim -y
ros2 run turtlesim turtlesim_node
- ros2 action list ⇒ 실행 중인 action들을 조회 가능합니다.
$ ros2 action list
/turtle1/rotate_absolute
- ros2 action info ⇒ ****특정 action의 정보를 조회합니다.
$ ros2 action info /turtle1/rotate_absolute
Action: /turtle1/rotate_absolute
Action clients: 0
Action servers: 1
    /turtlesim
- ros2 interface show ⇒ Action에서 사용되는 데이터 타입은 action입니다. 이에 대한 자세한 정보를 조회합니다.
$ ros2 interface show turtlesim/action/RotateAbsolute
# The desired heading in radians
float32 theta
---
# The angular displacement in radians to the starting position
float32 delta
---
# The remaining rotation in radians
float32 remaining
- ros2 action send_goal ⇒ 커멘드 라인에서 손쉽게 Action Goal을 보낼 수 있습니다. (feedback option을 제공합니다.)
$ ros2 action send_goal <action_name> <action_type> <values>
$ ros2 action send_goal /turtle1/rotate_absolute turtlesim/action/RotateAbsolute "{theta : 0.0}" --feedback
1657646954.088327 [0]       ros2: using network interface enp7s0 (udp/166.104.135.89) selected arbitrarily from: enp7s0, docker0
Waiting for an action server to become available...
Sending goal:
     theta: 0.0

Goal accepted with ID: d3ddca85948d4099a13dbeb8183e5ecc

Result:
    delta: -0.7839995622634888

Goal finished with status: SUCCEEDED
/turtle1/rotate_absolute는 거북이를 특정한 절대 각도로 회전시키는 action으로 feedback 옵션 지정 시 커멘드 라인 상에 변화하는 각도록 실시간으로 확인 가능합니다.
- ROS 2 Action CLI 정리
| CMD | Description |
|---|---|
| ros2 action list | 전체 action list 조회 |
| ros2 action info | 특정 action 정보 조회 |
| ros2 interface show | 특정 action 데이터 타입에 대한 조회 |
| ros2 action send_goal | 터미널을 통한 action goal request |
여기까지 배웠다면 ROS 2의 개념적인 부분은 대부분 습득하셨다고 보아도 좋습니다. 그럼 앞으로 프로그래밍과 예시들을 통해 ROS 2 시스템에 더욱 능숙해져보겠습니다.