Lecture8. ROS 2 Service and Programming
ROS 2 Service
ROS 2 Service의 개념을 다시 복습해봅시다.
image from : docs.ros.org
Service 개념 정리
- Service를 요청하는 주체를 Service Client라고 하며, Service 요청 자체를 **Request(혹은 Call)**라고 합니다.
- Service를 요청받는 주체를 Service Server라고 하며, Service Server는 Request에 대한 응답, 즉 Service Response를 다시 Service Client에게 회답합니다.
- Request와 Response를 위해 사용되는 데이터 타입은 srv라고 하며 Request와 Response로 나뉩니다.
Service의 중요한 특징 한 가지 추가하자면, 하나의 Service Server에 여러 Client가 request 할 수 있지만, Server는 동시에 여러 request를 처리하지 못합니다.
image from : docs.ros.org
- Service 통신 시 srv라는 데이터 형식이 사용됩니다. 특정 srv가 어떻게 구성되어 있는지 알고 싶을 때는 ros2 interface show를 사용합니다.
$ ros2 interface show gazebo_msgs/srv/SpawnEntity
string name                       # Name of the entity to be spawned (optional).
string xml                        # Entity XML description as a string, either URDF or SDF.
string robot_namespace            # Spawn robot and all ROS interfaces under this namespace
geometry_msgs/Pose initial_pose   # Initial entity pose.
string reference_frame            # initial_pose is defined relative to the frame of this entity.
                                  # If left empty or "world" or "map", then gazebo world frame is
                                  # used.
                                  # If non-existent entity is specified, an error is returned
                                  # and the entity is not spawned.
---
bool success                      # Return true if spawned successfully.
string status_message             # Comments if available.
서비스 타입 중간에 보이는 - - - 부분은 request와 response의 구분자라고 생각하시면 됩니다.
- 이번 시간의 실습을 위해, 새로운 Gazebo 환경을 소개하고자 합니다. 해당 환경의 실행을 위해 아래와 같은 작업을 함께해주세요!
# package clone
cd ~/ros2_ws/src
git clone https://github.com/RB2023ROS/gz_ros2_examples.git

# package build & sourcing
cd ~/ros2_ws
cbp rgbd_world && source install/setup.bash
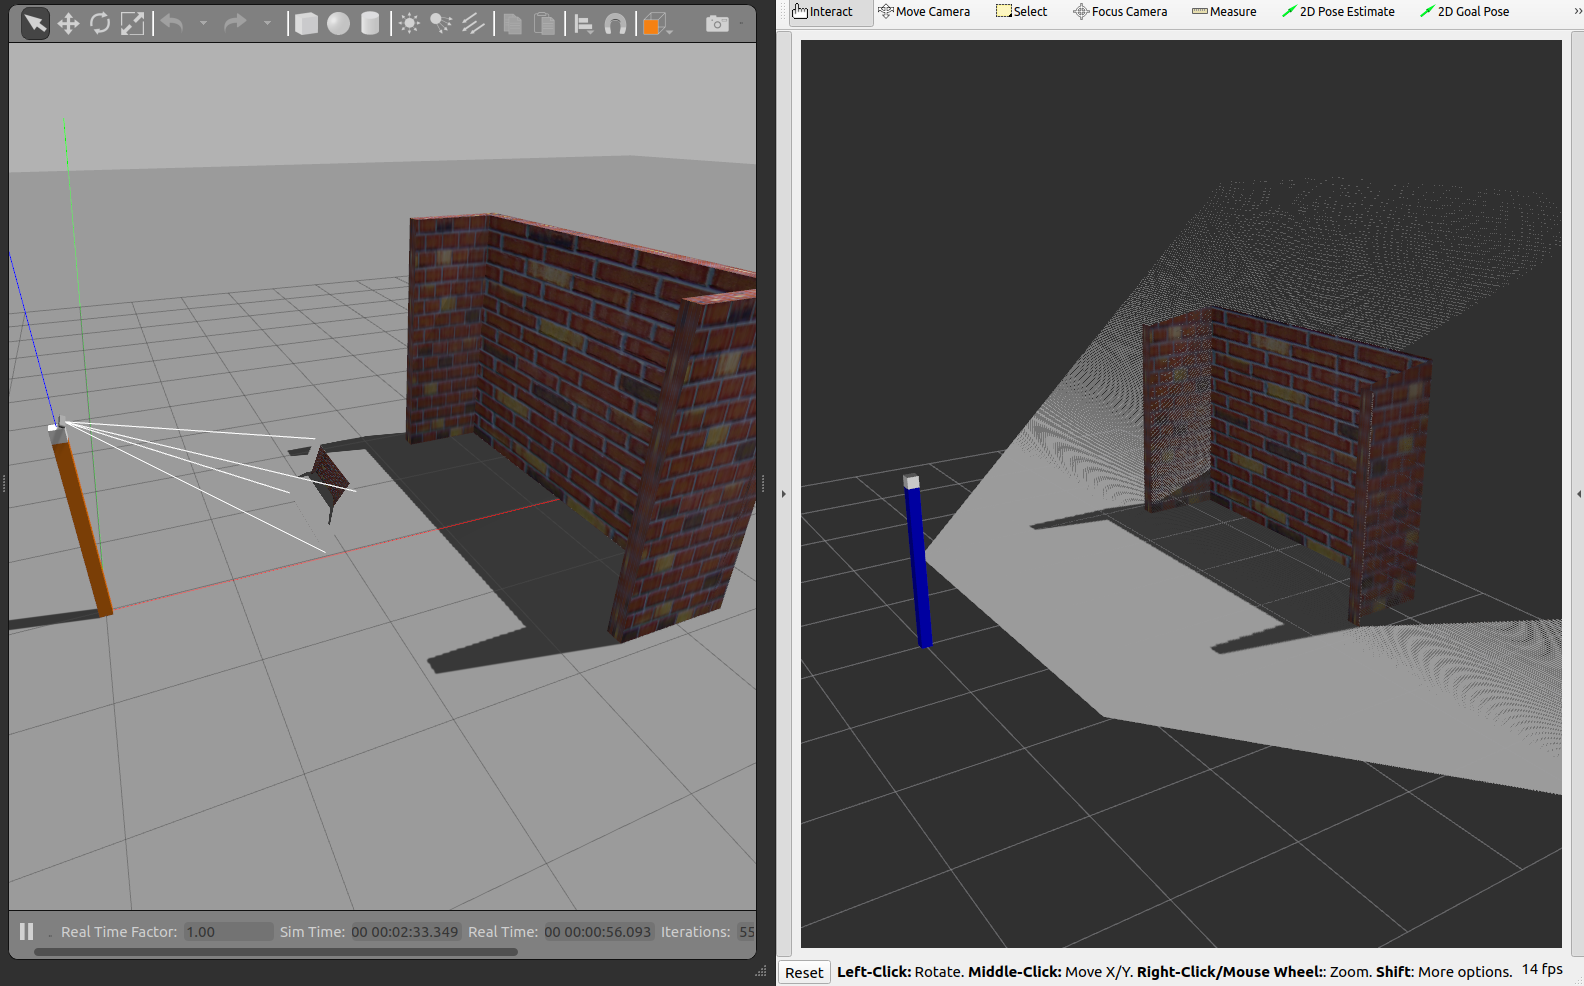
- ros2 launch를 통해 이번 실습을 위한 환경을 실행해봅시다.
ros2 launch rgbd_world depth_world.launch.py
⇒ 카메라와 벽이 포함된 간단한 환경을 구성하였습니다. 참고로 PC 성능에 따라 Rviz2 화면이 매우 느릴 수 있으니 불편하시다면 point cloud 시각화는 제거해주세요!!
ROS 2 Service Programming - Python
example 1 - Service Client Example (Spawn Entity)
- 이번 예시의 데모를 먼저 보여드리겠습니다.
# Demo package build
cd ~/ros2_ws/src
cbp py_service_tutorial
source install/local_setup.bash

# Terminal 1 - gazebo env launch
ros2 launch rgbd_world depth_world.launch.py

# Terminal 2 - Execute Service Client
ros2 run py_service_tutorial spawn_object_wo_gravity
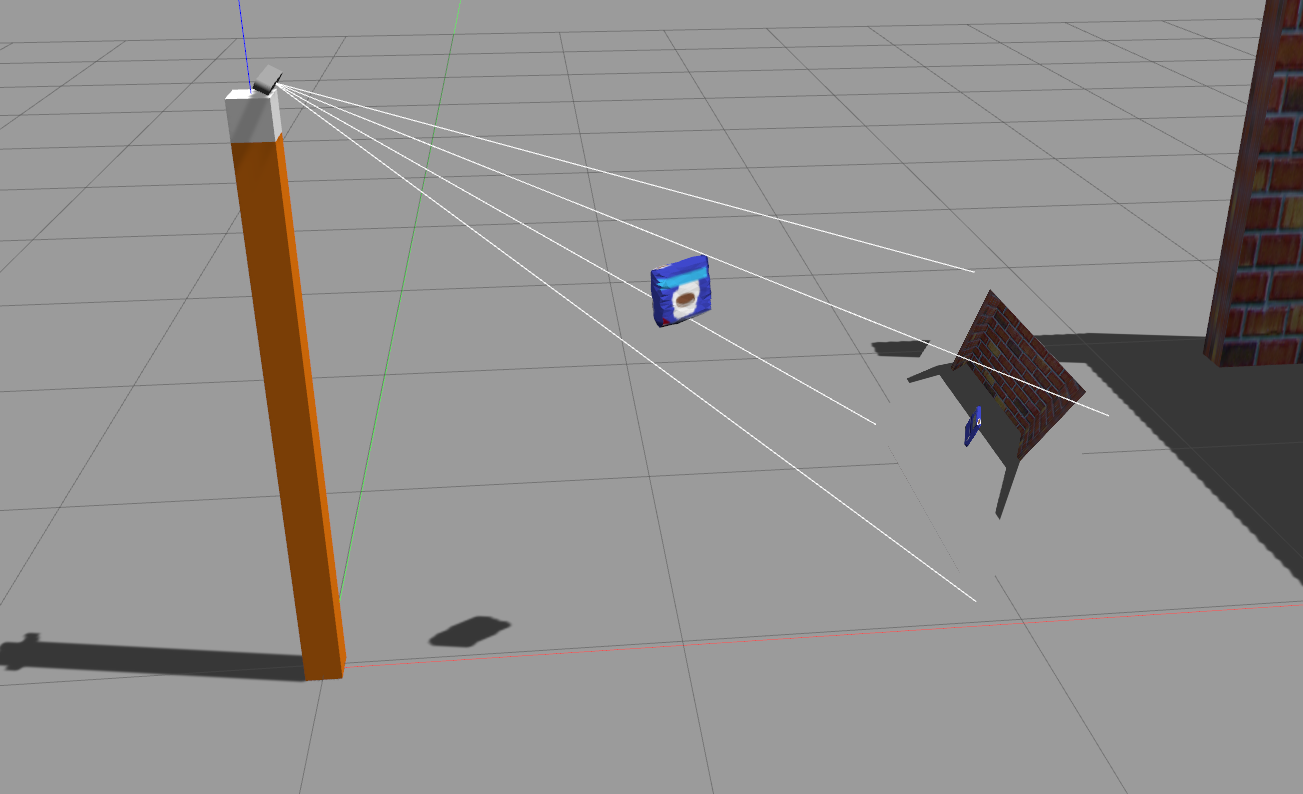
- Terminal 2에서 아래와 같은 콘솔 로그를 볼 수 있으며, 원하는 물체를 선택하면 gazebo 환경 상에서 해당 물체가 등장하는 것을 확인 가능합니다.
Enter Model name Among Below List
        1.arm_part	2.beer         	3.biscuits
        4.book     	5.bowl        	6.create
        7.disk_part	8.eraser      	9.glue
        10.hammer  	11.plastic_cup	12.snacks
        13.soap    	14.soap2      	15.soda_can
        16.sticky_notes
        [Type your choice]:
예시 설명
Gazebo는 개발 초기부터 ROS의 사용을 고려한 시스템입니다. Gazebo와 ROS 사이의 인터페이스는 gazebo_ros_pkg가 담당하고 있습니다.
⇒ https://github.com/ros-simulation/gazebo_ros_pkgs
⇒ https://classic.gazebosim.org/tutorials?cat=connect_ros
- gazebo_ros_pkg를 통해 gazebo를 실행하면 여러 유용한 topic, service가 함께 실행됩니다.
# Terminal 1
ros2 launch gazebo_ros_pkg gazebo.launch.py
# Terminal 2
ros2 topic list

ros2 servie list
- 이들 중, 지금 예시에서는 “/spawn” service에 request한 것이며, 이는 xml 문법을 통해 원하는 모델을 Gazebo Client에 등장시켜즙니다. (즉, Service Client를 실행한 것입니다.)
# get info about service
ros2 service type /spawn

# get info about srv
ros2 interface show <sth>
코드 분석
- 첫 번째로 분석할 코드는 spawn_object.py 입니다. 사용할 srv를 import하고 있습니다.
from gazebo_msgs.srv import SpawnEntity
import rclpy
from rclpy.node import Node
- Service Client의 생성은 create_client를 사용합니다.
class SpawnClientNode(Node):

    def __init__(self):
        super().__init__('gazebo_model_spawner')
        self.client = self.create_client(SpawnEntity, 'spawn_entity')
| Parameter | Description |
|---|---|
| Srv Type | Service에 사용될 데이터 타입 |
| Service Name | Request 대상이 되는 Service 이름 |
- Client 입장에서 존재하지도 않은 Server를 계속 기다리면 안될 것입니다. 이를 방지하기 위해 일반적으로 특정 시간 동안 대기하는 로직을 사용합니다.
while not self.client.wait_for_service(timeout_sec=1.0):
    self.get_logger().error('service not available, waiting again...')
- 클래스를 더 분석하기 전에 main문을 살펴보겠습니다.
- Node를 생성하며, 해당 Node내부에는 Service Client가 구현되어 있습니다.
- send_req()를 통해 Service Call을 실행합니다. (내부적으로 call_async() 실행) 이에 따른 결과로 future라는 값이 반환됩니다.
- spin_until_future_complete()를 통해 future가 진행되는 동안 비동기로 대기합니다.
- future가 완료 상태가 되면 Response를 출력하게 됩니다.
def main(args=None):

    rclpy.init(args=args)
    robot_spawn_node = SpawnClientNode()

    future = robot_spawn_node.send_req()
    rclpy.spin_until_future_complete(robot_spawn_node, future)

    if future.done():
        try:
            response = future.result()
        except Exception:
            raise RuntimeError(
                'exception while calling service: %r' % future.exception()
            )
        else:
            robot_spawn_node.get_logger().info('==== Service Call Done ====')
            robot_spawn_node.get_logger().info(f'Status_message : {response.status_message}')
        finally:
            robot_spawn_node.get_logger().warn('==== Shutting down node. ====')

    robot_spawn_node.destroy_node()
    rclpy.shutdown()
Future란 rclpy에서 멀티쓰레딩을 위해 사용되며, task의 상태를 담고 있는 객체입니다.
- 다시 클래스로 돌아와서, send_req() 메소드를 살펴봅시다. Srv를 채우고 call_async() 함수를 통해 이를 Service Server에게 전달합니다. 그 결과로 얻게 된 future를 반환하게 됩니다.
def send_req(self):
		...
    self.get_logger().debug('==== Sending service request to `/spawn_entity` ====')
    self.future = self.client.call_async(self.req)

    return self.future
- 동기 Request인 call()도 있지만, 이렇게 되는 경우 다른 callback의 사용, 혹은 spin의 동작을 막게 되어 전체 시스템의 deadlock을 유발합니다. 때문에 공식 튜토리얼에서도 비동기 Call을 추천하고 있습니다.
def send_req(self):
		...
    self.get_logger().debug('==== Sending service request to `/spawn_entity` ====')
    self.future = self.client.call(self.req)

    return self.future
Service Client 관련 메소드들을 정리해봅시다.
| Code | Description |
|---|---|
| create_client(, ) | client 생성 |
| spin_until_future_complete(,) | Client Request Task가 완료되기까지 비동기 대기 |
| future.done(), future.result() | Future의 상태를 다루는 함수들 |
| call_async(), call() | 비동기, 동기 service call |
- 기능상으로, 새로운 물체를 등장시키면 중력에 의해 물체가 바닥으로 떨어져버립니다. 이를 방지하기 위해 gazebo의 물성치 옵션을 꺼줘야 합니다. spawn_object_wo_gravity.py에는 이를 위한 구현이 추가되어 있습니다.
self.physics_client = self.create_client(Empty, 'pause_physics')
...
# physics pause request
pause_future = robot_spawn_node.send_pause_req()
rclpy.spin_until_future_complete(robot_spawn_node, pause_future)
future_pending_logic("Pause",robot_spawn_node, pause_future)
example 2 - Service Server Example (Snapshot)
이번에 보여드릴 ROS 2 service 예시는 Gazebo상의 카메라를 통해 사진을 찍는 Service Server입니다.
- 예시 실행 - rqt를 통해 service call이 성공하면 현재 시간에 해당하는 파일이름으로 카메라가 바라보는 시야 이미지가 저장됩니다.
# Terminal 1 - Execute Gazebo World
ros2 launch rgbd_world depth_world.launch.py

# Terminal 2 - Execute Service Server
ros2 run py_service_tutorial take_picture_server

# Terminal 3 - Execute rqt's service caller
rqt
- Service Caller의 사용법과 결과는 다음과 같습니다.
⇒ data 필드에 True를 전달하면 사진을 찍어 workspace에 저장해줍니다.

코드 분석
코드를 살펴보기 전에, 이를 어떻게 구현할 수 있을지 같이 생각해봅시다.
- 사진 촬영 신호를 받아 수행하는 Service Server
- 카메라 image data Subscriber
항상 사진을 찍는 것이 아니라 Service Call이 오는 그 순간에만 사진을 저장해야 합니다.
⇒ 위 조건에 따라 작성한 Node의 생성자는 다음과 같습니다.
class PictureNode(Node):

    def __init__(self):
        super().__init__('turtle_circle_server')

        self.img_topic_name = "/rgb_cam/rgb_cam/image_raw"

        self.server = self.create_service(
            SetBool, 'take_picture', self.take_picture_callback
        )

        self.subscriber = self.create_subscription(
            Image, self.img_topic_name, self.sub_callback, 10
        )

        self.br = CvBridge()
        self.is_request = False
- Service Server의 생성은 create_service를 사용하며 필요한 매개변수들은 아래와 같습니다.
| Parameter | Description |
|---|---|
| SetBool | Srv Type |
| ’take_picture' | Service Name |
| self.take_picture_callback | Request 시 실행될 Service Callback |
- 참고로 이번에 사용하는 srv는 example_interfaces/srv/SetBool이며, Bool Type의 request와 String response를 갖고 있습니다. (ros2 interface show를 통해 조회 가능합니다.)
$ ros2 interface show example_interfaces/srv/SetBool
# This is an example of a service to set a boolean value.
# This can be used for testing but a semantically meaningful
# one should be created to be built upon.

bool data # e.g. for hardware enabling / disabling
---
bool success   # indicate successful run of triggered service
string message # informational, e.g. for error messages
- service call에 대한 callback, take_picture_callback()입니다. 이 callback은 request와 response 2개의 매개변수를 필요로 하는 함수로, bool type의 data가 True이면 내부 상태를 변화시킵니다.
		def take_picture_callback(self, request, response):

        if request.data is True:
            self.get_logger().info('KimChi~')
            self.is_request = True

        response.success = True
        response.message = "Successfully image written"

        return response
- 클래스 내부 is_request의 상태가 변화하면 subscription callback에서 이미지를 저장하는 로직이 실행됩니다. CV Bridge를 통해 ROS topic을 OpenCV 포맷으로 바꿀 수 있으며, imwrite를 통해 이미지를 저장할 수 있습니다.
def sub_callback(self, data):

    if self.is_request:
        current_frame = self.br.imgmsg_to_cv2(data, "bgr8")

        file_name = str(self.get_clock().now().to_msg().sec) + '.png'
        cv2.imwrite(file_name, current_frame)
        self.get_logger().info(f'Image saved in {file_name}')

        self.is_request = False
ROS 2 Service Programming - C++
example 1 - Service Client Example (Spawn Entity)
- 이번에는 동일한 코드를 C++로 구현해 봅시다. 일전 예시와 기능은 동일하므로 실행만 해보겠습니다.
# Terminal 1 - gazebo env launch
ros2 launch rgbd_world depth_world.launch.py

# Terminal 2 - Execute Service Client
ros2 run cpp_service_tutorial spawn_object_wo_gravity
코드 분석
- 이번에 분석할 코드는 spawn_object_wo_gravity.cpp ****입니다. include시 snake case를 사용한다는 점에 유의합니다. (저는 copilot을 통해 손쉽게 개발하고 있습니다.)
#include "rclcpp/rclcpp.hpp"
#include "std_srvs/srv/empty.hpp"
#include "gazebo_msgs/srv/spawn_entity.hpp"
- Service Client의 생성은 create_client를 사용합니다. 중력을 정지키시는 service와 모델을 등장시키는 service 총 2가지를 사용합니다.
class GZSpawnClient : public rclcpp::Node {
private:
  rclcpp::Client<Spawn>::SharedPtr spawn_client;
  rclcpp::Client<Empty>::SharedPtr pause_client;
  ...

public:
  GZSpawnClient() : Node("gazebo_model_spawner"){
    pause_client = this->create_client<Empty>("pause_physics");
    spawn_client = this->create_client<Spawn>("spawn_entity");
| Parameter | Description |
|---|---|
| template argument | Service에 사용될 데이터 타입 |
| service name | Request 대상이 되는 Service 이름 |
- python예시와 동일하게 각 Service Client 마다 특정 시간 동안 대기하는 로직을 사용합니다.
while (!pause_client->wait_for_service(1s)) {
  if (!rclcpp::ok()) {
    RCLCPP_ERROR(this->get_logger(), "Interrupted while waiting for the service. Exiting.");
    exit(0);
  }
  RCLCPP_INFO(this->get_logger(), "Pause service not available, waiting again...");
}
- main문을 살펴보겠습니다.
- Node를 생성하며, 해당 Node내부에는 Service Client가 구현되어 있습니다.
- send_pause_request()를 통해 Pause Service Call을 실행합니다. (내부적으로 async_send_request() 실행) 이에 따른 결과로 future가 반환됩니다.
- Pause에 대한 response를 완료합니다.
- Spawn Service를 위해 사용자로부터 등장시킬 물체를 선택받습니다.
- spin_until_future_complete()를 통해 spawn future가 진행되는 동안 비동기로 대기합니다.
- future가 완료 상태가 되면 Response를 출력하게 됩니다.
int main(int argc, char **argv) {
  rclcpp::init(argc, argv);

  auto node = std::make_shared<GZSpawnClient>();

  auto pause_result = node->send_pause_request();
  if (rclcpp::spin_until_future_complete(node, pause_result) == rclcpp::FutureReturnCode::SUCCESS) {
    RCLCPP_INFO(node->get_logger(), "Pause Successfully Done.");
  } else {
    RCLCPP_ERROR(node->get_logger(), "Failed to pause physics!");
  }

  std::string model_name;
  ...

  auto spawn_result = node->send_spawn_request(model_name);
  // Wait for the spawn_result.
  if (rclcpp::spin_until_future_complete(node, spawn_result) == rclcpp::FutureReturnCode::SUCCESS) {
    RCLCPP_INFO(node->get_logger(), "Spawn Successfully Done.");
  } else {
    RCLCPP_ERROR(node->get_logger(), "Failed to spawn model!");
  }

  rclcpp::shutdown();

  return 0;
}
- rclcpp::FutureReturnCode는 3가지 상태를 갖는 enum type입니다.
| Enumerator |
|---|
| SUCCESS |
| INTERRUPTED |
| TIMEOUT |
- 물성치를 정지시키는 pause service call은 딱히 추가 작업이 필요 없습니다. (Empty Call이기 때문입니다.)
auto send_pause_request(){
  return pause_client->async_send_request(pause_request);
}
- spawn request에서는 물체의 sdf 파일을 읽어들이고 이를 service srv 데이터 필드에 채운 뒤, 최종 service call이 이루어집니다. 물체의 이름과 번호 매칭을 위해 map 자료구조를 사용합니다.
auto send_spawn_request(const std::string &model_name){
    auto item = model_map.find(model_name);
    std::string model_path;
    ...

    spawn_request->xml  = ss.str();
    ...

    return spawn_client->async_send_request(spawn_request);
  }
service call의 동기, 비동기 실행에 대해서는 이후 Advanced 강의에서 좀 더 자세하게 다루어 볼 예정입니다.
Service Client 관련 메소드들을 정리해봅시다.
| Code | Description |
|---|---|
| create_client() | client 생성 |
| rclcpp::spin_until_future_complete(,) | Client Request Task가 완료되기까지 비동기 대기 |
| rclcpp::FutureReturnCode | Future의 상태를 담고 있는 enum type |
| async_send_request(std::make_sharedSpawn::Request) | 비동기 service call |
example 2 - Service Server Example (Snapshot)
- python 때와 마찬가지로 예시를 실행해봅시다.
# Terminal 1 - Execute Gazebo World
ros2 launch rgbd_world depth_world.launch.py

# Terminal 2 - Execute Service Server
ros2 run cpp_service_tutorial take_picture_server

# Terminal 3 - Execute rqt's service caller
rqt
- Service Caller의 사용법과 결과는 다음과 같습니다.
코드 분석
지금, 우리에게 필요한 통신 메커니즘은 2가지 입니다.
- 사진 촬영 신호를 받아 수행하는 Service Server
- 카메라 image data Subscriber
복습을 해볼 겸, 이 부분을 직접 코딩해보는 것도 좋은 학습이 될 것입니다.
- Node의 생성자는 다음과 같습니다.
class PictureNode : public rclcpp::Node {
private:
  rclcpp::Service<SetBool>::SharedPtr bool_server;
  rclcpp::Subscription<Image>::SharedPtr image_subscriber;
...
public:
  PictureNode() : Node("take_picture_server"){
    image_subscriber = this->create_subscription<Image>(
      this->img_topic_name, 10,
      std::bind(&PictureNode::img_sub_callback, this, std::placeholders::_1)
    );

    bool_server = this->create_service<SetBool>(
      "take_picture",
      std::bind(&PictureNode::server_callback, this, std::placeholders::_1, std::placeholders::_2)
    );
client service 먼저 살펴보겠습니다.
- Service Server의 생성은 create_service를 사용하며 필요한 매개변수들은 아래와 같습니다.
| Parameter | Description |
|---|---|
| template argument | Srv Type |
| “take_picture” | Service Name |
| std::bind(Class, Method) | Request 시 실행될 Service Callback |
- create_service의 callback 함수는 request와 response 2개의 매개변수를 갖습니다. request를 통해 일련의 로직을 실행하고 결과를 response로 리턴하는 방식을 갖고 있습니다.
void server_callback(const std::shared_ptr<SetBool::Request> request,
                      const std::shared_ptr<SetBool::Response> response){
  if (request->data) {
    RCLCPP_INFO(this->get_logger(), "KimChi~");
    this->is_request = true;
  }

  response->success = true;
  response->message = "Successfully image written";
}
- subscription callback에서는 이미지를 저장하는 로직이 실행됩니다. CV Bridge를 통해 ROS topic을 OpenCV 포맷으로 바꿀 수 있는데요. OpenCV와 ROS 2를 다루는 내용이 등장했는데 지금은 우선 간단하게 살펴본 뒤, 이후 강의에서 다시 한 번 자세히 다룰 예정입니다.
#include <cv_bridge/cv_bridge.h>
#include <image_transport/image_transport.hpp> // Using image_transport allows us to publish and subscribe to compressed image streams in ROS2
#include <opencv2/opencv.hpp> // We include everything about OpenCV as we don't care much about compilation time at the moment.

#include "rclcpp/rclcpp.hpp"

#include "sensor_msgs/msg/image.hpp"
#include "example_interfaces/srv/set_bool.hpp"

...

void img_sub_callback(const Image::ConstSharedPtr msg){
  if (this->is_request){
    cv::Mat img = cv_bridge::toCvShare(msg, "bgr8")->image;

    std::string file_name = std::to_string(this->get_clock()->now().seconds()) + ".jpg";
    cv::imwrite(file_name, img);

    RCLCPP_INFO(this->get_logger(), "Image saved as %s", file_name.c_str());
    this->is_request = false;
  }
}
- 주의할 점으로 빌드 시 OpenCV 종속성을 기입해줘야 합니다.
find_package(rclcpp REQUIRED)
find_package(std_srvs REQUIRED)
find_package(turtlesim REQUIRED)
find_package(sensor_msgs REQUIRED)
find_package(gazebo_msgs REQUIRED)
find_package(geometry_msgs REQUIRED)
find_package(custom_interfaces REQUIRED)
find_package(example_interfaces REQUIRED)

find_package(OpenCV REQUIRED)
find_package(cv_bridge REQUIRED)
find_package(image_transport REQUIRED)

add_executable(take_picture_server src/take_picture_server.cpp)
ament_target_dependencies(take_picture_server rclcpp example_interfaces std_msgs sensor_msgs cv_bridge image_transport OpenCV)
- 참고로 저는 ROS 2를 설치할 시 기본 세팅되는 OpenCV를 사용하였습니다.