Lecture5 - First Programming, ROS Topic
이번 강의부터, 본격적인 프로그래밍이 시작됩니다.
첫번째로 Node의 프로그래밍을 살펴보고자 하며, 시작 전 간단한 복습을 진행하고 시작하겠습니다.
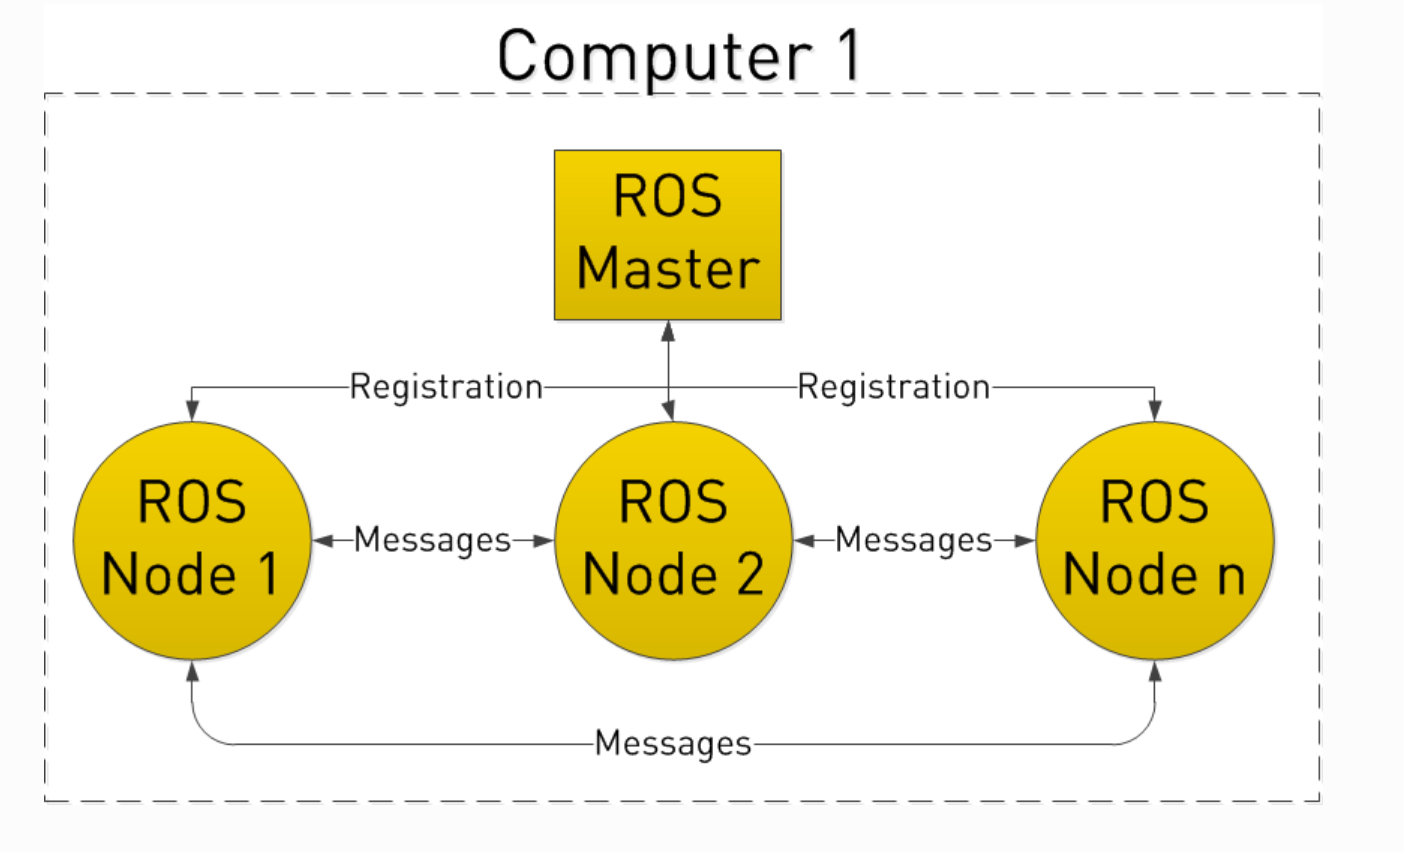
image from : clearpathrobotics
- Workspace와 패키지
# WS 생성
mkdir -p catkin_ws/src
cd catkin_ws
catkin config --init

# Package 생성
catkin_create_pkg <pkg-name> <depend1> <depend2> ...
ROS Node Programming
- C++ 코드는 src 폴더 안에, 파이썬 코드는 scripts라는 폴더 안에 위치시키는 것이 일반적입니다.
cd <pkg-name>
mkdir scripts
지금부터, 직접 명령어를 한줄씩 따라치면서 실습하셔도 좋고, 제가 미리 준비해둔 Package를 사용하셔도 좋습니다.
다음으로, 파이썬 코드를 작성하고 패키지를 빌드해봅시다.
cd scripts
# my_first_node.py 생성
첫번째 프로그래밍 코드는 Node의 기본입니다.
모든 소스코드는 github repo에서 확인 가능합니다.
- my_first_node.py
#!/usr/bin/env python3

import rospy
from std_msgs.msg import String

def my_first_node():
    # ROS nodes require initialization
    # It contains master registration, uploading parameters
    rospy.init_node('my_first_node', anonymous=True)

    # ROS safe timer
    rate = rospy.Rate(10) # 10hz

    # Loop control Example
    while not rospy.is_shutdown():
        hello_du = "hello du %s" % rospy.get_time()
        rospy.loginfo(hello_du)
        # Below line calls sleep method in Python internally.
        rate.sleep()

if __name__ == '__main__':
    try:
        my_first_node()
    except rospy.ROSInterruptException:
        pass
- 코드를 새로 작성한 다음에는 습관적으로 패키지를 빌드하고 실행합니다. 파이썬 코드의 경우 파일의 실행 권한이 주어져 있어야 합니다.
cd scripts
chmod +x *

cd ~/catkin_ws
catkin build my_first_pkg
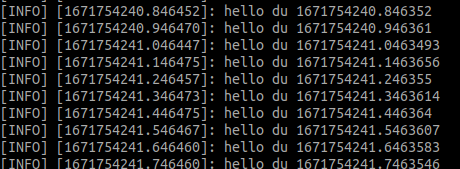
- 작성한 node를 실행해봅시다. 반복해서 터미널 로그가 남을 것입니다.
# Terminal 1
roscore

# Terminal 2
rosrun my_first_package my_first_node.py
코드 분석
첫 코드인 만큼 자세하게 분석하고 넘어가보려 합니다.
- ROS Noetic은 Python 3를 사용합니다. 가상환경의 파이썬, 직접 설치한 파이썬 등 여러 버전이 설치되어 있을 것입니다. 공식 문서에서는 이러한 혼란을 방지하기 위해 코드의 제일 처음 아래 라인을 추가하는 것을 추천하고 있습니다.
#!/usr/bin/env python3
- Python을 사용하여 ROS를 다루기 위해 사용되는 패키지는 rospy입니다. import를 사용해도 좋고 from / import를 통해 특정 클래스만 가져올 수도 있습니다.
import rospy
from std_msgs.msg import String
- 당장 사용하지는 않지만 Test Code를 작성해야 하는 경우가 있습니다. 이러한 상황에 대비하기 위해 main 함수를 따로 두고 아래와 같이 프로그램을 시작하기를 권장합니다.
if __name__ == '__main__':
    try:
        my_first_node()
    except rospy.ROSInterruptException:
        pass
- 이제, my_first_node를 분석해 보겠습니다. Node의 실행을 위해 Master에 등록하고, 초기화하는 작업이 필요하며, 이를 위해 별도로 init_node라는 메소드를 실행해주어야 합니다.
def my_first_node():
    # ROS nodes require initialization
    # It contains master registration, uploading parameters
    rospy.init_node('my_first_node', anonymous=True)
- ROS 시스템은 기본적으로 무한 Loop입니다. 이 Loop가 한차례 반복되는 주기를 설정하는 부분입니다. ROS의 시간 체계에 대해서는 이후 한번 더 다루겠습니다.
    # ROS safe timer
    rate = rospy.Rate(10) # 10hz
- rospy를 통해 실행 중인 Node의 상태를 확인할 수 있으며,
is_shutdown()은 예기치 못한 에러가 발생하거나 사용자의 종료를 인지할 수 있습니다. 10Hz를 맞추기 위해 Loop마다 sleep을 걸어주고 있습니다.
    # Loop control Example
    while not rospy.is_shutdown():
        ...
        rate.sleep()
- ROS에서 콘솔 로그를 얻는 방법으로 print 보다
rospy.log를 사용하기를 추천합니다.
        hello_du = "hello du %s" % rospy.get_time()
        rospy.loginfo(hello_du)
        # Below line calls sleep method in Python internally.
ROS Timer
ROS는 기본적으로 무한 Loop를 하나의 프로세스 안에서 동작시키는 프로그램입니다. Timer를 통해 일정 시간마다 동작하는 코드를 구현할 수 있습니다.
cd my_first_pkg/scripts
# spin_node.py 생성
- spin_node.py
#!/usr/bin/env python3

import rospy

# callback method requires event, which is TimerEvent
def hello_du(event=None):
    hello_du = "hello du %s" % rospy.get_time()
    rospy.loginfo(hello_du)

def my_first_node():
    rospy.init_node('my_first_node', anonymous=True)

    # Timer Class is kind of Thread.
    # It's rule is execute sleep in certain period with given event.
    rospy.Timer(rospy.Duration(1.0/100.0), hello_du)
    rospy.spin()

if __name__ == '__main__':
    try:
        my_first_node()
    except rospy.ROSInterruptException:
        pass
코드의 실행 결과는 이전과 같기 때문에 Timer와 spin에 대해서만 짚고 넘어가겠습니다.
- Timer는 크게 두가지 매개변수를 받습니다. 실행 주기와 Callback 함수입니다. 해당 주기마다 Callback 함수를 실행시킵니다.
rospy.Timer(rospy.Duration(1.0/100.0), hello_du)
- 앞으로 여러분들은 직접 while loop를 구현하기보다
rospy.spin()을 더 많이 사용하시게 될 겁니다. Timer를 선언한 이후, 하나의 Thread에서 막혀버리는 것을 방지하는 역할을 수행합니다.
    rospy.Timer(rospy.Duration(1.0/100.0), hello_du)
    rospy.spin()
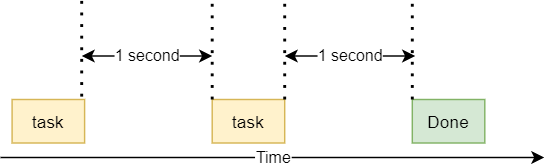
image from : python tutorial
OOP Node Programming
- my_first_oop_node.py
#!/usr/bin/env python3

import rospy

class OOPNode:

    def __init__(self):
        self.counter_ = 0
        self.timer_ = rospy.Timer(rospy.Duration(1.0/100.0), self.hello_du)

    def hello_du(self, event=None):
        hello_du = f"hello du {rospy.get_time()}, counter: {self.counter_}"
        rospy.loginfo(hello_du)
        self.counter_ += 1

def my_first_oop_node():
    rospy.init_node('my_first_oop_node', anonymous=True)

    oop_node = OOPNode()

    rospy.spin()

if __name__ == '__main__':
    try:
        my_first_oop_node()
    except rospy.ROSInterruptException:
        pass
이후의 실습들을 위해 한가지 예시만 더 살펴보고자 합니다. 객체 지향을 사용한 ROS Node 작성방법입니다. 파이썬에서 OOP를 사용하기 위해 Class 키워드를 사용하며, self등 OOP와 관련된 내용은 모두 알고 있다는 상태에서 진행하겠습니다.
- OOP를 사용하면 main 메소드가 매우 간편해진다는 장점이 있습니다. 클래스를 생성하고, spin을 하기만 하면 됩니다.
def my_first_oop_node():
    rospy.init_node('my_first_oop_node', anonymous=True)
    oop_node = OOPNode()
    rospy.spin()
- OOP로 전환되면서 변경된 구현에 주목합시다. Timer의 Callback 함수로 클래스 메소드가 사용되었으며, 클래스 변수인 counter를 사용하여 구현한 점에 주목합니다.
class OOPNode:
    def __init__(self):
        self.counter_ = 0
        self.timer_ = rospy.Timer(rospy.Duration(1.0/100.0), self.hello_du)

    def hello_du(self, event=None):
        hello_du = f"hello du {rospy.get_time()}, counter: {self.counter_}"
        rospy.loginfo(hello_du)
        self.counter_ += 1
앞으로, 대부분의 코드는 OOP 기반으로 작성됩니다. 파이썬의 클래스에 대해 숙지가 되어있지 않다면 꼭 복습하고 다음 강의를 청취하세요!
ROS Topic
다시 개념 학습으로 돌아와보았습니다. 아래 그림은 지난 강의의 rqt_graph입니다.

위 그림에서 동그라미는 Node를 뜻하고, 화살표는 topic을 뜻합니다.
이번 시간에는 이 Topic이 무엇인지 배워보고자 합니다.
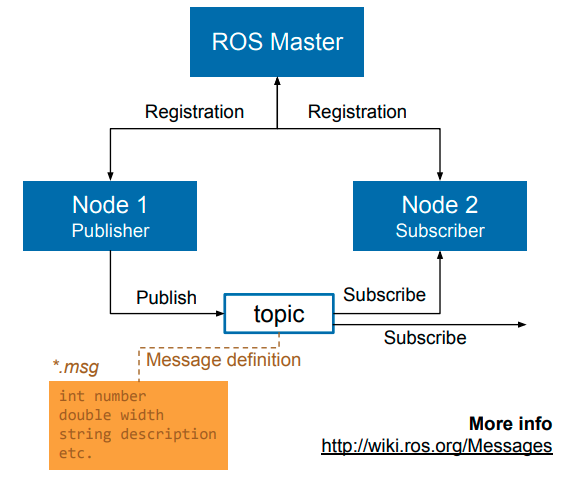
Topic은 Node들 사이에 데이터(Message)가 오가는 길(Bus)의 이름입니다.
- image from : docs.ros.org
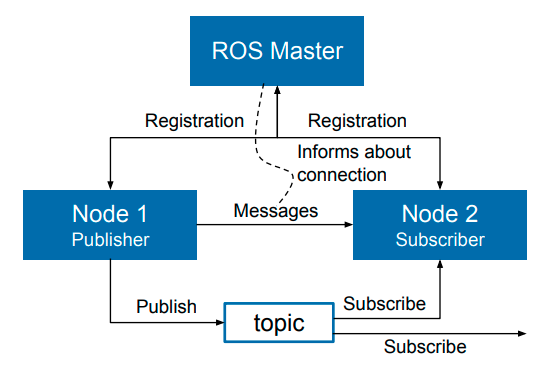
그림에서와 같이 ROS Topic은
- Publisher(발행자) Subscriber(구독자)로 나누어 Topic의 송신, 수신자를 구분합니다.
- Publisher, Subscriber는 Node안에서 생성되며 별도로 사용할 수는 없습니다.
- Pub/Sub 사이에 Message가 전달되며, 이 길의 이름이 Topic인 것입니다.
- 주의할 점은, Publisher, Subscriber는 오로지 Topic의 이름으로 소통한다는 것입니다. 어떤 Node에 publish 할지 Publisher는 전혀 모르며 오로지 Topic이 같은 Subscriber가 데이터를 받게 됩니다.
더불어, Topic은 여러 Node들로 부터 데이터를 받을 수 있고, 전송 시에도 여러 Node들에게 전송이 가능한 방식입니다. ⇒ Topic의 중요한 속성이니 꼭 알아두셨으면 좋겠습니다.
- image from : docs.ros.org
Node와 Topic의 개념을 다시 한 번 다잡고 갑시다.
- Node는 실행되는 프로그램이며, ROS Master에 등록하고 관리됩니다.
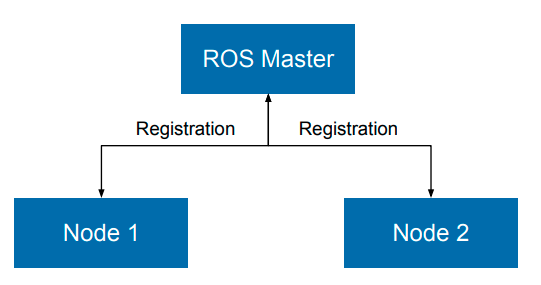
- Node들 사이의 통신 메커니즘 중 Topic이라는 것이 있으며, 이는 Publisher와 Subscriber라는 개념을 갖고 있습니다.
- Publisher와 Subscriber 사이의 오가는 데이터는 특정한 타입을 갖습니다. 이를 Message라고 부릅니다.
Topic Message
- 로봇 프로그래밍 시에는 다양한 센서 데이터들이 다뤄집니다.
- 센서 뿐만 아니라, 제어 데이터도 주고 받아야 합니다.

ROS에서는 주로 사용되는 이러한 데이터 형식을 Message라는 이름으로 지칭하며, 여러 기본 형태를 제공합니다. 더불어 사용자가 직접 Message를 커스터마이징할 수도 있습니다.
- 일전 예시의 분석을 통해 Topic과 Message에 대해 다시 한 번 살펴봅시다.
# Terminal 1
roscore
# Terminal 2
rosrun roscpp_tutorials talker
# Terminal 3
rosrun roscpp_tutorials listener
두 프로그램이 실행되고 있는 상태를 유지하면서, 아래 내용을 따라와주세요
- rostopic list를 통해 사용중인 topic들을 모두 조회 가능합니다.
$ rostopic list
/chatter
/rosout
/rosout_agg
- 특정 topic에 대한 자세한 정보를 알고 싶다면 rostopic info를 사용합니다. talker와 listener가 조회된 모습도 보입니다.
$ rostopic info /chatter
Type: std_msgs/String

Publishers:
 * /talker_215337_1671763968667 (http://192.168.55.236:37863/)

Subscribers:
 * /listener_215355_1671763970127 (http://192.168.55.236:44969/)
- 해당 topic이 사용중인 Message를 조회하기 위해 rostopic type을 사용합니다.
$ rostopic type /chatter
std_msgs/String
- rosmsg show를 통해 Message의 원형을 확인할 수 있습니다.
$ rosmsg show std_msgs/String
string data
- topic 데이터를 엿볼 수 있는 rostopic echo입니다.
$ rostopic echo /chatter
data: "hello world 1671764088.1913402"
---
data: "hello world 1671764088.2913551"
---
...
- rostopic hz로 topic의 pub/sub 주기를 분석할 수 있습니다.
$ rostopic hz /chatter
subscribed to [/chatter]
average rate: 10.000
	min: 0.100s max: 0.100s std dev: 0.00014s window: 10
average rate: 9.999
	min: 0.099s max: 0.100s std dev: 0.00023s window: 20
마지막으로 rqt_graph를 다시 한 번 살펴봅시다.
rqt_graph

방금 살펴본 커멘드 라인들을 충분히 숙지하시기 바랍니다. 그러한 의미에서, 이번에는 Gazebo 예시를 분석해볼까 합니다.
# Terminal 1
roslaunch smb_gazebo smb_gazebo.launch
# Terminal 2
rosrun teleop_twist_keyboard teleop_twist_keyboard.py
- rostopic list 결과
$ rostopic list
/clicked_point
/clock
/cmd_vel
/diagnostics
/e_stop
/gazebo/link_states
/gazebo/model_states
/gazebo/parameter_descriptions
/gazebo/parameter_updates
/gazebo/performance_metrics
/gazebo/set_link_state
...
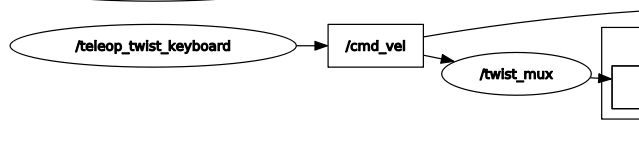
우리가 집중하고자 하는 topic은 로봇을 제어하는 /cmd_vel입니다.
- rostopic info 결과
$ rostopic info /cmd_vel
Type: geometry_msgs/Twist

Publishers:
 * /teleop_twist_keyboard (http://192.168.55.236:33903/)

Subscribers:
 * /twist_mux (http://192.168.55.236:38201/)
 * /gazebo (http://192.168.55.236:33033/)
- rostopic type 결과
$ rostopic type /cmd_vel
geometry_msgs/Twist
- geometry_msgs/Twist의 rosmsg show 결과
$ rosmsg show geometry_msgs/Twist
geometry_msgs/Vector3 linear
  float64 x
  float64 y
  float64 z
geometry_msgs/Vector3 angular
  float64 x
  float64 y
  float64 z
- /scan의 rostopic echo 결과
$ rostopic echo /scan
header:
  seq: 0
  stamp:
    secs: 204
    nsecs: 678000000
  frame_id: "rslidar"
angle_min: -1.5707999467849731
angle_max: 1.5707999467849731
angle_increment: 0.008700000122189522
time_increment: 0.0
scan_time: 0.033330000936985016
range_min: 0.44999998807907104
range_max: 50.0
ranges: [inf, inf, inf, inf, inf, inf, inf, inf, inf, inf, inf, ...
- /scan의 rostopic hz결과
$ rostopic hz /scan
subscribed to [/scan]
WARNING: may be using simulated time
average rate: 10.000
	min: 0.100s max: 0.100s std dev: 0.00000s window: 8
average rate: 10.000
	min: 0.100s max: 0.100s std dev: 0.00000s window: 17
rqt_graph에서 /cmd_vel을 찾아볼까요?
rqt_graph
Publisher 프로그래밍
이번 시간 사용할 Package는 py_topic_pkg 입니다. 실습 전 실행부터 해보겠습니다.
- Package Build
cd ~/catkin_ws
catkin build py_topic_pkg
source devel/setup.bash
- 예제 실행
# Terminal 1
roslaunch smb_gazebo smb_gazebo.launch

# Terminal 2
rosrun py_topic_pkg cmd_vel_pub.py
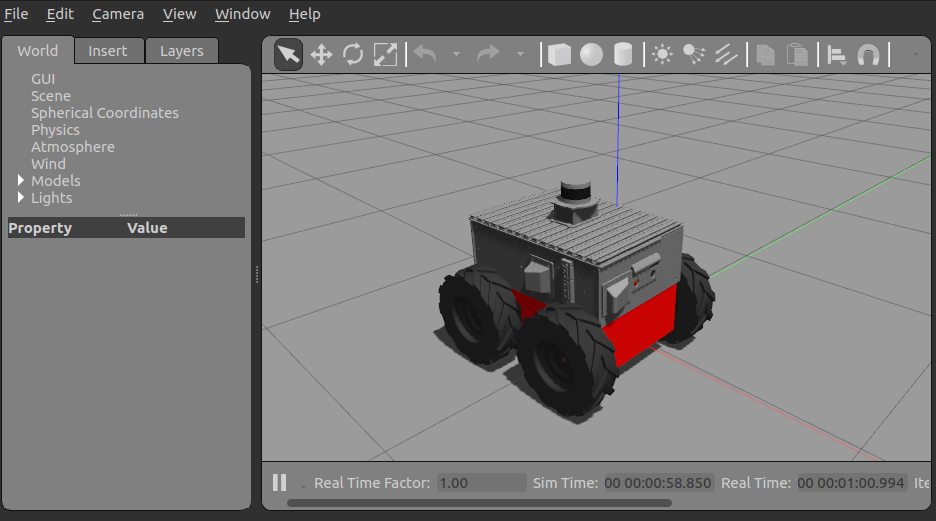
로봇이 아래와 같이 원을 그리며 움직일 것입니다.
- cmd_vel_pub.py
#!/usr/bin/env python3

import rospy
from geometry_msgs.msg import Twist

class CmdVelPubNode:

    def __init__(self):
        # Publisher requires 3 paramters
        #  1. topic name
        #  2. topic msg type
        #  3. topic queue size
        self.cmd_vel_pub_ = rospy.Publisher("cmd_vel", Twist, queue_size=10)
        self.timer_ = rospy.Timer(rospy.Duration(1.0/10.0), self.pub_msg)
        self.twist_ = Twist()

    def pub_msg(self, event=None):
        # geometry_msgs.Twist
        # ref: http://docs.ros.org/en/melodic/api/geometry_msgs/html/msg/Twist.html
        self.twist_.linear.x = 0.5
        self.twist_.angular.z = 1.0

        self.cmd_vel_pub_.publish(self.twist_)

def cmd_vel_node():
    rospy.init_node('cmd_vel_node', anonymous=True)
    cmd_vel_pub_node = CmdVelPubNode()
    rospy.spin()

if __name__ == '__main__':
    try:
        cmd_vel_node()
    except rospy.ROSInterruptException:
        pass
- 파이썬 ros 프로그래밍을 위한 rospy, 로봇의 속도 제어에 필요한 Message type인 Twist를 import 하고 있습니다.
import rospy
from geometry_msgs.msg import Twist
- rospy.Publisher를 통해 publisher를 생성할 수 있습니다. 이는 최소 3개의 매개변수를 필요로 합니다.
- topic 이름
- topic type
- queue size
self.cmd_vel_pub_ = rospy.Publisher("cmd_vel", Twist, queue_size=10)=
- 우리는 로봇의 제어 신호를 주기적으로 전송하고자 합니다. 따라서 Timer도 선언하였습니다.
self.timer_ = rospy.Timer(rospy.Duration(1.0/10.0), self.pub_msg)
- 다음으로, Message Type인 geometry_msgs/Twist 값을 채웁니다. 현재 우리 로봇은 2차원 평면에서 움직이며, 로봇 형태 때문에 앞뒤 선속도와 각속도를 갖게 됩니다.
        ...
        self.twist_ = Twist()

    def pub_msg(self, event=None):
        self.twist_.linear.x = 0.5
        self.twist_.angular.z = 1.0
Message의 종류는 매우 많습니다. 구글을 통해 검색하면서 코딩하는 습관을 들여봅시다.
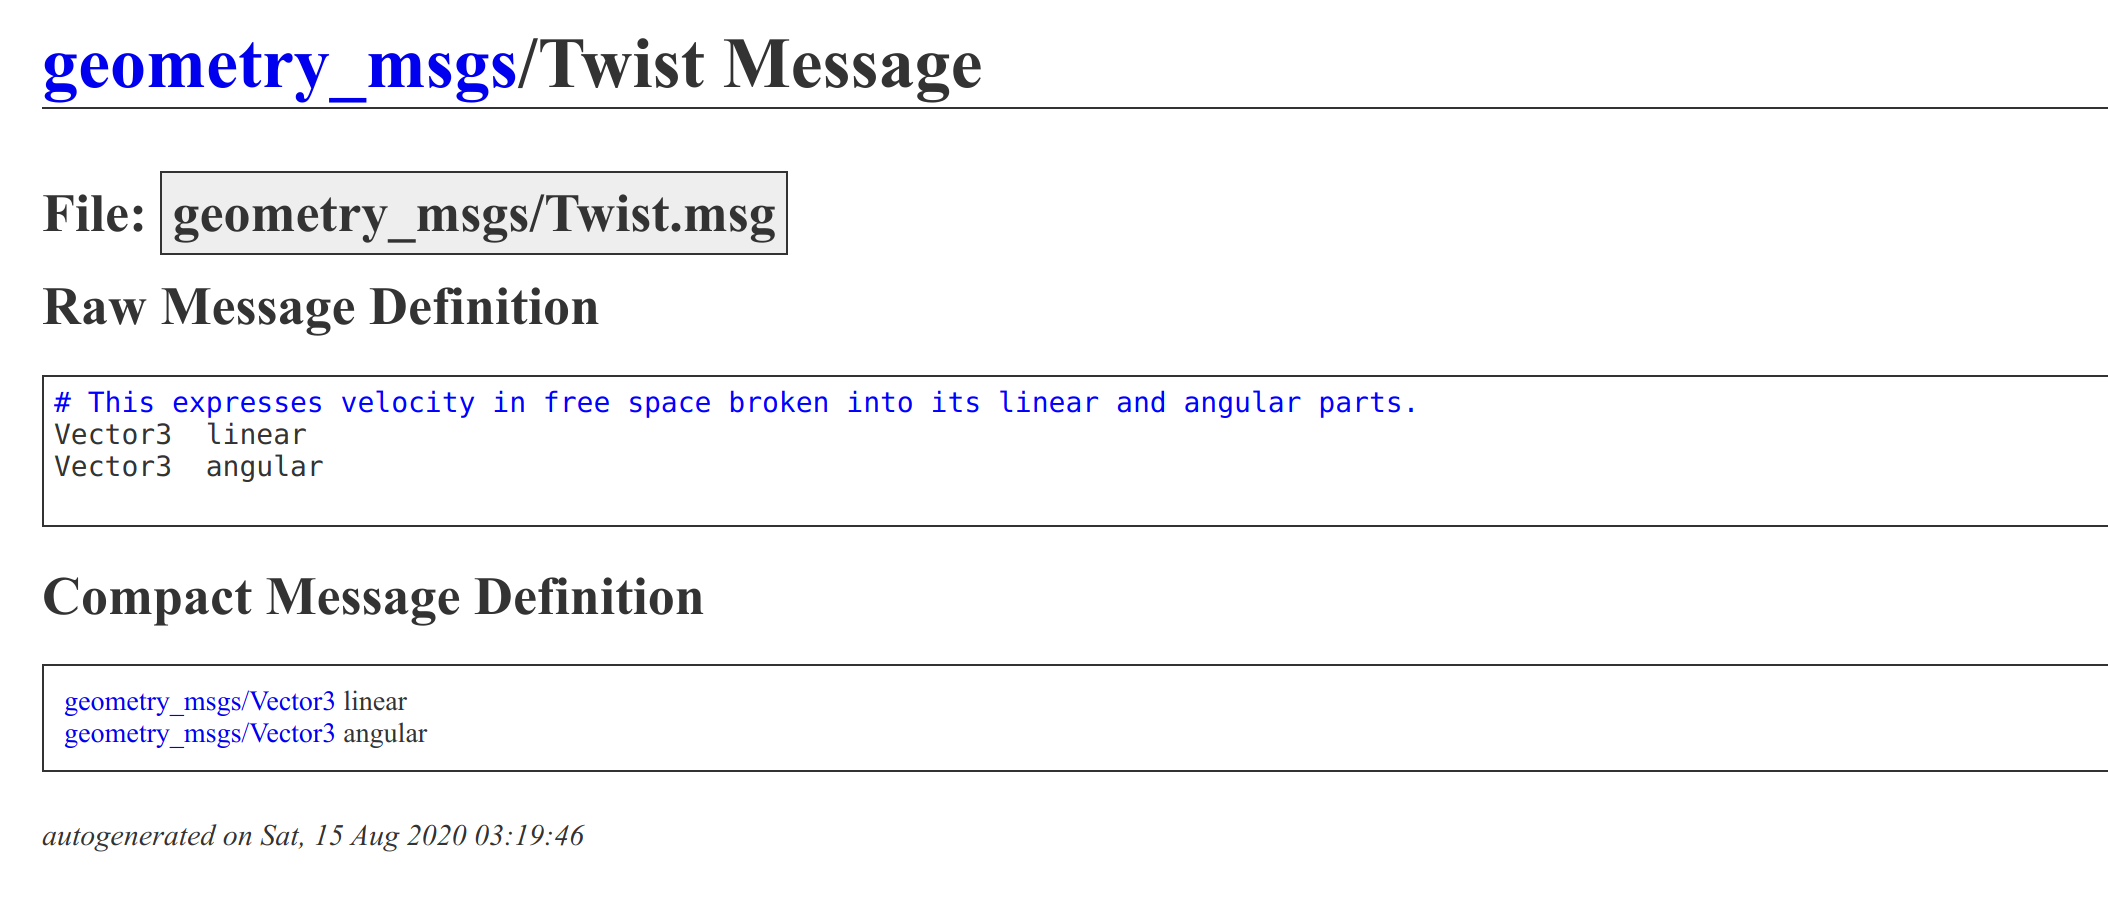
- from : http://docs.ros.org/
linear의 단위는 m/s 이며, angular의 단위는 rad/s 입니다. pi = 3.14
- 마지막, 가장 중요한 topic publish는 생성한 Publisher의 publish() 메소드를 사용합니다. 미리 준비해둔 topic message를 사용합시다.
    def pub_msg(self, event=None):
        # geometry_msgs.Twist
        # ref: http://docs.ros.org/en/melodic/api/geometry_msgs/html/msg/Twist.html
        self.twist_.linear.x = 0.5
        self.twist_.angular.z = 1.0

        self.cmd_vel_pub_.publish(self.twist_)
이 Node를 실행하면, 우리의 ROS가 일정 주기에 맞추어 알맞게 topic publish를 실행시켜줄 것입니다. 우리는 정해진 구현에 맞추어 코드만 작성하면 되는 것이지요 😊
    def cmd_vel_node():
        rospy.init_node('cmd_vel_node', anonymous=True)
        cmd_vel_pub_node = CmdVelPubNode()
        rospy.spin()
Subscriber 프로그래밍
- 이번 예시에는 로봇에 장착된 라이다 센서를 사용해보려 합니다. 예시를 실행해보겠습니다.
# Terminal 1
roslaunch smb_gazebo smb_gazebo.launch

# Terminal 2
rosrun py_topic_pkg laser_scan_sub.py
- 실행 이후, 영상과 같이 박스를 로봇의 전방에 배치해봅시다.
터미널에 등장하는 문구에 집중해보세요. 박스가 추가되면서 출력창에 어떠한 변화가 생기나요?
로봇에 부착된 라이다 센서는 전방 180도 사방으로 360개의 레이저를 흩뿌립니다.
레이저의 특성상 물체를 맞고 되돌아오게 되며, 이 시간을 통해 물체와의 거리를 알 수 있습니다.
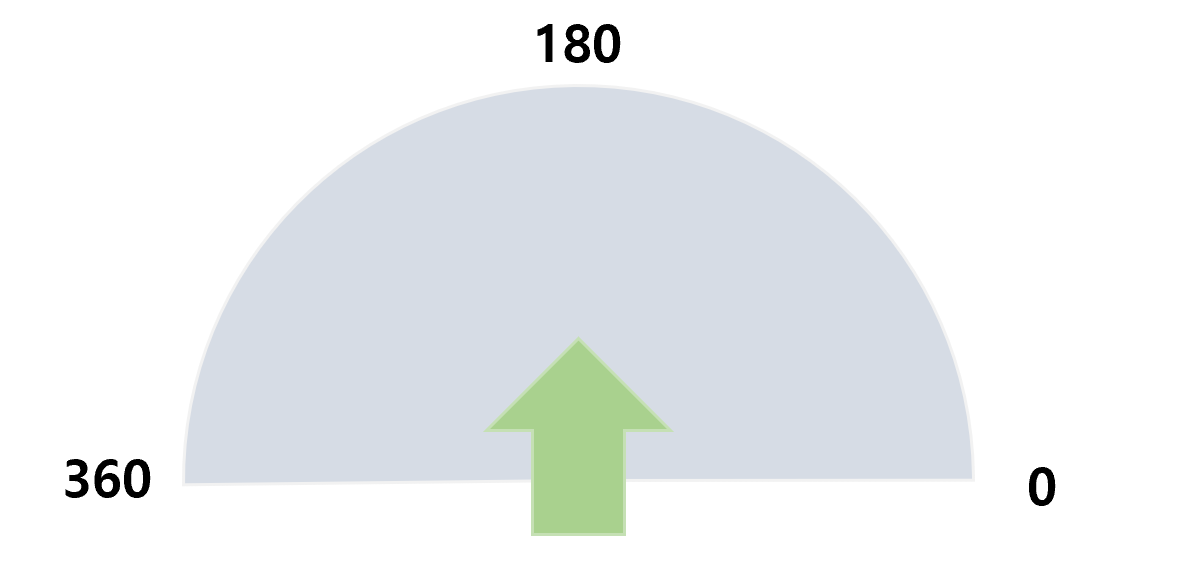
예시의 프로그램은 로봇에 부착된 레이저에서 publish되는 데이터를 subscribe한 것입니다. 이를 프로그래밍하면서 python으로 subscriber를 다루는 방법에 대해 배워봅시다.
- laser_scan_sub.py
#!/usr/bin/env python3
import rospy
from sensor_msgs.msg import LaserScan
class LaserSubNode:
def __init__(self):
# Publisher requires 3 paramters
# 1. topic name
# 2. topic msg type
# 3. sub callback method
self.laser_sub_ = rospy.Subscriber("scan", LaserScan, self.laser_cb)
# first param of callback method is always topic msg
def laser_cb(self, data):
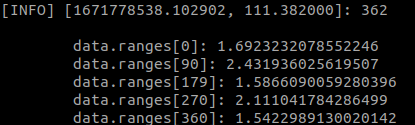
rospy.loginfo( len(data.ranges))
print(f"""
data.ranges[0]: {data.ranges[0]}
data.ranges[90]: {data.ranges[90]}
data.ranges[179]: {data.ranges[179]}
data.ranges[270]: {data.ranges[270]}
data.ranges[360]: {data.ranges[360]}
""")
def laser_sub_node():
rospy.init_node('laser_sub_node', anonymous=True)
laser_sub_node = LaserSubNode()
rospy.spin()
if __name__ == '__main__':
try:
laser_sub_node()
except rospy.ROSInterruptException:
pass
- 이번에 사용하는 topic message는 sensor_msgs/LaserScan입니다.
import rospy
from sensor_msgs.msg import LaserScan
subscriber는 publisher와 달리 Timer가 필요하지 않습니다. publish되는 데이터가 없으면 아무 동작을 할 수 없으며, publish 주기에 맞추어 subscribe할 수밖에 없는 것이지요.
- subscriber는 rospy.Subscriber로 생성하며 최소 3개의 매개변수를 요구합니다.
- topic 이름
- topic message 이름
- subscribe 마다 실행되는 callback 메소드
class LaserSubNode:

    def __init__(self):
        # Publisher requires 3 paramters
        #  1. topic name
        #  2. topic msg type
        #  3. sub callback method
        self.laser_sub_ = rospy.Subscriber("scan", LaserScan, self.laser_cb)
- 이 callback 메소드에서 주의해야 할 점은, 항상 callback method의 매개변수가 subscribe된 데이터라는 점입니다. 지금의 경우 LaserScan 타입의 데이터일 것입니다.
		# first param of callback method is always topic msg
    def laser_cb(self, data):
        rospy.loginfo( len(data.ranges))
				...
- 마지막으로, 깔끔한 터미널 출력을 위해 print 함수를 사용하였습니다.
print(f"""
    data.ranges[0]: {data.ranges[0]}
    data.ranges[90]: {data.ranges[90]}
    data.ranges[179]: {data.ranges[179]}
    data.ranges[270]: {data.ranges[270]}
    data.ranges[360]: {data.ranges[360]}
""")
Subscriber 실행 시에는 항상 rospy.spin()을 잊지 말도록 합니다. spin 되지 않는다면 특정 쓰레드가 자원을 점유하기 때문에 subscriber의 상태를 갱신할 수 없습니다.
def laser_sub_node():
    rospy.init_node('laser_sub_node', anonymous=True)
    laser_sub_node = LaserSubNode()
    rospy.spin()
과제 - 물체 회피하기
pub/sub의 개념을 잘 이해하였는지 알아볼 수 있는 과제를 준비해보았습니다. 정답이 따로 있는 것은 아니기에 부담 없이 해보시고, 저의 답안도 한번 살펴보세요.
- 예제 실행
# Terminal 1
roslaunch smb_gazebo smb_gazebo.launch
# Ternimal 2
rosrun py_topic_pkg collision_aviod.py
- Gazebo 예제를 실행하였다면, 로봇의 전방에 장애물을 놓아 진로를 막아봅니다.
- 여러분께서 구현해야 하는 것은, 라이다 센서를 사용하여 로봇이 회피 주행을 하도록 만드는 것입니다.

일종의 템플렛 코드를 첨부하였으며, my_collision_aviod.py라는 이름의 코드입니다.
해당 코드의 TODO 부분을 작성하여 여러분만의 회피 알고리즘을 만들어 보세요!
- 로봇의 라이다 데이터인 LaserScan을 Subscribe하여 Twist Type을 사용하는 scan topic으로 publish를 하게 됩니다.
class CollisionAvoidNode:

    def __init__(self):
        self.laser_sub_ = rospy.Subscriber("scan", LaserScan, self.laser_cb)
        self.cmd_vel_pub_ = rospy.Publisher("cmd_vel", Twist, queue_size=10)
        self.twist_ = Twist()

    def laser_cb(self, data):
        # TODO: Prevent robot from collision
        # make your own logic to do that

        return None
제가 작성한 예시를 수정하여 더욱 똑똑한 로봇을 구현하셔도 좋고, 자유롭게 실습해보시기 바랍니다.
참고자료