Lecture7 - Rqt Tools and rosbag, ROS Time
강의 초반, 다양한 rqt tool들을 살펴본 바 있습니다. 이제는 Topic과 Service에 모두 익숙해졌기 때문에, rqt의 많은 기능들을 사용할 수 있습니다. 다시 한 번 rqt를 살펴보면서 편리한 툴들의 사용법을 익혀봅시다.
Message Publisher & Topic Monitor
강의자를 따라 다음과 같이 화면을 구성합니다.
- plugins ⇒ topics ⇒ Message Publisher
- pulgins ⇒ topics ⇒ Topic Monitor
- message publisher를 사용하면 코딩 없이 cmd_vel을 publish가 가능합니다.
- Topic Msg에 원하는 데이터를 채워넣은 뒤, 주기를 선택한 후 체크박스를 클릭하면 로봇이 움직이기 시작합니다.
- Topic Monitor를 사용하면, 여러 데이터들을 효과적으로 모니터링 가능합니다.
- Topic Publisher와 동일하게 체크박스를 눌러 topic을 선택한 뒤, 변하는 데이터를 확인해봅시다.
코딩 없이 간단히 값의 확인과 동작 여부를 확인할 수 있는 툴들이었습니다.
RQT Multiplot
수치 데이터를 그래프로 보고싶은 경우 rqt의 multiplot이 유용하게 사용됩니다.
sudo apt install ros-noetic-rqt-multiplot
rosrun rqt_multiplot rqt_multiplot
/odom topic의 X,Y position을 기준으로 그래프를 그려보도록 하겠습니다. 아래의 gif를 통해 모든 과정을 기록하였으니 차근차근 따라와주세요.
RQT Console
지금까지 ROS의 콘솔 로그를 위해 rospy.loginfo()를 사용하였습니다. 사실 ROS에는 loginfo말고도 다양한 level의 logger level이 존재합니다. 실습을 통해 살펴봅시다.
- rospy logger level
# Terminal 1
roscore
# Terminal 2
rosrun my_first_package logger_level.py
- 코드의 내용과 함께 예시를 살펴봅시다.
    def hello_du(self, event=None):
        hello_du = f"hello du {rospy.get_time()}, counter: {self.counter_}"
        rospy.logdebug(hello_du)
        rospy.loginfo(hello_du)
        rospy.logwarn(hello_du)
        rospy.logerr(hello_du)
        rospy.logfatal(hello_du)
        self.counter_ += 1
ROS는 총 5가지의 logger level을 갖추고 있으며, Debug 부터 Fatal로 갈수록 더 높은 level을 갖는다고 보시면 됩니다. Info level 부터 콘솔 출력이 이루어지며, Python의 stdout를 사용합니다.
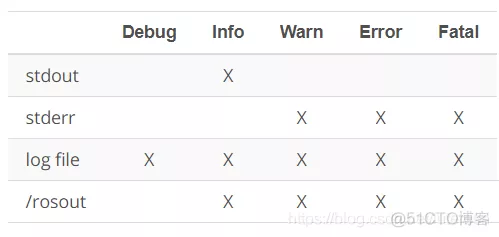
- image from : 51CTO
상황에 따라 각기 다른 level의 log를 사용하도록 하면, 실제 로봇 개발시에도 큰 도움이 됩니다.
rqt에는 이러한 다양한 level을 갖는 ros의 log를 필터링하는 rqt console이라는 툴이 있습니다. 사용 방법을 함께 알아봅시다.
그 밖에도 수많은 rqt 도구들이 있지만, 모두 살펴보는 대신 링크로 대체하겠습니다. > ROS Wiki
ROS Bags
rqt 툴에 속하지는 않지만, 개발 시 매우 유용한 ROS의 기능을 하나 더 소개시켜드리고자 합니다.
rosbag은 프로그램 동작 중 발생하는 message 데이터를 기록하고 복기할 수 있게 해주는 툴입니다. 로봇 알고리즘을 개발할 때, 같은 상황에 대해 성능을 비교하는 경우, 혹은 교육 목적으로 데이터셋을 제공하는 경우 등에 매우 유용하게 사용할 수 있습니다.
rosbag 사용법을 함께 실습해보겠습니다.
- smb gazebo를 실행합니다.
roslaunch smb_gazebo smb_gazebo.launch world:=big_map_summer_school
- rosbag의 사용 시 여러 옵션들이 있습니다.
- -o 옵션으로 rosbag의 이름을 지정합니다.
- -a 옵션 사용 시 모든 topic을 저장합니다.
- rosbag의 종료는 ctrl + c를 사용합니다.
rosbag record -o first_rosbag /scan /tf /tf_static
/tf와 /tf_static은 왜 저장하는 것일까요? 생각해봅시다.
- rosbag info를 통해 저장을 마친 rosbag의 정보를 조회할 수 있습니다.
$ rosbag info first_rosbag_<time-format-sth>.bag
path:        first_rosbag_2022-12-27-15-51-55.bag
version:     2.0
duration:    4.8s
start:       Jan 01 1970 09:07:35.31 (455.31)
end:         Jan 01 1970 09:07:40.12 (460.12)
size:        83.8 KB
messages:    49
compression: none [1/1 chunks]
types:       sensor_msgs/LaserScan [90c7ef2dc6895d81024acba2ac42f369]
topics:      /scan   49 msgs    : sensor_msgs/LaserScan
- 저장 완료된 rosbag을 다시 복기해봅시다.
$ rosbag play first_rosbag_2022-12-27-15-56-23.bag
[ INFO] [1672124296.822088842]: Opening first_rosbag_2022-12-27-15-56-23.bag

Waiting 0.2 seconds after advertising topics... done.
...
- rviz를 통해 시각화까지 해봅시다.

rosbag은 기본적으로 topic을 저장합니다.
rviz 화면을 살펴보면 아래와 같은 Warning이 발생할 것입니다. 그런데 이 문구, 익숙하지 않나요?
[ WARN] [1672124550.336965013]: TF_REPEATED_DATA ignoring data with redundant timestamp for frame LF_WHEEL at time 472.056000 according to authority unknown_publisher
[ WARN] [1672124550.336981403]: TF_REPEATED_DATA ignoring data with redundant timestamp for frame LH_WHEEL at time 472.056000 according to authority unknown_publisher
[ WARN] [1672124550.336991753]: TF_REPEATED_DATA ignoring data with redundant timestamp for frame RF_WHEEL at time 472.056000 according to authority unknown_publisher
[ WARN] [1672124550.337003964]: TF_REPEATED_DATA ignoring data with redundant timestamp for frame RH_WHEEL at time 472.056000 according to authority unknown_publisher
[ WARN] [1672124550.356035553]: TF_REPEATED_DATA ignoring data with redundant timestamp for frame base_link at time 472.076000 according to authority unknown_publisher
[ WARN] [1672124550.356945321]: TF_REPEATED_DATA ignoring data with redundant timestamp for frame LF_WHEEL at time 472.076000 according to authority unknown_publisher
[ WARN] [1672124550.356960231]: TF_REPEATED_DATA ignoring data with redundant timestamp for frame LH_WHEEL at time 472.076000 according to authority unknown_publisher
[ WARN] [1672124550.356970561]: TF_REPEATED_DATA ignoring data with redundant timestamp for frame RF_WHEEL at time 472.076000 according to authority unknown_publisher
ROS Time
일전 강의에서 언급한 바와 같이, 이번 강의에 ROS의 시간 체계에 대해서 다잡고 가고자 합니다.
- rospy.loginfo를 통해 콘솔에 출력되는 시간과 같이 ROS에서 기본적으로 사용되는 시간의 기준은 PC의 Clock입니다. (이를 wall timer라고 부릅니다.)
- ROS 프로그램은 일정 주기를 갖고 무한히 반복되는 상황이 잦습니다. 이때 사용하는 주기가 정확해야 할 것입니다.
- 우리는 2023년 00월 00일이라는 시간체계를 사용하지만, Gazebo와 같은 시뮬레이션 툴은 시작되는 시점이 곧 0분 0초가 됩니다. 이러한 시간의 차이로 인해 warning과 error가 빈번하게 발생합니다.
그럼, 실질적으로 ROS에서 시각과 주기, 시간은 어떻게 다루는지 예시와 함께 python 코드를 살펴봅시다.
- ros_time.py
$ rosrun my_first_package ros_time.py
[INFO] [1672127477.793024]: Current time 1672127477 792964935
[INFO] [1672127477.793593]: Current time to_sec 1672127477
[INFO] [1672127477.794082]: Past time 1672127477 292964935
[INFO] [1672127477.893132]: Current time 1672127477 893082141
[INFO] [1672127477.893684]: Current time to_sec 1672127477
[INFO] [1672127477.894148]: Past time 1672127477 393082141
...
코드는 다음 위치에서 확인이 가능합니다. > https://github.com/RB2023ROS/du2023-ros1/blob/main/my_first_package/scripts/ros_time.py
- rospy Time instance
rospy에서는 Time이라는 클래스로 시간을 표현합니다. 가장 많이 사용되는 현재 시간은 rospy.Time.now() 로 파악할 수 있으며, 이는 sec와 nsec등의 클래스 변수를 갖고 있습니다.
def hello_du(self, event=None):

    now  = rospy.Time.now()
    seconds = now.to_sec()

    rospy.loginfo("Current time %i %i", now.secs, now.nsecs)
    rospy.loginfo("Current time to_sec %i", seconds)
- rospy Time Duration
시간 간격을 나타내는 클래스로 Duration이 사용되며, Time 인스턴스와 +,- 연산이 가능합니다.
    delta = rospy.Duration(0.5)
    past  = now - delta
    rospy.loginfo("Past time %i %i", past.secs, past.nsecs)
- rospy Rate
while loop와 Rate를 사용하여 일정 주기다마 반복되는 구현이 가능합니다. 이때 사용되는 시간 기준은 PC의 Clock입니다.
    r = rospy.Rate(10) # 10hz
    while not rospy.is_shutdown():
        time_ex.hello_du()
        r.sleep()
Topic vs Service and Action
지금까지 ROS의 통신 메커니즘으로 Topic과 Service에 대해 배워보았습니다. 그런데, 사실 ROS의 통신 메커니즘에는 Action이라는 한가지가 더 있습니다.
Action은 Topic과 Service 모두의 특징을 갖고 있는 진보된 통신 메커니즘입니다. Action은 Feedback이라는 것으로 Goal Request 이후 계속적인 데이터 송수신이 가능합니다. Action은 ROS 2 강의에서 살펴볼 예정으로 어떻게 사용될 수 있을지 한번 고민해보세요.
- image from : docs.rog.org
참고자료