Lecture8 - Deal with Open Source Projects, Custom Interfaces
Deal with Open Source Projects
이번 시간에는 오픈 소스 프로젝트를 사용하는 방법에 대해 배워보겠습니다. 보다 실질적인 사용 방법을 보여드리기 위해 저 또한 여러분들과 같은 상황에서 처음부터 하나씩 같이 해보겠습니다.
오늘 데모하고자 하는 로봇 소프트웨어는 드론 시뮬레이션입니다. 지금까지 지상을 움직이는 바퀴 로봇만을 다루었기 때문에 새로운 플렛폼을 동작시켜보고자 합니다.
- 항상 시작은 구글링부터!!

- 검색 결과 원하는 패키지를 찾은 것 같습니다. > https://github.com/RAFALAMAO/hector-quadrotor-noetic
목적에 부합하는 오픈소스를 찾기 위해서 아래와 같은 기본적인 내용을 고려해야 합니다.
- 버전 호환성
- 구체적인 목표에 부합하는지
- Star, Fork를 통해 검증된 소스코드임을 확인
- Issue를 통해 사용 중 문제가 있지는 않은지
Readme를 따라 package build를 진행하고 최초 실행을 해보겠습니다.
# Terminal 1
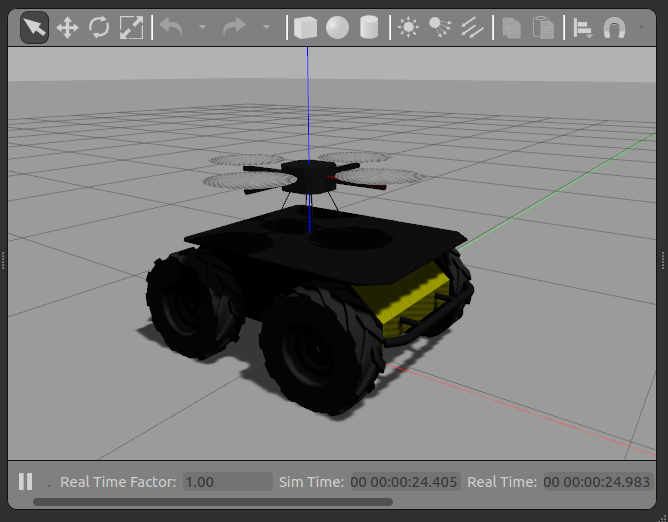
roslaunch hector_quadrotor_gazebo quadrotor_empty_world.launch
# Terminal 2
rosrun hector_ui ui_hector_quad.py
동작에는 문제가 없어보입니다. 그럼 이 프로젝트가 내부적으로 어떻게 구현되어있는지 분석해봅시다.
rqt_graph

로봇의 위치를 알려주는 topic인 /ground_truth/state와 /ground_truth_to_tf/pose를 파악할 수 있습니다. gazebo에서 물체의 절대적인 위치를 알려주기 때문에 이를 ground truth라고 부르고 있습니다.
- 이번에는 조종 프로그램의 소스코드를 확인해봅시다. (hector_quadrotor_noetic/hector_ui/src에 위치하고 있습니다.)
#Callback de pose y orientacion simulador
def pose_callback(data):
    x_p.set("{0:.2f}".format(data.pose.pose.position.x))
    y_p.set("{0:.2f}".format(data.pose.pose.position.y))
    z_p.set("{0:.2f}".format(data.pose.pose.position.z))

def rot_callback(data):
    z_o.set("{0:.2f}".format( math.degrees(quaterionToRads(data)) ))

rospy.init_node('HectorQ_GUI', anonymous=False)
#Subscribers
posicionLider_sub = rospy.Subscriber("/ground_truth/state", Odometry , pose_callback)
orientaLider_sub = rospy.Subscriber("/ground_truth_to_tf/pose", PoseStamped , rot_callback)
두 종류의 subscriber가 존재하며 각각 UI의 상태를 업데이트하는 것 같이 보입니다.
- 이번에는 launch file을 분석해봅시다 - hector_quadrotor/hector_quadrotor_gazebo/launch/quadrotor_empty_world.launch
<?xml version="1.0"?>

<launch>
  <arg name="paused" default="false"/>
  <arg name="use_sim_time" default="true"/>
  <arg name="gui" default="true"/>
  <arg name="headless" default="false"/>
  <arg name="debug" default="false"/>

  <include file="$(find gazebo_ros)/launch/empty_world.launch">
    <arg name="paused" value="$(arg paused)"/>
    <arg name="use_sim_time" value="$(arg use_sim_time)"/>
    <arg name="gui" value="$(arg gui)"/>
    <arg name="headless" value="$(arg headless)"/>
    <arg name="debug" value="$(arg debug)"/>
  </include>

  <include file="$(find hector_quadrotor_gazebo)/launch/spawn_quadrotor.launch" />
    <arg name="model" value="$(find hector_quadrotor_description)/urdf/quadrotor_hokuyo_utm30lx.gazebo.xacro"/>
</launch>
gazebo_ros의 empty_world.launch, hector_quadrotor_gazebo의 spawn_quadrotor.launch가 실행되며, model이라는 argument를 갖습니다.
spawn_quadrotor.launch에는 다음과 같은 node들이 실행됩니다.
- spawn_model
- robot_state_publisher
- ground_truth_to_tf
- controller.launch ⇒ controller_spawner
이렇게 rqt 툴들과 코드의 구조를 파헤치면서 전체 구조를 파악할 수 있으며 원하는 부분만을 고치면서 Package를 발전시켜나가는 것입니다.
launch file의 응용을 실습해봅시다. 일전 배워본 husky gazebo와 hector gazebo를 함께 사용해보는 것입니다.
- husky gazebo 는 다음과 같은 내용을 담고 있었습니다.
- gazebo_ros를 실행시키고
- husky model을 spawn하는 또다른 launch file을 include 하였습니다.
<launch>

  <arg name="world_name" default="worlds/empty.world"/>

  <include file="$(find gazebo_ros)/launch/empty_world.launch">
    <arg name="world_name" value="$(arg world_name)"/> <!-- world_name is wrt GAZEBO_RESOURCE_PATH environment variable -->
    <arg name="paused" value="false"/>
    <arg name="use_sim_time" value="true"/>
    <arg name="gui" value="true"/>
    <arg name="headless" value="false"/>
    <arg name="debug" value="false"/>
  </include>

  <include file="$(find husky_gazebo)/launch/spawn_husky.launch">
  </include>

</launch>
- 그럼, 겹치는 부분을 제외하고 quadrotor_empty_world.launch의 내용을 추가하여 새로운 launch file을 만들어 봅시다. (hetero_spawn.launch 생성)
<launch>

  <include file="$(find husky_gazebo)/launch/husky_empty_world.launch" />

  <include file="$(find hector_quadrotor_gazebo)/launch/spawn_quadrotor.launch" />
    <arg name="model" value="$(find hector_quadrotor_description)/urdf/quadrotor_hokuyo_utm30lx.gazebo.xacro"/>

</launch>
- 아래와 같은 오류가 발생하네요, 이는 robot_state_publisher node가 중복되기 때문에 발생하는 문제입니다.
RLException: roslaunch file contains multiple nodes named [/robot_state_publisher].
Please check all <node> 'name' attributes to make sure they are unique.
Also check that $(anon id) use different ids.
The traceback for the exception was written to the log file
- 이를 해결하기 위해서, 저는 다른 launch file(spawn_two_quadrotors.launch)을 참고해보았습니다. group 태그를 사용하면 같은 로봇의 중복 선언을 namespace를 통해 구분할 수 있게됩니다.
<?xml version="1.0"?>
<launch>
   <arg name="model" default="$(find hector_quadrotor_description)/urdf/quadrotor.gazebo.xacro" />

   <group ns="uav1">
     <include file="$(find hector_quadrotor_gazebo)/launch/spawn_quadrotor.launch">
       ...
   </group>

   <group ns="uav2">
     <include file="$(find hector_quadrotor_gazebo)/launch/spawn_quadrotor.launch">
       ...
   </group>
</launch>
- 이제, hetero_spawn.launch를 최종 수정해봅시다.
<launch>

  <include file="$(find husky_gazebo)/launch/husky_empty_world.launch" />

  <arg name="model" default="$(find hector_quadrotor_description)/urdf/quadrotor.gazebo.xacro" />
  <group ns="uav1">
    <include file="$(find hector_quadrotor_gazebo)/launch/spawn_quadrotor.launch">
      <arg name="name" value="uav1" />
      <arg name="tf_prefix" value="uav1" />
      <arg name="model" value="$(arg model)" />
      <arg name="z" value="1.0" />
    </include>
  </group>

</launch>
실행 후 topic을 조회해보면, 아래와 같이 quadrotor의 topic 앞에 namespace가 추가되어 있는 모습이 확인 가능합니다. 여러 로봇을 사용하게 되면 /cmd_vel, /scan등 사용하는 topic의 이름이 중복될 수 있어 namespace를 추가 설정하는 것이 일반적입니다.
$ rostopic list
/clock
/cmd_vel
/husky_velocity_controller/cmd_vel
/husky_velocity_controller/odom
/husky_velocity_controller/parameter_descriptions
/husky_velocity_controller/parameter_updates
/imu/data
/odometry/filtered
...
/uav1/aerodynamics/wrench
/uav1/cmd_vel
/uav1/command/motor
/uav1/command/twist
/uav1/command/wrench
/uav1/fix_velocity
...
마지막으로, 로봇을 제어해보면서 이번 세션을 마무리해보겠습니다. gazebo의 world를 바꾸거나, husky가 아닌 smb로 모델을 바꾸는 등 응용 예시들을 직접 해보면서 launch file의 사용에 익숙해지시기 바랍니다.
# husky 제어
rosrun teleop_twist_keyboard teleop_twist_keyboard.py
# quadrotor 제어
rosrun hector_ui ui_hector_quad_leader.py
ROS Custom Interfaces
ROS에서 기본 제공되는 msg와 srv도 훌륭하지만, 상황에 따라 나만의 custom msg/srv를 사용해야 하는 경우가 있습니다. 이번 시간에는 custom interface를 만들어보고, 사용해보겠습니다.
드론의 이착륙을 제어하는 srv를 만들어보고자 합니다.
- 이륙/착륙을 구분하는 string이 필요할 것이며,
- 기준은 시간을 사용하고자 합니다. ( ex - 2초간 이륙 )
- service request는 성공 여부인 bool type으로 해보겠습니다.
- custom interface를 만들기 위해 저는 별도의 package를 생성하였습니다.
cd ~/catkin_ws/src/du2023-ros1
catkin_create_pkg custom_interfaces
- package 내부에 msg 혹은 srv라는 폴더를 만들고, custom interface를 정의하는것이 추천됩니다.
cd custom_interfaces
mkdir srv

# QuadrotorControl.srv 생성
string command
uint8 seconds
---
bool success
- custom_interfaces package의 package.xml을 수정합니다.
  <build_depend>message_generation</build_depend>
  <exec_depend>message_runtime</exec_depend>
- custom_interfaces package의 CMakeLists.txt를 수정합니다.
# 1. find_package 수정
find_package(catkin REQUIRED COMPONENTS
   roscpp
   rospy
   std_msgs
   message_generation
)

# 2. catkin_package 주석 해제 후 수정
catkin_package(
  ...
  CATKIN_DEPENDS message_runtime ...
  ...)

# 3. add_service_files에 파일 반영
add_service_files(
  FILES
  QuadrotorControl.srv
)

# 4. generate_messages 주석 해제 후 수정
generate_messages(
  DEPENDENCIES
  std_msgs  # Or other packages containing msgs
)
- custom interface를 빌드하고 생성을 확인해봅시다.
$ catkin build custom_interfaces

$ rossrv show custom_interfaces/QuadrotorControl
string command
uint8 seconds
---
bool success
지금 생성한 QuadrotorControl은 catkin_ws에서만 사용 가능한 srv라는 점에 유의합니다. 다른 workspace에서는 QuadrotorControl에 대해 알 길이 없습니다.
Custom Interfaces 사용해보기
- 작성한 QuadrotorControl를 사용하여 Service Server를 만들어봅시다! 정해진 시간동안 takeoff와 land 움직임을 수행하는 Service입니다.
# Terminal 1
roslaunch hector_quadrotor_gazebo quadrotor_empty_world.launch

# Terminal 2
rosrun py_service_pkg quadrotor_custom_srv.py

# Terminal 3
rqt
소스 코드는 이 링크에서 확인이 가능합니다.
- custom_interfaces package에서 QuadrotorControl srv를 import 하며, 로봇의 제어를 위해 Twist msg도 import 하였습니다.
import rospy

from geometry_msgs.msg import Twist
from custom_interfaces.srv import QuadrotorControl, QuadrotorControlResponse
- Service Server와 Topic Publisher를 생성합시다.
class QuadRotorUpDown(object):

    def __init__(self):
        self.cmd_vel_pub_ = rospy.Publisher("cmd_vel", Twist, queue_size=10)
        self.stop_server_ = rospy.Service("up_down", QuadrotorControl, self.up_down_cb)

        self.twist_msg_   = Twist()
        self.response_    = QuadrotorControlResponse()

        rospy.loginfo("Quadrotor Up-Down Server Started")
- callback 함수인 up_down_cb입니다. command가 land/takeoff일 때의 경우를 나누고, 그 이외의 입력은 오류로 판명합니다.
def up_down_cb(self, request):

    if request.command == "land":
        self.twist_msg_.linear.z  = -0.5
        self.response_.success = True
    elif request.command == "takeoff":
        self.twist_msg_.linear.z  = 0.5
        self.response_.success = True
    else:
        rospy.logwarn("Unknown Command")
        self.response_.success = False
        return self.response_
- request의 seconds 시간동안 로봇이 움직여야 할 것이며, 이를 위해 now를 갱신하며 지나간 시간을 계속해서 tracking 합니다.
    start = rospy.Time.now()
    now = rospy.Time.now()
    while (now - start).secs < request.seconds:
        now = rospy.Time.now()
        self.cmd_vel_pub_.publish(self.twist_msg_)
- 모든 동작이 완료된 이후에는 로봇을 다시 정지시킵니다.
    rospy.loginfo(f"{request.command} done, quadrotor stop")
    self.twist_msg_.linear.z = 0.0
    self.cmd_vel_pub_.publish(self.twist_msg_)

    return self.response_
Husky Move Base
ROS 1에서 로봇 자율주행을 위해 사용하는 스택을 Move Base라고 지칭합니다. ROS 1 noetic에서 husky 로봇을 통해 Move Base를 실습해보겠습니다.
- 예시를 위해 필요한 패키지를 다운받습니다.
sudo apt-get install ros-noetic-husky-navigation
- slam 예시를 실행합니다.
# Terminal 1
export HUSKY_LMS1XX_ENABLED=1;  roslaunch husky_gazebo husky_playpen.launch
# Terminal 2
roslaunch husky_viz view_robot.launch
# Terminal 3
roslaunch husky_navigation gmapping_demo.launch
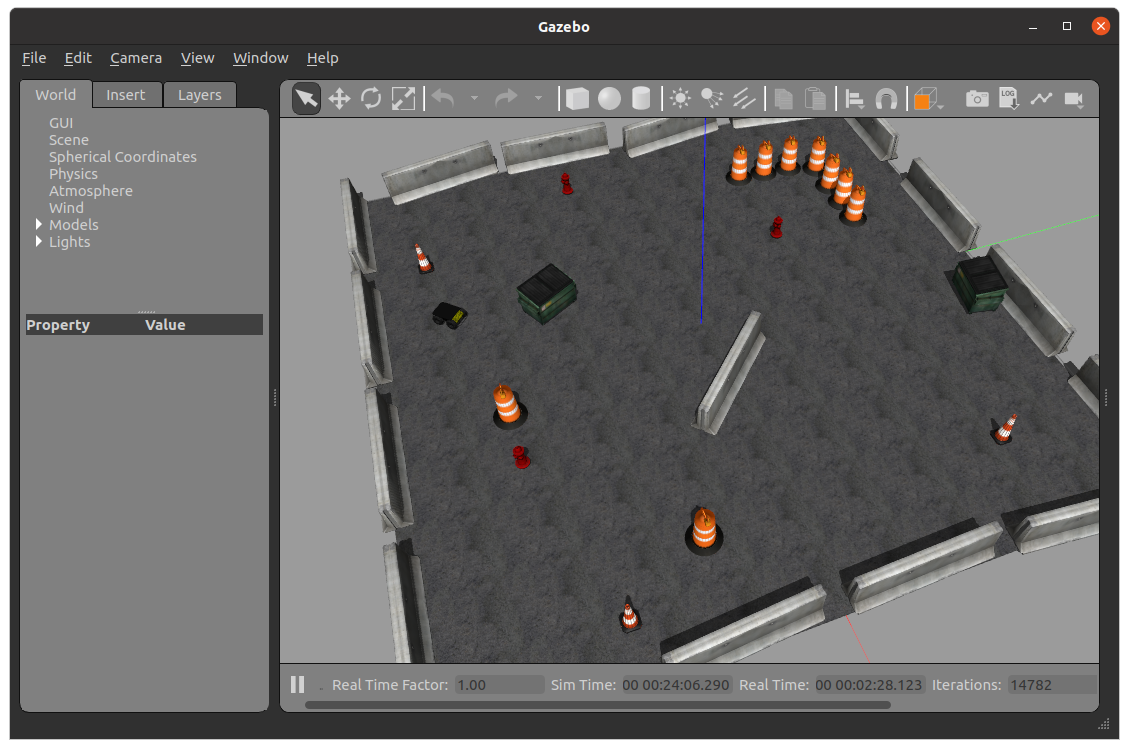
사진과 같은 world와 함께 husky가 등장할 것입니다.
- rviz에서 map topic을 추가합니다.
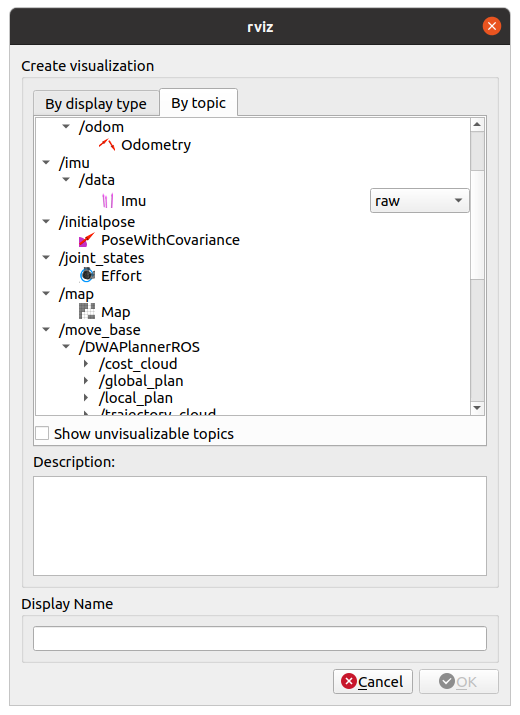
- rviz의 2D Nav Goal을 사용하면 로봇을 특정 위치로 이동시킬 수 있습니다. 해당 예시는 slam과 navigation을 동시에 실행하는 예시입니다.
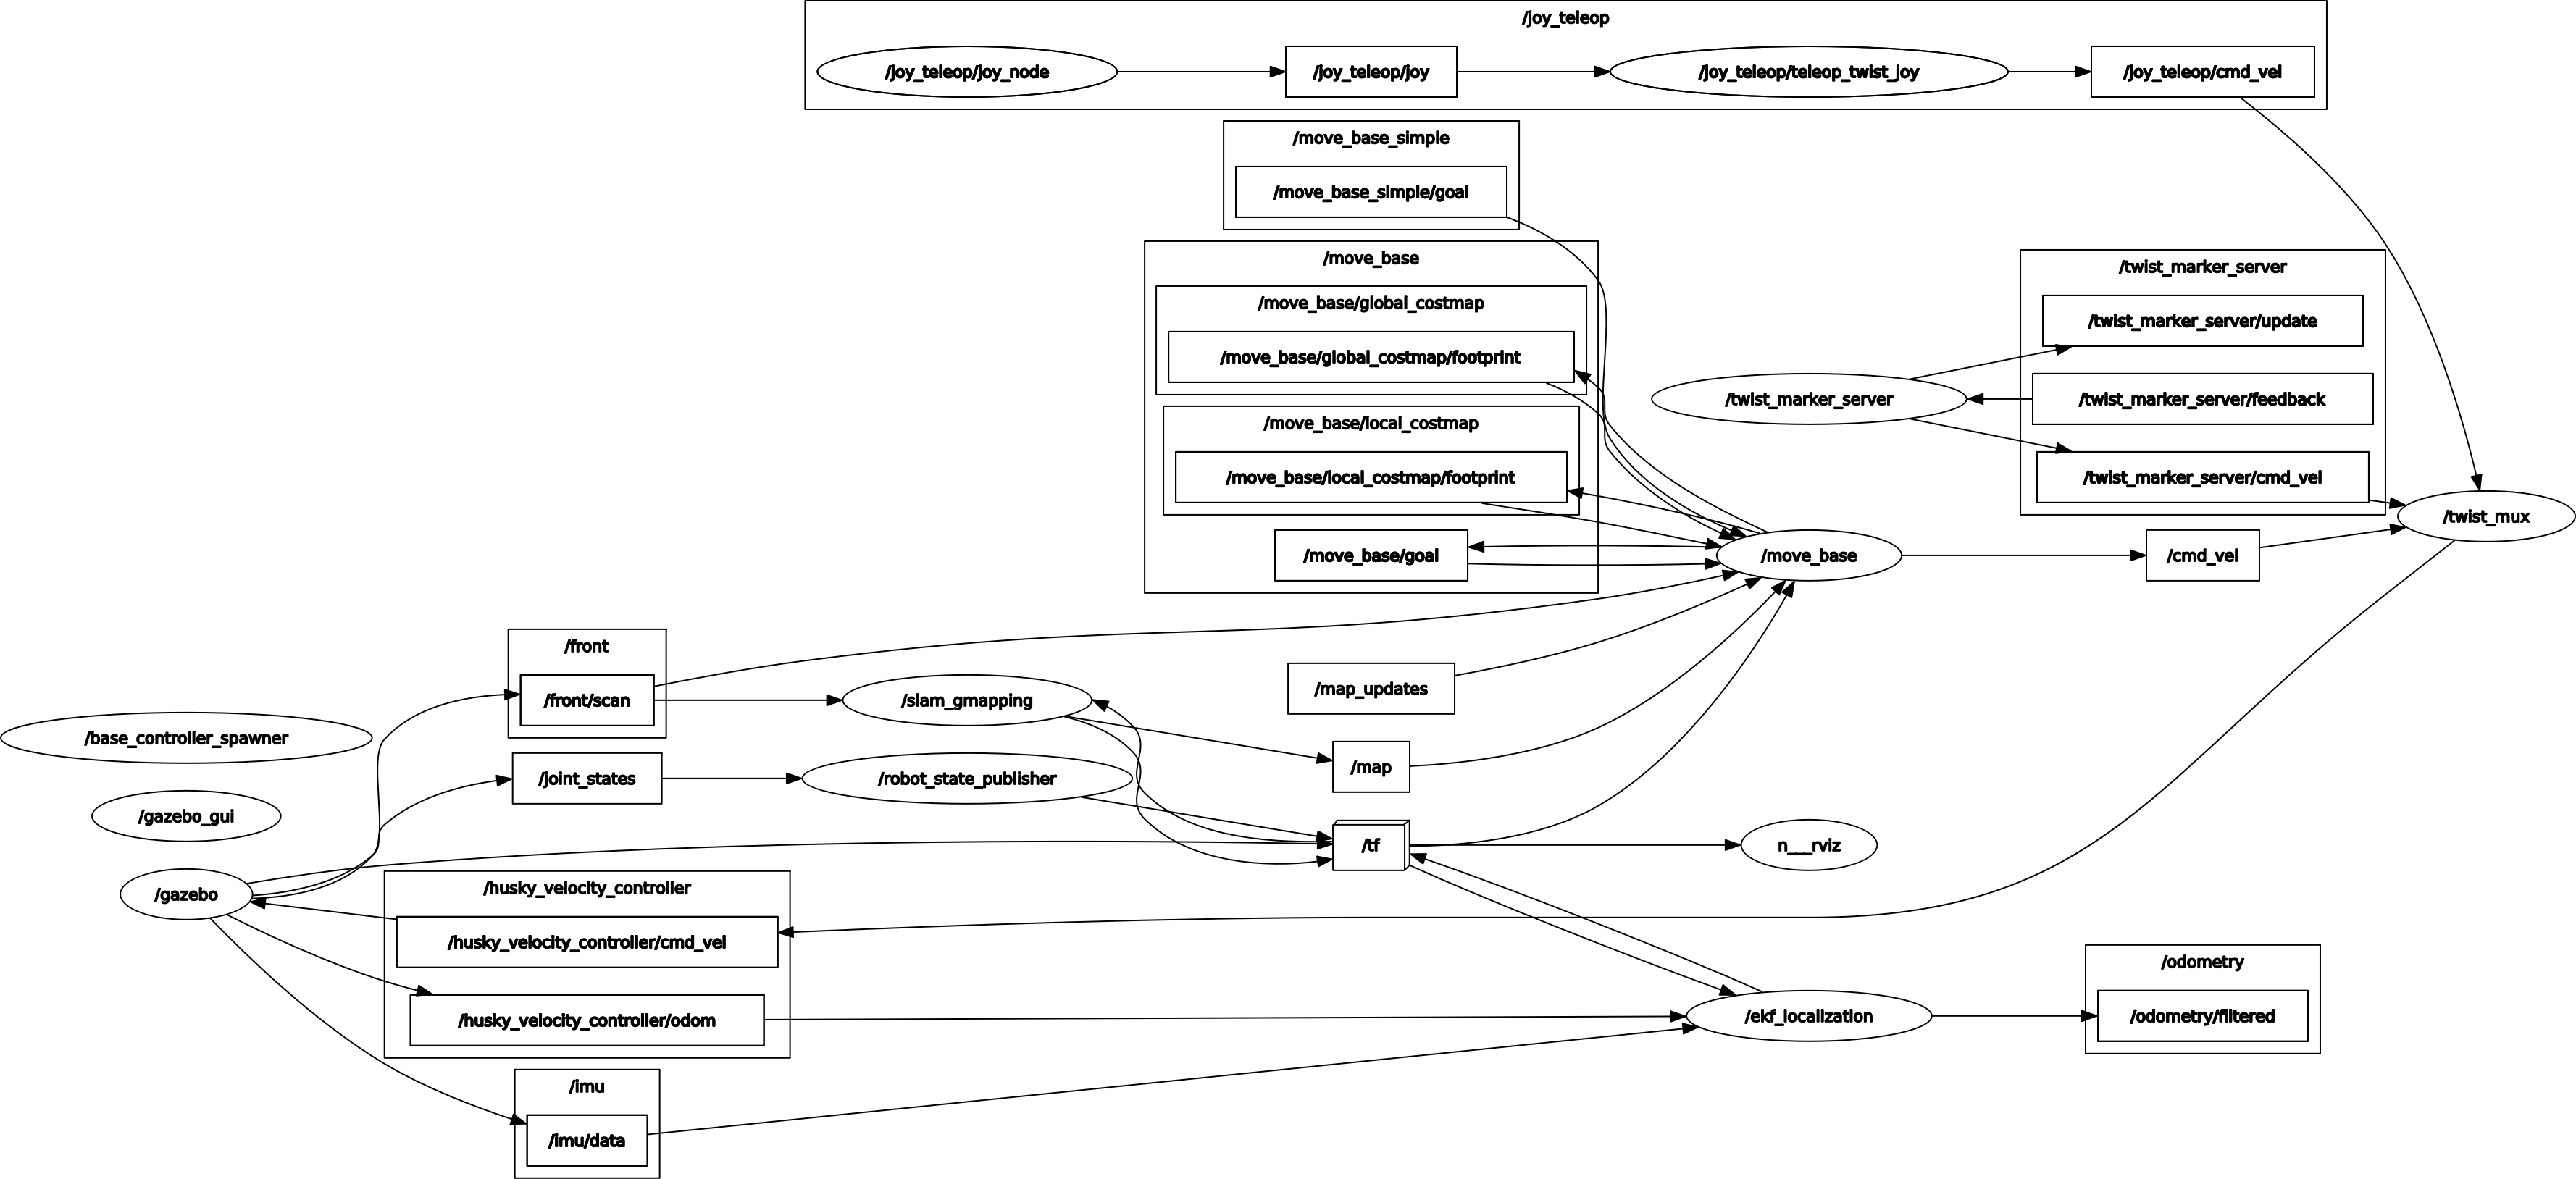
- rqt_graph를 통해 살펴본 현 상황의 node들과 topic입니다.
참고자료